Compressed Downpipe MazdaSPEED6 (PDF)
File information
Title: MAF Customizer Installation Instructions
Author: anthony joseph messina
This PDF 1.4 document has been generated by Acrobat PDFMaker 8.1 for Word / Acrobat Distiller 8.1.0 (Windows), and has been sent on pdf-archive.com on 14/02/2011 at 21:55, from IP address 68.104.x.x.
The current document download page has been viewed 2636 times.
File size: 501.55 KB (10 pages).
Privacy: public file


File preview
cp-e™, Inc.
6802 Mid Cities Avenue
Beltsville, MD 20705
www.cp-e.com
MATERIALS INCLUDED:
9
9
9
9
9
9
(1)
(1)
(1)
(1)
(2)
(2)
cp-e™ Instruction booklet
cp-e™ Stainless Steel Downpipe (Stainless Steal CNC Spun High Flow Metallic Catalytic Converter will be welded in if purchased.)
cp-e™ 2 1/2” Composite Gasket (Used when bolting cp-e™ downpipe to stock/other 2 1/2”cat back exhaust.)
cp-e™ 3” Stainless Steel Gasket (Supplied at no additional charge if you have purchased cp-e™ Stainless Steel Cat Back exhaust.)
Stainless Steel 1/2” Bolts
Stainless Steel 1/2” Nuts
TOOLS NEEDED FOR INSTALLATION:
¾
¾
¾
¾
¾
¾
¾
¾
¾
¾
¾
¾
¾
¾
(1)
(1)
(1)
(1)
(1)
(1)
(1)
(1)
(1)
(1)
(1)
(1)
(1)
(2)
1/4” Drive socket wrench
3/8” Drive socket wrench
8 mm Socket
10 mm Socket
12 mm Socket
14 mm Socket
17 mm Socket
Socket wrench extension
Oxygen sensor specific socket
Large pliers
Car jack
Can of penetrating oil
Shop towel
Jack stands
*** WARNING***
This document and the images within it are the copyrighted intellectual property of Custom Performance
Engineering, Inc. They may not be reproduced or distributed in anyway, including electronic duplication and
publication, without the express written consent of Custom Performance Engineering, Inc. By installing this product
the end user is agreeing to hold Custom Performance Engineering, Inc., its staff, and business associates (hereto
referred as cp-e™) harmless from any and all damages that may result, both directly and/or indirectly, from the use
and or installation of this product. cp-e™ will not be held responsible for any damages whatsoever. This is a
performance enhancing product, and it is understood that the user is aware of, and liable for, any damages that
result from the use and or misuse of this product.
NOTE: This product should be installed by, or under the supervision of, a qualified performance automotive specialist.
Failure to do so may result in major property damage, serious injury, and or death. Be sure to exercise caution when
driving your vehicle. Safety must be your primary concern! Always obey posted traffic laws and limits. Drive within the
limits of the law, the limits of safety, and the limits of your ability.
cp-e™ 3” Stainless Steel Downpipe
1
PROCEDURE OVER VIEW:
I. PLEASE READ DIRECTIONS ONE TIME COMPLETELY BEFORE
INSTALLING. (This is an overview of the installation.)
II. INSTALL 3” STAINLESS STEEL DOWNPIPE
�
***DISCONNECT THE NEGATIVE BATTERY CABLE BEFORE BEGINNING INSTALLATION***
The car battery stores a tremendous amount of energy and must be treated with respect. Disconnect the
NEGATIVE, BLACK, wire from the car’s battery. Be extremely careful NOT to short the battery with your tools
while removing the negative cable. Shorting the battery by touching the terminal will almost certainly cause
severe burns, a fire, or even an explosion. FYI, the reason to remove the negative terminal of the battery is so that
if the wrench were to slip while on the nut of the battery terminal, and accidentally contact the frame of the car
(ground) the result would not be a short from positive to ground , but a much less harmful short from negative-tonegative. Be careful to not slip and hit anything.
�
Remove intercooler.
�
Remove downpipe heat shields.
�
Remove two oxygen sensors.
�
Take out the factory downpipe.
�
Install cp-e’s stainless steel downpipe system.
�
Reinstall two oxygen sensors.
�
Reinstall intercooler.
III. START VEHICLE
NOTE: Do not tighten anything until all the components of the intake system are in place. This is to allow movement of the
parts while installation is taking place.
cp-e™ 3” Stainless Steel Downpipe
2
Instructions for:
MazdaSPEED6 (4 Cylinder 2.3 Turbo) 3” Stainless Steel Downpipe
’06-‘07
II. INSTALL 3” STAINLESS STEEL DOWNPIPE
�
***DISCONNECT THE NEGATIVE BATTERY CABLE BEFORE BEGINNING INSTALLATION***
The car battery stores a tremendous amount of energy and must be treated with respect. Disconnect the
NEGATIVE, BLACK, wire from the car’s battery. Be extremely careful NOT to short the battery with your tools
while removing the negative cable. Shorting the battery by touching the terminal will cause severe burns, a fire, or
even an explosion. Removing the negative terminal of the battery will insure that if a wrench were to slip while on
the nut of the battery terminal, and accidentally contact the frame of the car (ground) there will not be a short from
positive to ground. Be careful not to slip and hit anything. It is also a good idea to do this in order to rest the
factory ECU for optimal performance.
�
Remove the intercooler cover (2-10mm bolts). Unbolt the cover and pull it towards you to remove.
�
Remove the blow-off valve recirculation hose, and small vacuum line. Remove vacuum line to intake system.
Use pliers to remove the torsion clip.
cp-e™ 3” Stainless Steel Downpipe
3
�
Remove intercooler – Loosen throttle body and turbo outlet hose clamps with either a flathead screwdriver or an
8mm wrench. Remove 3-12mm golden bolts holding the intercooler in place. Remove the intercooler while being
careful not to damage the delicate fins. Stuff a couple rags in the throttle opening and turbo outlet to prevent small
debris from entering while working.
�
Remove top exhaust manifold heat shield (5-8mm bolts).
�
Remove the gold intercooler support bracket at the rear of the engine (2-13mm bolts).
cp-e™ 3” Stainless Steel Downpipe
4
�
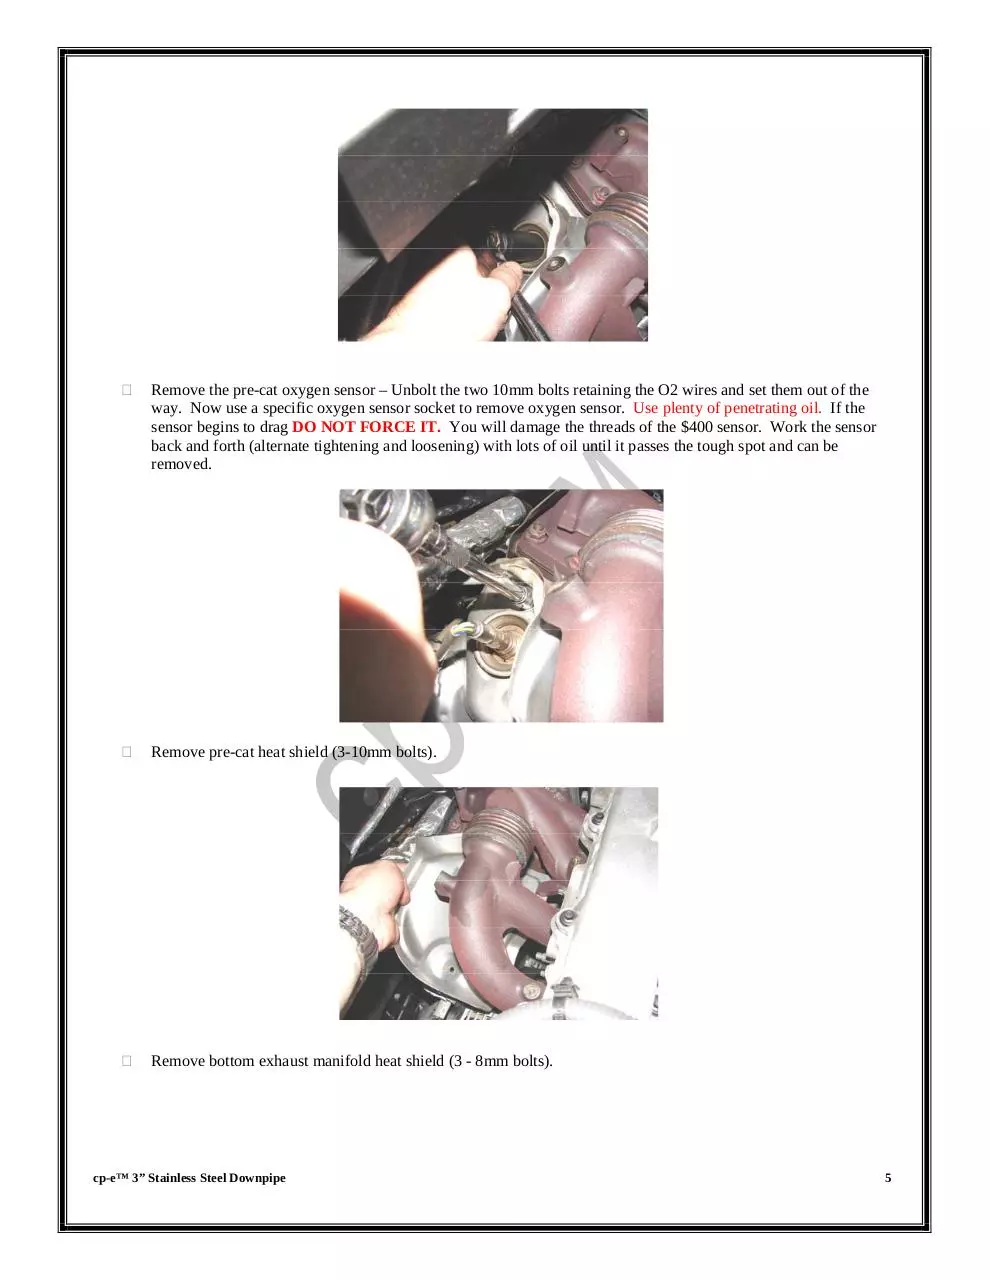
Remove the pre-cat oxygen sensor – Unbolt the two 10mm bolts retaining the O2 wires and set them out of the
way. Now use a specific oxygen sensor socket to remove oxygen sensor. Use plenty of penetrating oil. If the
sensor begins to drag DO NOT FORCE IT. You will damage the threads of the $400 sensor. Work the sensor
back and forth (alternate tightening and loosening) with lots of oil until it passes the tough spot and can be
removed.
�
Remove pre-cat heat shield (3-10mm bolts).
�
Remove bottom exhaust manifold heat shield (3 - 8mm bolts).
cp-e™ 3” Stainless Steel Downpipe
5
�
Soak all 5 - 14mm bolts that fasten the downpipe to the turbo with penetrating oil. While they soak, jack the car
up and support it with jack stands.
�
Remove 5 - 14mm bolts from the downpipe to the turbo. Sometimes the nuts get fused onto the studs, and both
end up coming out. This is not a problem, as they can be reused anyway.
�
Remove bolts attaching downpipe to the catback.
�
Spray rear O2 sensor with penetrating oil and remove it with an oxygen sensor socket.
cp-e™ 3” Stainless Steel Downpipe
6
�
Remove the two 14mm bolts which are attached to the second cat. This will allow you to remove the center
downpipe section and the cat.
�
Remove the plastic under pan (7-10mm bolts).
�
Remove the 17mm bolt on the small end of the wishbone engine mount. Loosen the rear bolt, but don’t remove it.
The engine will droop, but will still be supported by the top engine mounts. It isn’t a bad idea to support the
engine with a jack stand before removing the mount so the engine doesn’t drop suddenly.
cp-e™ 3” Stainless Steel Downpipe
7
�
Remove two bolts in the gold colored pre-cat support bracket. If the engine is sagging and preventing clearance to
these bolts, jack the engine up slightly until you can see the bolts. These bolts are best removed from a vantage
point directly beneath them.
�
Support the engine with a jack under the oil pan.
�
�
Remove three bolts on the top engine mount, and pull off the metal retainer.
Slowly lower the jack so the front of the engine drops 2-3”, or until you gain enough clearance to remove the top
cat from the top of the engine bay.
cp-e™ 3” Stainless Steel Downpipe
�
�
�
�
�
�
�
�
�
�
�
�
8
Drape a rag over the cat, and remove it from the top of the engine bay. It is a tight squeeze, so be careful not to
scratch the paint on the firewall.
Reattach both top and bottom engine mounts.
Install cp-e’s 3” Stainless downpipe from underneath the car by sliding it up and over the studs from the turbo.
Start all 5–14mm turbo outlet bolts, do not tighten and of the bolts until all of them are started. You may have to
slide the downpipe 1/2” to 1” back on the studs to start the bottom two bolts.
Tighten all turbo outlet bolts.
Install the pre-cat oxygen sensor.
Using supplied 1/2” bolts and gaskets attach downpipe to catback.
The paper gasket will allow you to attach the downpipe to the stock catback. You must trim it just like the picture
above.
The cp-e™ gasket will be used to attaché donwpipe to the cp-e™ 3” Catback.
Install rear oxygen sensor.
The only heat shield that will not go back onto the car is the one pictured above.
The rest of the install is just the reverse of the removal process.
III. START THE VEHICLE & TAKE OFF!
*** WARNING***
Please be careful when first driving with the addition of the 3" Stainless Steel Downpipe. The vehicle’s driving
characteristics will be different. The change in vehicle power and performance may take the inexperienced driver by
surprise. The user must be careful, and above all obey all posted speed limits and regulations.
cp-e™ 3” Stainless Steel Downpipe
9
Download Compressed Downpipe MazdaSPEED6
Compressed Downpipe MazdaSPEED6.pdf (PDF, 501.55 KB)
Download PDF
Share this file on social networks
Link to this page
Permanent link
Use the permanent link to the download page to share your document on Facebook, Twitter, LinkedIn, or directly with a contact by e-Mail, Messenger, Whatsapp, Line..
Short link
Use the short link to share your document on Twitter or by text message (SMS)
HTML Code
Copy the following HTML code to share your document on a Website or Blog
QR Code to this page

This file has been shared publicly by a user of PDF Archive.
Document ID: 0000028552.