Bells&Whistles on QRZ (PDF)
File information
Title: Bells & Whistles on QRZ
Author: Vlad Lambrianov UA6JD
This PDF 1.4 document has been generated by Microsoft Word - coveQRZr.docx / PDF-XChange Viewer [Version: 2.0 (Build 48.0) (Mar 2 2010; 21:29:03)], and has been sent on pdf-archive.com on 19/02/2012 at 16:11, from IP address 85.172.x.x.
The current document download page has been viewed 10724 times.
File size: 10.8 MB (149 pages).
Privacy: public file
File preview
This book is devoted to the memory
of my brother Harry UA6JW
PRACTICAL GUIDE FOR WEB DESIGN ON WWW.QRZ.COM
3
nd
edition
INTRODUCTION
3
IMPORTANT NOTE
4
HOW TO ADD PICTURES TO YOUR QRZ LISTING
7
CKEditor 3.5
12
HOW TO INSERT THE HTML CODE
13
CSS STYLE
14
BACKGROUND PROPERTIES
16
TEXT
26
BORDER
41
CURSOR
45
LINK
45
DESIGN YOUR OWN GRAPHIC/IMAGE
47
SKYPE BUTTON
51
EMBED
54
HTML TABLES
59
HTML DIV
64
BASIC HTML SCROLL BOX
69
FLAG COUNTER
76
ONLINE VISITORS TRACKER
81
WORLD MAP VISITORS COUNTER
85
WEB HIT COUNTER
90
SOLAR TERRESTRIAL DATA
91
WEATHER GRAPHICS
105
GUESTBOOK
120
TIME
122
SCROLLER TEXT
129
COUNTDOWN
130
DX CLUSTER
131
CHAT BOX
138
APPENDIX A.
COLORS NAME
139
APPENDIX B.
HTML TAGs & CHARACTER ENTITIES
142
APPENDIX C.
DESIGN CALLSIGN BANNER
145
Feel like a broke-down engine, mama,
ain’t got no whistles or bells.
— Blind Willie McTell, "Broke Down Engine Blues No. 2", NYC, 1933
At the beginning of industrial era of a train, automobiles and other
mechanical carriages should be equipped with a bell and whistles to scare away horses and passerby. These elements were
completely superfluous, but were required under the law. From here
also there was an English phrase “with Bells and Whistles” refers
to non-essential features, visual or functional, that are an
enhancement to the object.
INTRODUCTION
In this book ways and means of personalizing your own pages in
www.qrz.com. Really the site is created as a world callsigns database therefore all additional changes described in this book are not obligatory
additions to your data. Hence the name of the book is “BELLS AND
WHISTLES...”
After I had written the first edition I received many e-mails with
questions concerning installation. Therefore I decided to describe in more
detail those questions. I tried to make this book accessible to all user
levels, by giving different variants of codes and examples. I have included
lot of samples so you can play around and help you choose what is best for
you and then you must design your unique HTML or CSS code. Here are
copy/paste examples, feel free to use the code on this page for your own
QRZ page. You can also change the values to suit.
If you have any problems with installation any widgets or work with
CSS & HTML please just e-mail me or let me know about the problems in
http://forums.qrz.com/forumdisplay.php?19-Community-Help-Center.
Information about the scripts and widgets taken from different web
sites - all examples of their use on QRZ developed and tested by me.
I will appreciate any information on the mistakes found on the pages
of the book.
73, Vlad UA6JD
3
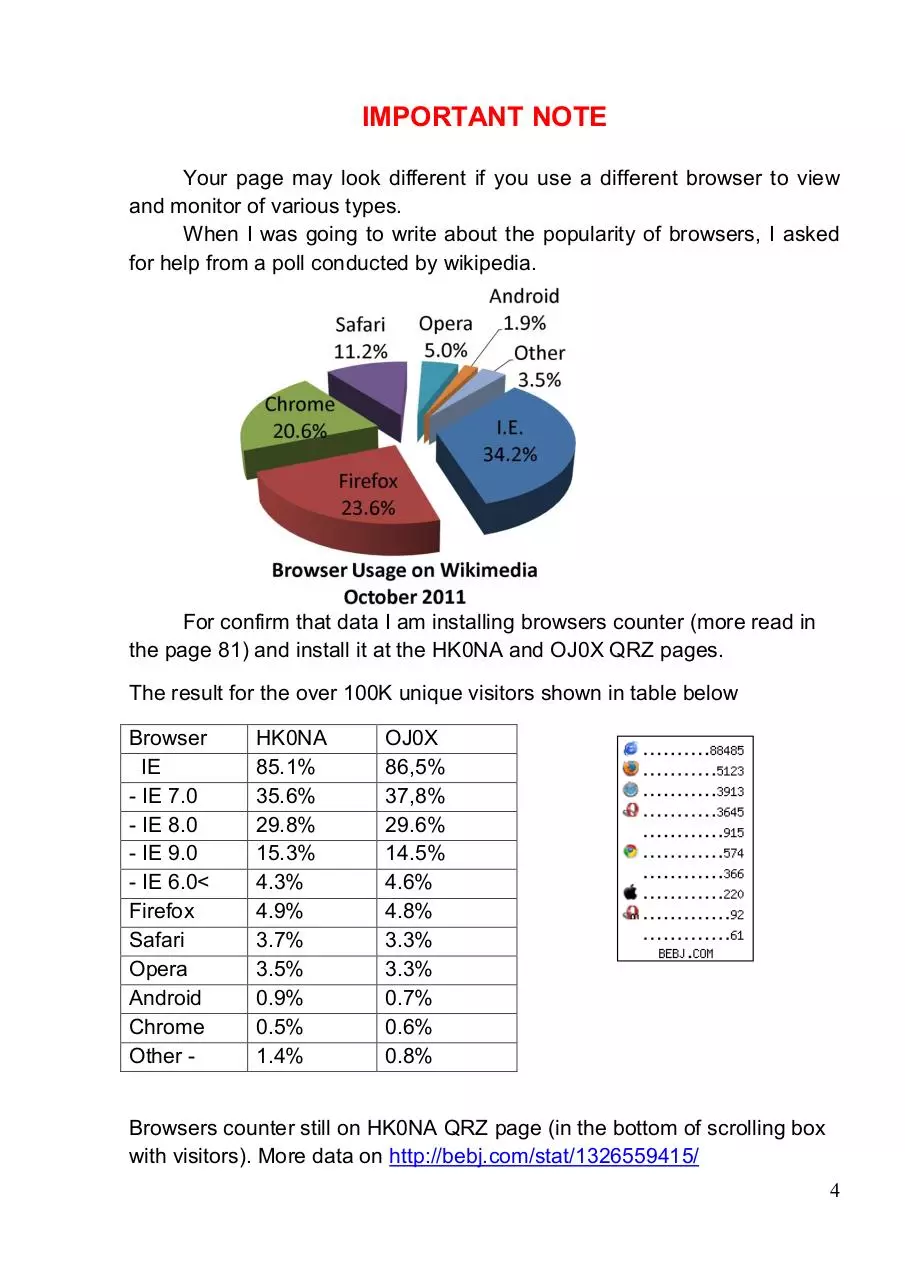
IMPORTANT NOTE
Your page may look different if you use a different browser to view
and monitor of various types.
When I was going to write about the popularity of browsers, I asked
for help from a poll conducted by wikipedia.
For confirm that data I am installing browsers counter (more read in
the page 81) and install it at the HK0NA and OJ0X QRZ pages.
The result for the over 100K unique visitors shown in table below
Browser
IE
- IE 7.0
- IE 8.0
- IE 9.0
- IE 6.0<
Firefox
Safari
Opera
Android
Chrome
Other -
HK0NA
85.1%
35.6%
29.8%
15.3%
4.3%
4.9%
3.7%
3.5%
0.9%
0.5%
1.4%
OJ0X
86,5%
37,8%
29.6%
14.5%
4.6%
4.8%
3.3%
3.3%
0.7%
0.6%
0.8%
Browsers counter still on HK0NA QRZ page (in the bottom of scrolling box
with visitors). More data on http://bebj.com/stat/1326559415/
4
Internet Explorer, one of the most widely used web browsers on QRZ,
but there are many more bugs, issues, and inconsistencies that can arise in
Internet Explorer, but these are probably the most common and most
important ones to keep in mind when trying to create a cross-browser
experience.
If you’re going to start with IE in your development, or at the very
least check your layout in IE early on, then you should understand what
things Internet Explorer (usually versions 6 & 7) has problems with, or what
its limitations are.
For example, text-shadow property is not support in IE7 version, so
about 35 percent of users will not see shadows in your design. The
<marquee> tag does not appear to work in the release versions of IE 8, etc.
More about reference off all the new CSS3 properties and their
browser support check in
http://www.w3schools.com/cssref/css3_browsersupport.asp
Very often I have seen that after my design, page’s owner modify the
size of tables, images and so on. Perhaps that makes them more suitable
for viewing on his monitor. Bind to the size of the main elements of a fixed
width is a wrong step, not taking into account that about 20% of users are
still using 1024pix monitor. So far all the blogs and social networks use a
1024pix width of the base layer. A few months ago at QRZ also tried to
introduce such system, but because of the sheer number of protesters
posts on the forum all returned to the old standard.
Another QRZ feature - subscribers have the option to turn off viewing
the ad block on QRZ page and there pages not had ads placed in the left
column and their QRZ page is wider than 120 pix.
Why I pay attention to such statistics?
Be sure to check your page using different browsers and types of
monitors. If you have no such possibility - ask your friends that they did it.
One last recommendation - always makes a backup of your CSS /
HTML code and keeps it as a text file. This will allow you to easily return to
a working version of your page.
5
You can always ask for help - click on the marked line below on the
top bar of your page and describe your problem; the QRZ Staff always will
come to your aid.
Click here and
QRZ staff will
help you
If you use HTML/CSS from other QRZ page do not forget about
copyright and please get permission to use the code page from the owner!
Never use counters from another pages – generate your own HTML code.
QRZ does not allow invisible text that is made by using CSS to make
the text the same or close to the background color. Whatever text colors
and/or size/font is chosen, the text must remain clearly legible.
In the personal QRZ pages are prohibited using the device
automatically playing different sounds when a viewer visits your page.
There should be a switch to play a sound - otherwise the device will be
deleted from your QRZ page.
JAVASCRIPT
Additionally, no javascript or <script> tags may be embedded in your
content.
6
HOW TO ADD PICTURES TO YOUR QRZ LISTING
A Step-by-Step Guide
Uploading your Pictures
To begin, make sure you're logged in, then, pull up your callsign and
hovered on the Edit button , choose & click Edit <yourcallsign>
Next, Choose Add or edit your pictures, and QSL images
7
Then, upload all the images that you want to appear in your listing.
Placing the Uploaded Pictures
After you've uploaded your images, go back to the main Edit Record
menu and choose Add or edit your biography text...
8
Position the cursor at the place in your bio where you want the new
image(s) to be inserted.
Then, while editing your bio, click the picture icon as shown below:
If you want add picture which you just upload click to “Browse Server”
icon
9
Double-click on the image that you want inserted into your bio
Choose border, vertical (VSpace) and horizontal (HSpace) volume between
text and your image, image align (left, right) – then click “OK” when finish.
Alternative text will show if image is not displayed.
10
Using the mouse, grab one of the small white handles to stretch your
picture to the desired size.
Finish editing your text, add more pictures, etc., then click on Save
when you're done.
Start bragging about your new callsign page.
11
Image Sizes: If your uploaded image is greater than 800 pixels in either
width or height, the system will automatically downsize it so that it fits inside
an 800x800 box. Similarly, if the uploaded image is uses more than 200
kilobytes on our disk then we'll resample the image to produce a smaller
file. Our resampling engine (ImageMagick) converts the file to JPG format
with a 75% Quality setting.
Image Names: Our server cannot accept just any file name, so we will
rename your file if needed while trying to preserve the meaningful parts. In
a nutshell, we accept the characters A-Z, 0-9, underscore, parenthsis,
hyphens, and period. Don't worry too much about this, since we'll show
you the new name in the listing.
Image Types: You can upload and use a variety of image types, with GIF,
JPG, TIF, BMP, and PNG being the most popular. Don't blame us if your
image type doesn't work however. We can't guarantee them all. Some
image types (such as BMP) will be automatically converted to JPG after
they are uploaded.
Copyrighted Material: We shouldn't have to say this but a lot of people fail
to realize that most photos of celebrities, brand names, logos, etc., are
copyrighted and may not be used here. Get a digital camera and take your
own pictures.
Image file destination format
In CSS window: http://files.qrz.com/[last letter of ur call]/[ur call]/[file name]
example: http://files.qrz.com/d/ua6jd/UA6JD.jpg
In HTML window: /hampages/[ur call]/[file name]
example: /hampages/ ua6jd/UA6JD.jpg
CKEditor 3.5
CKEditor using in QRZ page for edit your bio and provides a clean and
simple user interface. If you are familiar with desktop word processors like
Microsoft Word or OpenOffice.org Writer, you will quickly see that using an
online text editor is just as easy and intuitive.
More about CKEditor read in User's Guide http://docs.cksource.com/CKEditor_3.x/Users_Guide
12
HOW TO INSERT the HTML CODE
1.
2.
3.
Click to “Source” and insert your HTML code
4.
If you have trouble with step#1 (button Edit) you can use direct link to edit
your page: http://www.qrz.com/ed/{you callsign}
or MouseOver your callsign in top-right corner of blue bar and choose
Edit<yourcallsign>.
Don’t forget do a backup copy of your HTML code and keep it as text
file each time when you planning do a minor change in the code. In
this case you can back to workable version of your page very fast.
13
CSS STYLE
CSS (Cascading Style Sheets) is designed primarily to enable the
separation of document content (written in HTML or a similar markup
language) from document presentation, including elements such as the
layout, colors, and fonts.
The CSS specifications are maintained by the World Wide Web
Consortium (W3C).
Let's consider on practical examples the basic teams which can to
you it is required to give to your page bright individuality.
Before testing with CSS style please do a copy of your present CSS
and save it as text file – if you will have a trouble with your experiments you
can back to previously version in any time (anyway on the next page is
your Custom stylesheet).
The primary top-level style selectors are:
14
#csbody - This selector underlies the entire area of callsign listing
including the callsign data and the biography area. (red)
#calldata - This is the upper portion of the #csbody area, where the
callsign information is displayed (blue)
#biodata - This is the lower portion of the #csbody area, where the
biography information is displayed (green)
If you destroyed/damage your CSS code during your experiments
don’t worry: here was your Custom stylesheet
#csbody {
color: black;
}
I have backups running
in the background so I
will not lose any info
in a worst case
scenario!
#calldata {
color: black;
}
#biodata {
color: black;
}
Just copy red text and insert it to your CSS stylesheet box.
15
BACKGROUND PROPERTIES
Background properties affect how the background of an element
appears. Unlike with standard HTML, with CSS any element can have a
background image or color.
The background properties are :
background-color
background-image
background-attachment
background-repeat
background-position
background-size
Background-Color
Background-color specifies the color of the background of an
element. Any element can be given a background color with CSS.
Background-color is specified as either a color value, or as transparent. For
more on color values, see Appendix A.
A background-color of transparent ensures that whatever is behind
an element is visible, rather than obscured by the background of the
element. This is particularly useful with positioned elements, which might
overlap two or more elements. If no background-color is specified, then the
element has a transparent background. It is recommended that if you set a
background-color for an element, you should also set its color. This
ensures that there will not be an illegible clash between a text colors set by
user preferences against a background color set in your style sheet.
#csbody {
color: black;
}
#calldata {
color: Indigo;
background-color:khaki;}
#biodata {
color: rgb(0,0,0);
background-color:#C0C0C0;
}
16
It is recommended that if you set a background-color for an element,
you should also set its color. This ensures that there will not be an illegible
clash between a text colors set by user preferences against a background
color set in your style sheet.
CSS colors are defined using a hexadecimal (hex) notation for the
combination of Red, Green, and Blue color values (RGB). The lowest value
that can be given to one of the light sources is 0 (hex 000). The highest
value is 255 (hex FFF).
background-color :#FF0000;
background-color rgb(255,0,0);
background-color:red;
Background-Image
Please note that using the background-image property you are making it
impossible to print labels, as click the [+] Mailing Label on your page, you
are left with a picture background.
Background images can repeat vertically, horizontally, both (the traditional
tiling effect of background images in the <body> of HTML pages) or not at
all (enabling easy "watermark" effects.) The way the background changes
when you scroll a page can also be determined with CSS. A background
image can either scroll while the page scrolls (traditional HTML
appearance) or remain fixed while the text scrolls. In short, CSS goes far
beyond the background attributes of HTML.
You can specify the repeating nature and the actual position of the
background image using the background-repeat and backgroundattachment properties.
The background-repeat property has the following format:
background-repeat: repeat | repeat-x | repeat-y | no-repeat;
If you using repeat property your background-image you must use
seamless texture. A seamless texture is an image that has edges that
blend into each other when the image is repeated. Years ago, seamless
textures were used primarily for desktop wallpaper and web page
backgrounds. Today, high resolution textures are used for a variety of
design applications including Photoshop fills etc. Also you can download it
from Internet – just does a Google search as seamless textures download.
17
In the left example of
seamless Gaseous
Volcanic texture, which
can use as background in
qrzcom page
Fire text effect – page#29/30
Club Log search engine
< iframe> embed code
page#57
Slide show embed code page#54
#biodata { color:#ffffff;
background-image: url(http://files.qrz.com/c/em25uc/ur7uc_bg.jpg);
background-repeat:repeat;
background-color: #ffc;}
18
You can using part of pad-note line
image
and repeat it in csbody area and ring
and repeat it horizontally in the top of the page .
#csbody {color: black;
background-image: url(http://files.qrz.com/c/sv5pfc/hor.jpg);
background-repeat:repeat; background-color:#F0E68C;}
#calldata {
background-image: url(http://files.qrz.com/c/sv5pfc/note.jpg);
background-position: left top; background-repeat:repeat-x;
padding-top:51px; line-height: 26px;
color: #006600;font-size: 18px;font-style:italic;letter-spacing: 3px;}
Using two other images -
and
as sample below:
Weather
page#108
19
#csbody {
color: black;
background-image: url(http://files.qrz.com/a/ua0a/2_2.jpg);
background-repeat: repeat-y;
background-color:#fcfcfc;
padding-left:75px;
}
#calldata {
background-image:url(http://files.qrz.com/a/ua0a/2_1.jpg);
background-repeat:repeat;
padding-top:15px;
color:#90f;
font-size:20px;
font-style:italic;
line-height:29px;
letter-spacing: 2px;
}
#biodata {
color: black;
background-image:url(http://files.qrz.com/a/ua0a/2_1.jpg);
background-repeat:repeat;
background-color:#fcfcfc;
font-size:20px;
color:#9900ff;
line-height:30px;letter-spacing: 1px;
}
With property {background-repeat:no-repeat;} background image display a
only one time. If not indicate background-position property the element fix
in left top part of page.
The value for background-position is:
Value: [ [ <percentage> | <length> | left | center | right ] [ <percentage> |
<length> | top | center | bottom ]? ] | [ [ left | center | right ] || [ top | center |
bottom ] ]
If a background image has been specified, this property specifies its initial
position. If only one value is specified, the second value is assumed to be
'center'. If at least one value is not a keyword, then the first value
represents the horizontal position and the second represents the vertical
position. Negative <percentage> and <length> values are allowed.
20
<percentage>
A percentage X aligns the point X% across (for horizontal) or down
(for vertical) the image with the point X% across (for horizontal) or
down (for vertical) the element's padding box. For example, with a
value pair of '0% 0%', the upper left corner of the image is aligned
with the upper left corner of the padding box. A value pair of '100%
100%' places the lower right corner of the image in the lower right
corner of the padding box. With a value pair of '14% 84%', the point
14% across and 84% down the image is to be placed at the point
14% across and 84% down the padding box.
<length>
A length L aligns the top left corner of the image a distance L to the
right of (for horizontal) or below (for vertical) the top left corner of the
element's padding box. For example, with a value pair of '2cm 1cm',
the upper left corner of the image is placed 2cm to the right and 1cm
below the upper left corner of the padding box.
top
Equivalent to '0%' for the vertical position.
right
Equivalent to '100%' for the horizontal position.
bottom
Equivalent to '100%' for the vertical position.
left
Equivalent to '0%' for the horizontal position.
center
Equivalent to '50%' for the horizontal position if it is not otherwise
given, or '50%' for the vertical position if it is.
Please note that background-image fixed in calldata area is priority
over background-image fixed in csbody area.
Last example with practical use the background-images property:
#csbody {
background-color: #053363;
background-image: url(http://files.qrz.com/t/7z1tt/foot_03_2.png);
background-position:center top;
background-repeat:repeat-x;}
21
#calldata {
background-image: url(http://files.qrz.com/t/7z1tt/sa_flag1.gif);
background-position:20px 30px; background-repeat:no-repeat;
padding-left:192px; padding-right:30px; padding-top:10px;
color:#ffc; text-shadow: 0 0 1px #000, 0 0 3px #000; font-size: 14px;}
IMAGE HOSTING. Unfortunately, if your uploaded image is greater than
800 pixels in either width or height, the system in www.qrz.com will
automatically downsize image, so that it fits inside an 800x800 box that
insufficiently for a full covering of a full background. You, certainly, can to
fill the missing place suitable on color as background-color property - but it
will be simple an output from a difficult situation. To not get in this situation I
advise a picture with the sizes necessary for you to place in image hosting
service (concrete addresses of servers very simply to find with help Google
search as image hosting).
#csbody {background-color:#f8e963;
background-image:
url(http://imagesbase.com/upload/view/bg_1321113125_t5mfruiw9y.jpg);
background-position: center top;background-repeat:no-repeat;}
Linear-Gradient
The CSS linear-gradient - function creates an <image> which represents a
linear gradient of colors. The result of this function is an object of the CSS
<gradient> data type. Like any other gradient, a CSS linear gradient is not
a CSS <color> but an image with no intrinsic dimensions; that is, it has no
natural or preferred size, nor ratio. Its concrete size will match the one of
the element it applies to.
Linear gradients are defined by an axis, the gradient line, with each point
on it being of different colors. Perpendicular lines to the gradient-line have
one single color, the one of the point on the gradient line.
22
Syntax :
linear-gradient( [ [ <angle> | to <side-or-corner> ,]? <color-stop> [, <colorstop>]+ )
Where: <color-stop> <color> [ <percentage> | <length> ]
Sample:
#calldata { background-color: #F07575;
background-image: -webkit-gradient(linear, left top, left bottom, from(hsl(0,
80%, 70%)), to(#BADA55));
background-image: -webkit-linear-gradient(top, hsl(0, 80%, 70%),
#BADA55);
background-image: -moz-linear-gradient(top, hsl(0, 80%, 70%),
#BADA55);
background-image: -ms-linear-gradient(top, hsl(0, 80%, 70%),
#BADA55);
background-image:
-o-linear-gradient(top, hsl(0, 80%, 70%),
#BADA55);
background-image:
linear-gradient(to bottom, hsl(0, 80%, 70%),
#BADA55); }
Appendix C “ DESIGN A CALLSIGN BANNER”
Background Sizing
It's important to make sure every image is properly optimized and sized
before a site goes live. These extra steps help to keep file sizes low and
speeds browser rendering times, but the Web isn't a pixel perfect medium.
As elements can be resized, perfectly sized background images can show
their edges. These are times when stretching or filling an element's
background image would be most helpful
23
background-size Syntax:
background-size:[[<length>|<percentage>|auto]{1,2} || round ]
length - A specific size
percentage - A size relative to the container element.
round - tells the user agent to get it close to that width or height
If you specify one value, the image stretches the same amount for width
and height. Two values equal the width then the height to stretch.
There's a property that can help do just that: background-size. It should
probably be called "background-stretching" instead, since it can expand an
image to fill the background of an element
background-size: 100% auto;
The first value for the background-size property sets the width and the
second one sets the height. If there is only one value, its value is applied to
both the width and height. The background-size property accepts
percentage and length values as well as auto.
Currently, support for background-size is limited to Safari 3 and Opera 9.5.
And in order to use the property in those browsers, proprietary CSS
property values need to be used: -o-background-size and -webkitbackground-size. The following declaration block would be used in order to
get the greatest support from browsers side by side at present
background-size: 50% auto;
-o-background-size: 50% auto;
-webkit-background-size: 50% auto;
If you use a background-size: 0; then the image will not display, the same
effect as if the image were completely transparent.
Background-attachment
The background-attachment property sets whether a background image is
fixed or scrolls with the rest of the page.
The background-attachment property has the following format:
background-attachment: scroll | fixed;
24
Setting Multiple Background Values
#calldata { color:#0000cd; font-size:20px;font-style:italic;
background: #fff8dc url(http://m04.darc-husum.de/images/darc1_24.jpg)
center 50% no-repeat;}
All these properties can be used as background not only for decorating
your page, but for the individual elements - tables, images, etc.
<div style="background-image:
url(http://files.qrz.com/l/gm4wzl/bm1.png);
background-repeat:repeat-x; backgroundposition: center top;width:200px;
height:26px; text-align: center; color:#ffc;
font-weight: 600; padding-top:3px;">Solar
Data</div>
<div style="background-image:
url(http://files.qrz.com/l/gm4wzl/bm4.png);
background-repeat:no-repeat;backgroundposition:center top;background-color:#009;
width:200px;padding-top:15px;"><a
href="http://www.hamqsl.com/solar.html"
title="Click to add Solar-Terrestrial Data to your
website!"><img
src="http://www.hamqsl.com/solar2.php?back=
transparent" /></a></div>
Solar Data image with
transparent background
page#95
25
TEXT
The color property is used to set the color of the text. The color can
be specified as for background (see Appendix A).
QRZ does not allow invisible text that is made by using CSS to make
the text the same or close to the background color. Whatever text
colors and/or size/font is chosen, the text must remain clearly legible.
The text-align property is used to set the horizontal alignment of a
text. Text can be centered, or aligned to the left or right {text-align:center;}
The font family of a text is set with the font-family property {fontfamily:"Comic Sans MS";}
The font-style property is mostly used to specify italic text {fontstyle:italic;}
The font-size property sets the size of the text. Setting the text size
with pixels, gives you full control over the text size {font-size:14px;}
The font-weight property sets how thick or thin characters in text
should be displayed. Set different font weight {font-weight:900;} 400 is the
same as normal, and 700 is the same as bold.
Adjusting the Space Between Letters, Word & Line-Height
Tracking refers to the amount of space between letters in a word.
More space between letters often improves the readability of the text.
{letter-spacing: 1.25em; letter-spacing: 3px;}
{letter-spacing:normal;}
{letter-spacing: 3px;}
26
The word-spacing property increases or decreases the white space
between words.
The line-height property specifies the line height.
{word-spacing: 12px;}
{line-height: 200%;} {line-height: 2.0;} {line-height: 25px;}
Adding a Drop Shadow
The drop shadow is a time-honored method for adding depth and
texture to two-dimensional designs.
#calldata {text-shadow: #888 10px -12px 3px;}
Type the text-shadow property name, followed by a colon (:)
#888 Type a space and then a color value for the shadow. See table on
page 7-9 and note in page 9 for more detail on color values.
10px -12px Type a space and then two
positive or negative length values
separated by a space. The first value is
the vertical distance to offset the
shadow (positive is down; negative is
up). The second value is the horizontal
offset (positive is right; negative is left).
3px Type a space and then a positive
length value for the amount of blur to
apply to the shadow.
27
#calldata
{background:Linen;
color:Mediumblue;
text-align:center;
font-size:20px;
text-shadow: Lime 15px 5px 1px;
}
The text shadow CSS property is used to add shading to any text related
HTML element. The syntax includes figures for the X-offset, the Y-offset,
the blur amount and finally the color of the actual shadow. What’s more,
you don’t have to settle with one shadow, you can build up multiple textshadow values to create some really cool effects!
Below was several example of using few levels of text shadow
Vintage / Retro text effect
#calldata {
color: #000000;font-size:18px;line-height:20px;
text-shadow: 2px 2px 0px #eee, 4px 4px 0px #707070;}
The vintage style text effect is made up of
two text shadows, but the first is set to the
same color as the background in order to
give the impression that the second shadow
(the thin dark grey one) is offset to the
bottom right. Remember to make sure your
first shadow color is set to the same color as
your page background, and the text and
second shadow also both use the same
color.
28
Neon text effect
#calldata
{color:#000000;font-size:18px;line-height:20px;backgroundcolor:#000000;
text-shadow: 0 0 1px #fff, 0 0 2px #fff, 0 0 3px #fff, 0 0 4px #ff00de, 0 0 5px
#ff00de, 0 0 6px #ff00de;}
The neon text effect is made up of 8
levels of shading. The base text is given
a white fill, then each of the 8 textshadow values are given larger and
larger blur amounts while also getting
darker. This blends between a vivid
white inner glow and the large purple
outer aura.
Inset text effect
#calldata {
color:#000000;font-size:18px;line-height:20px;background-color:#8b0000;
text-shadow: 0px 2px 3px #666;}
The inset or letterpress style text effect is one
of the more common uses of text-shadow.
The shadow is offset on the Y-axis by a tiny
amount to give the impression of a subtle
highlight. On dark backgrounds offset the
shadow underneath the text with a light color,
whereas on light backgrounds offset to the
top of the text with a darker shadow color.
Fire text effect
#calldata {
color: black;font-size:18px;line-height:20px;background-color:#000000;
text-shadow: 0 0 1px #fefcc9, 1px -1px 3px #feec85, -2px -2px 4px #ffae34,
2px -4px 5px #ec760c, -2px -6px 6px #cd4606, 0 -8px 7px #973716, 1px 9px 8px #451b0e;}
29
The fire text effect is another style that
uses multiple levels of shading. Each
shadow is offset in different directions,
uses various blur settings and blends a
range of warm colors to create the
impression of a flame. These colors
span from bright whites through to
yellows, oranges and darker amber
tones.
Please note, that shadow property not support by IE7.
Text-Decoration
The text-decoration property specifies the decoration added to text.
{text-decoration:overline;}
{text-decoration:line-through;}
{text-decoration:underline;}
{text-decoration:blink;}
The text-decoration property is supported in all major browsers, but
the "blink" value is not supported in IE, Chrome, or Safari.
First-letter & first-line
The :first-letter selector is used to add a style to the first letter of the
specified selector.
The :first-line selector is used to add a style to the first line of the
specified selector.
Sample below:
Add in CSS window:
.xx2xxx p:first-letter
{font-size:200%;text-shadow:#000 0 0 1px, #000 0 0 3px;
color:#f00;}
.xx2xx p:first-line
{ font-size:120%;color:#00f;}
30
HTML code:
<p>
Predicted solar flux for the near term is about the same, 145 on
December 30 through January 6. From January 7-8 predicted flux values
are 130, then 135 on January 9-12, and 140 on January 13-15.</p>
<p>
Solar flux is expected to peak around 150 on January 24, then
go to a minimum of 130 on January 31 through February 4.</p>
<div class="xx2xxx">
<p>
Predicted solar flux for the near term is about the same,
145 on December 30 through January 6. From January 7-8 predicted flux
values are 130, then 135 on January 9-12, and 140 on January 13-15.</p>
</div>
<div class="xx2xx">
<p>
Solar flux is expected to peak around 150 on January 24,
then go to a minimum of 130 on January 31 through February 4.</p>
</div>
31
Marquee
You can create a scrolling marquee (i.e. scrolling text or scrolling
images) by using the <marquee> tag. You can make the text/images scroll
from right to left, left to right, top to bottom, or bottom to top - it's your
choice!
Slide-in text:
This text slides in from the right, and then stays where it is. You will need to
refresh this page to see the effect again.
<marquee behavior="slide" direction="left"> Your slide-in text goes
here</marquee>
Continuous scrolling text:
<marquee behavior="scroll" direction="left"> Your scrolling text goes
here</marquee>
Text bouncing back and forth:
<marquee behavior="alternate"> Your bouncing text goes here</marquee>
Text Scrolling Upwards:
<marquee behavior="scroll" direction="up"> Your upward scrolling text
goes here</marquee>
Text bouncing Up and Down
<marquee behavior="alternate" direction="up"> TEXT </marquee>
Text Angle Down
<marquee><marquee direction="down"> TEXT </marquee></marquee>
Text Angle Up
<marquee><marquee direction="up"> TEXT </marquee></marquee>
Angle Up Back and Forth
<marquee behavior="alternate" direction="down"><marquee
behavior="alternate"> TEXT </marquee></marquee>
Bounce Around Back and Forth
<marquee behavior="alternate" direction="down"><marquee
behavior="alternate"> TEXT </marquee></marquee>
32
Opposing Marqee's
<marquee> right to left
right </marquee>
</marquee> <marquee direction="right"> left to
Right to Left Blinking (Blinks in Firefox, Mozilla and Netscape only)
<marquee direction="left"><blink> TEXT </blink></marquee>
Change the Scrolling Speed:
<marquee behavior="scroll" direction="left" scrollamount="1"> Slow scroll
speed</marquee>
<marquee behavior="scroll" direction="left" scrollamount="10"> Medium
scroll speed</marquee>
<marquee behavior="scroll" direction="left" scrollamount="20"> Fast scroll
speed</marquee>
Scrolling Images:
Simply replace the src="... part with the location of your own image.
<marquee behavior="scroll" direction="left"> <img
src="/hampages/ua6jd/smile.gif" width="100" height="100" alt="smile" />
</marquee>
Images & Text (Both Scrolling):
Simply add your text under the image tag (but still within the marquee
tags).
<marquee behavior="scroll" direction="left">
<img src="/hampages/ua6jd/smile.gif" width="100" height="100" alt="!^!" />
<p>Sample text under a Marquee image</p></marquee>
Colored Background
<marquee bgcolor="#f00" style="color:#ff0"> TEXT HERE </marquee>
Yellow text over red color background .
33
Cool Effects with Marquees.
You can use HTML marquees for some cool effects.
Sample#1.Check out this falling text
<marquee direction="down" scrollamount="4" style="zindex:2;position:absolute;left:95px;top:155px;font-family:Cursive;fontsize:14pt;color:#fc0;height:75px;"> DX CODE OF CONDUCT</marquee><marquee direction="down"
scrollamount="7" style="z-index:2;position:absolute;left:249px;top:132px;font-family:Cursive;fontsize:14pt;color:#0f0;height:475px;"> DX CODE OF CONDUCT</marquee><marquee direction="down"
scrollamount="6" style="z-index:2;position:absolute;left:9px;top:165px;font-family:Cursive;fontsize:14pt;color:#fc0;height:50px;"> DX CODE OF CONDUCT</marquee><marquee direction="down"
scrollamount="3" style="z-index:2;position:absolute;left:72px;top:192px;font-family:Cursive;fontsize:14pt;color:#009;height:183px;"> DX CODE OF CONDUCT</marquee><marquee direction="down"
scrollamount="4" style="z-index:2;position:absolute;left:213px;top:114;font-family:Arial Black;fontsize:21pt;color:#800;height:80px;"> DX CODE OF CONDUCT</marquee><marquee direction="down"
scrollamount="7" style="z-index:2;position:absolute;left:233px;top:135px;font-family:Cursive;fontsize:14pt;color:#00cc00;height:351px;"> DX CODE OF CONDUCT</marquee><marquee
direction="down" style="z-index:2;position:absolute;left:94px;top:1110px;font-family:Cursive;fontsize:14pt;color:#f00;height:449px;"> DX CODE OF CONDUCT</marquee><marquee direction="down"
scrollamount="4" style="z-index:2;position:absolute;left:180px;top:198px;font-family:Cursive;fontsize:14pt;color:#99cc00;height:106px;"> DX CODE OF CONDUCT</marquee><marquee
direction="down" style="z-index:2;position:absolute;left:146px;top:171px;font-family:Cursive;fontsize:14pt;color:#fc0;height:178px;"> DX CODE OF CONDUCT</marquee><marquee direction="down"
scrollamount="1" style="z-index:2;position:absolute;left:225px;top:1115px;font-family:Cursive;fontsize:14pt;color:#ff0;height:268px;"> DX CODE OF CONDUCT</marquee><marquee direction="down"
scrollamount="4" style="z-index:2; position:absolute; left:19px; top:173px; font-family:Cursive;fontsize:14pt;color:#fc0;height:34px;"> DX CODE OF CONDUCT</marquee><marquee direction="down"
style="z-index:2; position:absolute;left:298px;top:162px;font-family:Cursive;fontsize:14pt;color:#fc0;height:328px;"> DX CODE OF CONDUCT</marquee><marquee direction="down"
scrollamount="3" style="z-index:2;position:absolute;left:78px;top:199px;font-family:Cursive;fontsize:14pt;color:#000;height:150px;"> DX CODE OF CONDUCT</marquee><marquee direction="down"
scrollamount="5" style="z-index:2; position:absolute; left:74;top:147;font-family:Cursive; fontsize:14pt;color:#fc0;height:398px;"> DX CODE OF CONDUCT</marquee><marquee direction="down"
scrollamount="3" style="z-index:2;position:absolute;left:119px;top: 110px;font-family:Tahoma;fontsize:20pt;color:#f00;height:24;"> DX CODE OF CONDUCT</marquee><marquee direction="down"
scrollamount="1" style="z-index:2;position:absolute;left:242px;top:114px;font-family:Cursive;fontsize:14pt;color:#fc0;height:486px;"> DX CODE OF CONDUCT</marquee><marquee direction="down"
style="z-index:2;position:absolute;left:197px;top:189px;font-family:Cursive;fontsize:14pt;color:#aeaeae;height:297px;"> DX CODE OF CONDUCT</marquee><marquee
direction="down" scrollamount="5" style="z-index:2;position:absolute;left:309px;top:148px;fontfamily:Cursive;font-size:14pt;color:#fc0;height:27px;"> DX CODE OF CONDUCT</marquee>
34
Sample#2.Falling text with Christmas snow effect.
<marquee behavior="scroll" direction="down" scrollamount="5"
style="position:absolute; left:130px; top:150px; width:16px; height:548px;">*</marquee> <marquee
behavior="scroll" direction="down" scrollamount="3" style="position:absolute; left:177px;
top:170px; width:16px; height:388px;">*</marquee> <marquee behavior="scroll" direction="down"
scrollamount="5" style="position:absolute; left:225px; top:190px; width:16px;
height:324px;">*</marquee> <marquee behavior="scroll" direction="down" scrollamount="5"
style="position:absolute; left:265px; top:180px; width:16px; height:499px;">*</marquee> <marquee
behavior="scroll" direction="down" scrollamount="5" style="position:absolute; left:325px;
top:160px; width:16px; height:411px;">*</marquee> <marquee behavior="scroll" direction="down"
scrollamount="5" style="position:absolute; left:239px; top:190px; width:16px;
height:251px;">*</marquee> <marquee behavior="scroll" direction="down" scrollamount="1"
style="position:absolute; left:141px; top:150px; width:16px; height:221px;">*</marquee> <marquee
behavior="scroll" direction="down" scrollamount="7" style="position:absolute; left:289px;
top:170px; width:16px; height:230px;">*</marquee> <marquee behavior="scroll" direction="down"
scrollamount="5" style="position:absolute; left:108px; top:230px; width:16px;
height:241px;">*</marquee> <marquee behavior="scroll" direction="down" scrollamount="2"
style="position:absolute; left:370px; top:190px; width:16px; height:386px;">*</marquee> <marquee
behavior="scroll" direction="down" scrollamount="2" style="position:absolute; left:394px;
top:150px; width:16px; height:484px;">*</marquee> <marquee behavior="scroll" direction="down"
scrollamount="2" style="position:absolute; left:430px; top:170px; width:16px;
height:442px;">*</marquee> <marquee behavior="scroll" direction="down" scrollamount="3"
style="position:absolute; left:475px; top:200px; width:16px; height:423px;">*</marquee> <marquee
behavior="scroll" direction="down" scrollamount="6" style="position:absolute; left:559px;
top:170px; width:16px; height:541px;">*</marquee> <marquee behavior="scroll" direction="down"
scrollamount="2" style="position:absolute; left:580px; top:200px; width:16px;
height:423px;">*</marquee> <marquee behavior="scroll" direction="down" scrollamount="5"
style="position:absolute; left:533px; top:170px; width:16px; height:385px;">*</marquee> <marquee
behavior="scroll" direction="down" scrollamount="1" style="position:absolute; left:614px;
top:200px; width:16px; height:332px;">*</marquee> <marquee behavior="scroll" direction="down"
scrollamount="3" style="position:absolute; left:651px; top:250px; width:16px;
height:386px;">*</marquee> <marquee behavior="scroll" direction="down" scrollamount="5"
style="position:absolute; left:684px; top:290px; width:16px; height:514px;">*</marquee> <marquee
behavior="scroll" direction="down" scrollamount="1" style="position:absolute; left:658px;
top:180px; width:16px; height:247px;">*</marquee> <marquee behavior="scroll" direction="down"
scrollamount="1" style="position:absolute; left:694px; top:160px; width:16px;
height:216px;">*</marquee> <marquee behavior="scroll" direction="down" scrollamount="2"
style="position:absolute; left:738px; top:200px; width:16px; height:392px;">*</marquee> <marquee
behavior="scroll" direction="down" scrollamount="1" style="position:absolute; left:753px;
top:150px; width:16px; height:544px;">*</marquee> <marquee behavior="scroll" direction="down"
scrollamount="5" style="position:absolute; left:800px; top:180px; width:16px;
height:404px;">*</marquee></p>
35
Sample#3. Slide show
<marquee behavior="alternate" direction="left" height="70" right="" style="filter:blur(add=2,
direction=directions, strength=80)" to="" width="100%"><marquee width="300"> <img
src="http://files.qrz.com/x/xx2xxx/ARRL_logo.png" style="height:100px;" /> <img
src="http://files.qrz.com/x/xx2xxx/CDG.png" style="height:100px;" /> <img
src="http://files.qrz.com/x/xx2xxx/banner.jpg" style="height:100px;" /> <img
src="http://files.qrz.com/x/xx2xxx/EPC.gif" style="height:100px;" /> <img
src="http://files.qrz.com/x/xx2xxx/dxcchr1.gif" style="height:100px;" /> <img
src="http://files.qrz.com/x/xx2xxx/rrdxa_logo.gif" style="height:100px;" /> </marquee></marquee>
Sample#4. Slide text
<marquee behavior=”alternate”><marquee width=”150″>Your Text Goes Here</marquee></marquee>
You can test all above marquee effects in http://htmledit.squarefree.com/
just copy/paste HTML code.
36
Multi-column layout
W3C offers a new way to arrange text “news-paper wise”, in columns.
Multi-column layout is actually a module on its own. It allows a web
developer to let text be fitted into columns, in two ways: by defining a width
for each column, or by defining a number of columns. The first would be
done by column-width, the latter by column-count. To create a space
between the columns, you need to specify a width for column-gap.
Multi-column layout is currently only supported in Mozilla based browsers
and Safari 3, who have prefixed the properties with respectively -moz- and
-webkit-. The example below is done with column-width, the CSS for it is as
follows:
<div style="-moz-column-width: 13em;-webkit-column-width: 13em;
-moz-column-gap: 1em;-webkit-column-gap: 1em;text-align: justify;">
Average daily …………………of 8 on December 29.</div>
FIELDSET
The <fieldset> element is used to group related form fields together. The
grouping of form fields allows for a more intuitive visual user interface while
also giving speech-based navigation methods better cues of how to render
a page.
The suggested rendering for the <fieldset> element is left to the browser,
but will usually take the form of a box around the contents of the <fieldset>.
If the optional <legend> element is present directly after the opening
<fieldset> tag, its contents are transposed above/on top of the region of the
<fieldset> bounding box in the location specified by the align attribute of the
<legend> element.
37
<legend style="border: 1px black solid;background:red;color:white;”>
BORDER
<fieldset style="border: 1px black solid;
background:#ffff00;">
HTML code:
<fieldset style="border: 1px black solid;background:#ffff00;">
<legend style="border: 1px black solid;background:red;color:white;
margin-left: 1em; padding: 0.2em 0.8em ">QSL via
<strong>UK8AR</strong></legend><p>
Special event station<strong> UM20Y</strong> will be active
from 25 August to 10 September 2011 to celebrate the 20th anniversary of
the indipendent Republic of Uzbekistan.<br />
Look for activity on the HF bands CW, SSB and RTTY</p></fieldset>
You can add a several fieldset elements in scrolling box for latest news (as
example see OJ0X and HK0NA QRZ pages)
Add in CSS window:
.leg{border: 3px black ridge; background:#1E2838; color:white;
margin-left: 1em; padding: 0.2em 0.8em;}
.field{ border: 4px #121822 ridge; background:#9EA7B8; text-align: justify;
color:#000;}
38
HTML code:
<div style="width:100%; height:280px; overflow-x: hidden;
overflow-y:scroll; text-align: center; font-weight: 600;">
<fieldset class="field" > <legend class="leg">Jan. 9, 2012</legend>
Text#1 here </fieldset> <br />
<fieldset class="field" > <legend class="leg">Jan. 6, 2012</legend>
Text#2 here </fieldset> </div>
More about text property in http://www.w3schools.com/css/css_text.asp
Padding & Margin
The padding clears an area around the content
(inside the border) of an element. The padding is affected
by the background color of the element. In CSS, it is
possible to specify different padding for different sides:
padding-top, padding-bottom, padding-right, and paddingleft. Possible values is length in px and %.The padding
property sets the left padding (space) of an element
{padding-left:20%;}.
39
The margin clears an area around an element (outside the border).
The margin does not have a background color, and is completely
transparent. It has same values as padding.
The <span> tag is used to group inline-elements in a document
Examples:
BONAIRE, PJ4.<span style="margin-left:35px;"> A large group of operators
are QRV as PJ4C until January 23. Activity is on 160 to 6 meters.QSL via
F9IE. </span>
BONAIRE, PJ4.<p style="margin-top:35px;">A large group of operators are
QRV as PJ4C until January 23. Activity is on 160 to 6 meters.QSL via
F9IE.</p>
BONAIRE, PJ4.<p style="margin-top:35px;margin-left:100px;">A large
group of operators are QRV as PJ4C until January 23. Activity is on 160
to 6 meters.QSL via F9IE.</p>
99% of users in order to realize the vertical spacing is used several
times (sometimes to 100 !) line break - but enough to use script
<p style="margin-top:200px;"> &nbsp;</p>
and will be made that the same result.
Button “Increase Indent” in CKEditor realizes margin-left 40px.
40
BORDERS
The CSS border properties allow you to specify the style and color of
an element's border.
The border-width property is used to set the width of the border. The
width is set in pixels, or by using one of the three pre-defined values: thin,
medium, or thick {border-width:5px;}.
The border-color property is used to set the color of the border. The
color can be set as background .
The border-style property specifies what kind of border to display:
dotted, dashed, solid, double, groove, ridge, inset, outset.
border Syntax:
border: [ <border-width> || <border-style> || <color> ] | inherit
border examples:
standard border
<p style="border : 2em solid #c00;">This paragraph has a 2 em solid red
border.</p>
41
Below are few samples for all above border & text properties.
#calldata {color: navy;font-size:18px;font-style:italic;text-align:center;
background-image: url(http://files.qrz.com/d/ua6jd/DXCC_JD.jpg);
background-position:0.5% 5%;
background-repeat:no-repeat;
background-color:#FFFDC9;
border-top-style:groove;
border-right-style:groove;
border-bottom-style:ridge;
border-left-style:ridge;
border-width:8px;
border-color:green;
}
#biodata {
color: black;
border-style:double;border-width:8px; border-color:red;
background-color:#FFFDC9;
}
42
#csbody {color: black;font-family:"Comic Sans MS";}
#calldata {color:#0000ff; font-size:20px;
border-right-style:solid;
border-top-style:dotted;
border-bottom-style:dashed;
border-left-style:solid;
border-width:8px;
border-color:#FF00ff;
padding-left:10%;
backgroundimage:url(http://static1.grsites.com/archive/textures/beige/beige175.jpg);
margin-left:20%;
margin-right:20%;
}
#biodata {
color: black;
border:double medium red;
background-color:#FFFDC9;}
43
One of the most keenly-anticipated CSS3 properties is border-radius. Web
designers will no longer have to resort to complex table structures using
custom-made corner graphics or including arcane JavaScript files in order
to produce designs with rounded corners.
<div style="
width: 190px;height: 20px;
background-color:#ff0;
border:solid 3px #f00;
border-radius: 25px;
color:#000000; text-align: center;
font-size: 14px; font-weight: 600;">
Worlwide Visitors</div><p>
<a href="http://s08.flagcounter.com/more/knA"
target="_blank"><img alt="free counters"
src="http://s08.flagcounter.com/count/knA/bg=ffff00/txt=000000/border=ffff0
0/columns=2/maxflags=30/viewers=3/labels=1/pageviews=0/flags=1/"
style="border:solid 3px #ff0000;border-radius: 25px; border-radius: 25px; moz-border-radius: 25px;-webkit-border-radius:25px;" /></a></p>
border-radius: 0px 10px 0px 10px ;
border-radius: 10px 10px 0px 0px ;
border-radius: 10px 0px 0px 10px ;
At present Opera (version 10.5 onward), Safari (version 5 onward) and
Chrome (version 5 onward) all support the individual border-*-radius
properties and the border-radius shorthand property as natively defined in
the current W3C Specification (although there are still outstanding bugs on
issues such as border style transitions, using percentages for lengths, etc.).
Check http://www.css3.info/preview/rounded-border/ for more info about
your browser support border property.
44
CURSOR
The cursor property specifies the type of cursor to be displayed when
pointing on an element.
Check
http://www.w3schools.com/cssref/playit.asp?filename=playcss_cursor
before you change your cursor property.
You can add it in CSS style as line
{cursor:help;}
or add to HTML code
<a href="/db/xx2xxx" style="cursor:help">xx2xxx</a>
LINK
CSS has several options for redefining the style of links.
a:link
Defines the style for normal unvisited links.
a:visited
Defines the style for visited links.
a:active
Defines the style for active links.
A link becomes active once you click on it.
a:hover
Defines the style for hovered links .
A link is hovered when the mouse moves over it.
Note: Not supported by Netscape browsers prior to version 6.
When setting the style for several link states, there are some order rules:
a:hover MUST come after a:link and a:visited
a:active MUST come after a:hover
Links can be styled with any CSS property (e.g. color, font-family,
background, shadow etc.).
45
The text-decoration property is mostly used to remove underlines from
links:
a:link {text-decoration:none;}
a:visited {text-decoration:none;}
a:hover {text-decoration:underline;}
a:active {text-decoration: underline overline;}
The background-color property specifies the background color for links:
a:link {background-color:#B2FF99;}
a:visited {background-color:#FFFF85;}
a:hover {background-color:#FF704D;}
a:active {background-color:#FF704D;}
present background-color on QRZ is grey .
Size changing links - create links that change in size and weight when
hovered.
a:link { font-size:17; font-weight:400;}
a:visited { font-size:17; font-weight:400;}
a:hover { font-size:20; font-weight:600;}
a:active { font-size:17; font-weight:400;}
Below was example as use above property in your personal page
In addition to setting a style for a CSS link property (as well as for any
HTML element) allows you to specify your own selectors called "id" and
"class".
The id selector is used to specify a style for a single, unique element.
The id selector uses the id attribute of the HTML element, and is defined
with a "#".
The style rule below will be applied to the element with id="xx2xxx"
As id name use unique word (as example best way is your callsign)
Add in your CSS style these lines:
# xx2xxx a:visited { text-decoration: none;color :#030;}
# xx2xxx a:link { text-decoration: none;color :#030;font-weight:600;}
46
# xx2xxx a:hover {text-decoration: underline; background:none; color:#f00;}
# xx2xxx a:active { text-decoration: none; color :#030;}
In HTML code add your id:
<a href="/db/xx2xxx" target="_blank" id=”xx2xxx">Testing page</a>
It was dark green color of text Testing page without decoration, but when
hover (MouseOver) it became red color with underline text and without
background Testing page .
If you have more than one link you can use id selector as table or div
property.
<div id=”xx2xxx">….HTML code of all your page, include few links….</div>
DESIGN YOUR OWN GRAPHICS/WIDGETS.
Probably you want to create your unique widget or linked graphic.
Before using any material from Internet be sure, that it not authorized by
the copyright or intellectual property owner, its agent, or the law.
For
example
you
have
http://www.swpc.noaa.gov
found
an
interesting
image
on
(Acknowledging SWPC: The information on government servers are in the
public domain and may be used freely by the public. Before using
information obtained from this server special attention should be given to
the date & time of the data and products being displayed. This information
shall not be modified in content and then presented as official government
material. Use of appropriate credits is requested.)
This plot shows the current extent and position of the
auroral oval in the northern hemisphere,
extrapolated from measurements taken during
the most recent polar pass of the
NOAA POES satellite.
47
The plots on this page show the current extent and position of the auroral
oval at each pole, extrapolated from measurements taken during the most
recent polar pass of the NOAA POES satellite. "Center time" is the
calculated time halfway through the satellite's pass over the pole. It works
in real time.
Right click and press "Save link as..."
http://www.swpc.noaa.gov/pmap/gif/pmapNst.gif.
Here is few ways design this widget.
Design by HTML code
<a href="http://www.swpc.noaa.gov" title="AURORAL OVAL IN THE
NORTHERN HEMISPHERE" target="_blank" > <img src="
http://www.swpc.noaa.gov/pmap/gif/pmapNst.gif"></a>
target="_blank" – open your browser in new window
From same site you can also edit HTML code for
southern hemisphere
<a href="http://www.swpc.noaa.gov" title="AURORAL
OVAL IN THE southern HEMISPHERE"> <img src="
http://www.swpc.noaa.gov/pmap/gif/pmapSst.gif"></a>
After testing above examples it will very easy add a logo of your club.
Always check you have authority to use a Logo.
(Usually restricted to current members only)
For example: you member of NCDXF, and holder of RDA awards.
You want add these logo to your site
<img src="http://www.rdaward.org/rdalogo.jpg">
You can make your images "clickable" so that when a
user clicks the image, it opens another URL. You do
this by simply wrapping the image with hyperlink code.
48
<a href="http://www.ncdxf.org"><img
src="http://www.ncdxf.org/images/ncdxf240.gif " border="0"></a>
The border attribute specifies the width of the border around an image in px
border="0" mean that image without border. If you click to logo you will
visit NCDXF web page http://www.ncdxf.org
There are a couple of attributes you'll want to know about <img> element.
The src attribute can be used for more than just relative links; you can also put
a URL in your src attribute. If a browser can't display the images on your
page, there is an alternative. You can give the visitor some indication of what
information is in the image using the <img> element's alt attribute.
<img src="http://files.qrz.com/m/k8tom/73_Tom_K8TOM.gif" border="0"
alt="73_Tom" />. If browser not display animated gif, it display text: 73_Tom
Images will appear at their natural dimensions when rendered in a browser
window. But because images are downloaded after the markup and text,
the browser won’t know the dimensions of the image until it has been
completely downloaded as well. The browser will reflow text to
accommodate the image once its dimensions are known, which can be
jarring if your visitor has already started reading the text. Including width
and height attributes in an img element will tell the browser to reserve
space for the image and draw the text where it should the first time around.
In sample above with NCDXF logo it display in natural size – if we would
like have logo with size 200x200px :
<img src="http://www.ncdxf.org/images/ncdxf240.gif " width="200"
height="200" alt="NCDXF_logo” border="0">
For another attribute test a sample with image and text.
We have NCDXF image and text about NCDXF. Usually users only add
image to the text without attribute.
We will have a HTML code:
<img src="http://www.ncdxf.org/images/ncdxf240.gif" width="200"
height="200" alt="NCDXF_logo” border="0">
The Northern California DX Foundation was founded in 1972 to assist
worthwhile amateur radio (ham radio) and scientific projects with funding
and equipment.
49
Download Bells&Whistles on QRZ
Bells&Whistles_on_QRZ.pdf (PDF, 10.8 MB)
Download PDF
Share this file on social networks
Link to this page
Permanent link
Use the permanent link to the download page to share your document on Facebook, Twitter, LinkedIn, or directly with a contact by e-Mail, Messenger, Whatsapp, Line..
Short link
Use the short link to share your document on Twitter or by text message (SMS)
HTML Code
Copy the following HTML code to share your document on a Website or Blog
QR Code to this page

This file has been shared publicly by a user of PDF Archive.
Document ID: 0000037060.