Trench Club (PDF)
File information
Title: Trench Club
Author: Randall
This PDF 1.4 document has been generated by PScript5.dll Version 5.2.2 / GPL Ghostscript 8.15, and has been sent on pdf-archive.com on 05/05/2012 at 09:00, from IP address 69.170.x.x.
The current document download page has been viewed 3818 times.
File size: 969.4 KB (9 pages).
Privacy: public file


File preview
- Building a Trench Club Assembling a close-quarters fighting instrument inspired by World War I trench warfare
requiring basic materials, limited shop skills and equipment, and materials of $40 (or less)
© RSW/JFB/QD/AD/AR 05-04-2012
BUILDING YOUR OWN TRENCH CLUB
Building Your Own Trench Club
Construction is pretty straightforward. Depending on how fast you work and what sort of finish you
prefer this project could conceivably be finished in a day. Because I made it up as I went along (and
repeated the finishing process multiple times) mine took somewhere on the order of two weeks, with
maybe two or three days of actual working time.
The first item you'll need is a bat. I used a Louisville Slugger youth model (MLB225YB) for a couple
of reasons, figuring from the start that I'd be cutting it down. In that light the shorter overall length and
narrower barrel on the youth size seemed a better jumping-off point. It was also the cheapest bat
readily available
**Since this was a first attempt I may go back eventually and build a second - in which case I'll take
better notes on what I used, how much it cost, and hopefully get some pictures along the way. **
But off we go. First, the components list.
Materials list: (stuff you need)
1x
1x
1x
1x
1x
12x
Approx. Price
$20
$1
$2
$6
$1
$2
$32
youth baseball bat, wood
aluminum fencepost cap (round or pointed)
2pc eyebolt pack, 3"
suede lace (1/8" x 8 yds)
lag screw, hex head 3"
lag screw, hex head 1"
Tools: (stuff you probably have)
Construction:
Shop vise
Metallic tape
Wrench
Wood saw
Rubber mallet
Drill/drill press
Metallic tape
Razor
White glue
Wood glue
Permanent marker
Finish (optional)
Wood stain
Spray paint, hi temperature automotive
Paint/finish stripper
Stripping solution afterwash
Scouring pads / steel wool
Rubber gloves (heavy)
Sandpaper, various grits / files
Once you have those in hand we can proceed to the construction.
© RSW/JFB/QD/AD/AR 05-04-2012
BUILDING YOUR OWN TRENCH CLUB
Part I: The Basic Club
For this you need:
- vise
- saw
- sandpaper or file
- permanent marker
I started by putting the bat in a vise and marking a circle a few inches up from the knob. Depending on
how precise you want to be you can measure this out (or not). The piece removed from mine wound up
being 5" give or take. I also didn't make a very even cut because I'm a lousy carpenter. Fortunately,
this isn't too noticeable on the finished product.
Once you've made the cut, hang on to the knob (that biscuit-looking piece you just removed from the
tail end of the bat). We'll be using it again later. You can throw out the center section if you want since
it'll be of no further use.
© RSW/JFB/QD/AD/AR 05-04-2012
BUILDING YOUR OWN TRENCH CLUB
Part II: De-Finishing & Marking Removal (optional)
For this you need:
- stripper
- stripper afterwash
- scouring pad or stainless steel
- heavy rubber gloves
- sandpaper or file
Next up, removing the finish. If refinishing isn't a big deal for you (or the zombies are banging on the
door as you feverishly assemble your war club) skip this and jump down to Part III. If not, read on.
You'll notice on first inspection that the bat has a gloss finish above the grip portion that we've just
removed. If you intend to refinish your trench club you'll have to do something about that. Bring out
your finish stripper (I use KleanStrip) rubber gloves, and scouring pad. A metal tub is also handy at
this point because the process is extremely messy and the goop will remove the finish from just about
anything. You'll need thick gloves of the sort available from any store that sells cleaning chemicals.
This is best done outdoors or in a well-ventilated area, as both the stripper and afterwash
give off toxic fumes.
Also, do not under any circumstance use the solution without gloves or eye protection.
Long sleeves are also a good idea. If you happen to get any of the stripper in contact with
bare skin, clean it immediately with water.
Follow the instructions on the can. Allow the solution to sit on the bat for fifteen minutes or so, then
return and scrape it off with the scouring pad. Repeat as necessary. When you have the markings and
finish removed to your satisfaction hit it with the afterwash until the last traces are gone.
With the factory finish out of the way you can now set about removing the various logos, signatures,
and trademarks. As I intended my project to be reminiscent of improvised trench weaponry used in the
First World War any readily visible markings had to go. With the finish stripped, I used coarse
sandpaper and files to even out any remaining indentions.
When finished, clean the bat with warm water and dish soap. If you've ever restored a gunstock the
same procedures can apply. Hang the bat somewhere out of the way and allow it to dry for a few days.
© RSW/JFB/QD/AD/AR 05-04-2012
BUILDING YOUR OWN TRENCH CLUB
Part III: Headpiece and Tailcap
For this you need:
- drill or drill press
- eyebolt (1)
- lag screw (3")
- 3x lag screw (1")
- fence post cap,
- permanent marker
While your war club sits on the drying rack there's still a few things we can do. Grab the above listed
items and clear a space on your workbench. If you have a drill press at your disposal this is where it
comes in handy. If not, a fixed vise and conventional handheld drill will suffice.
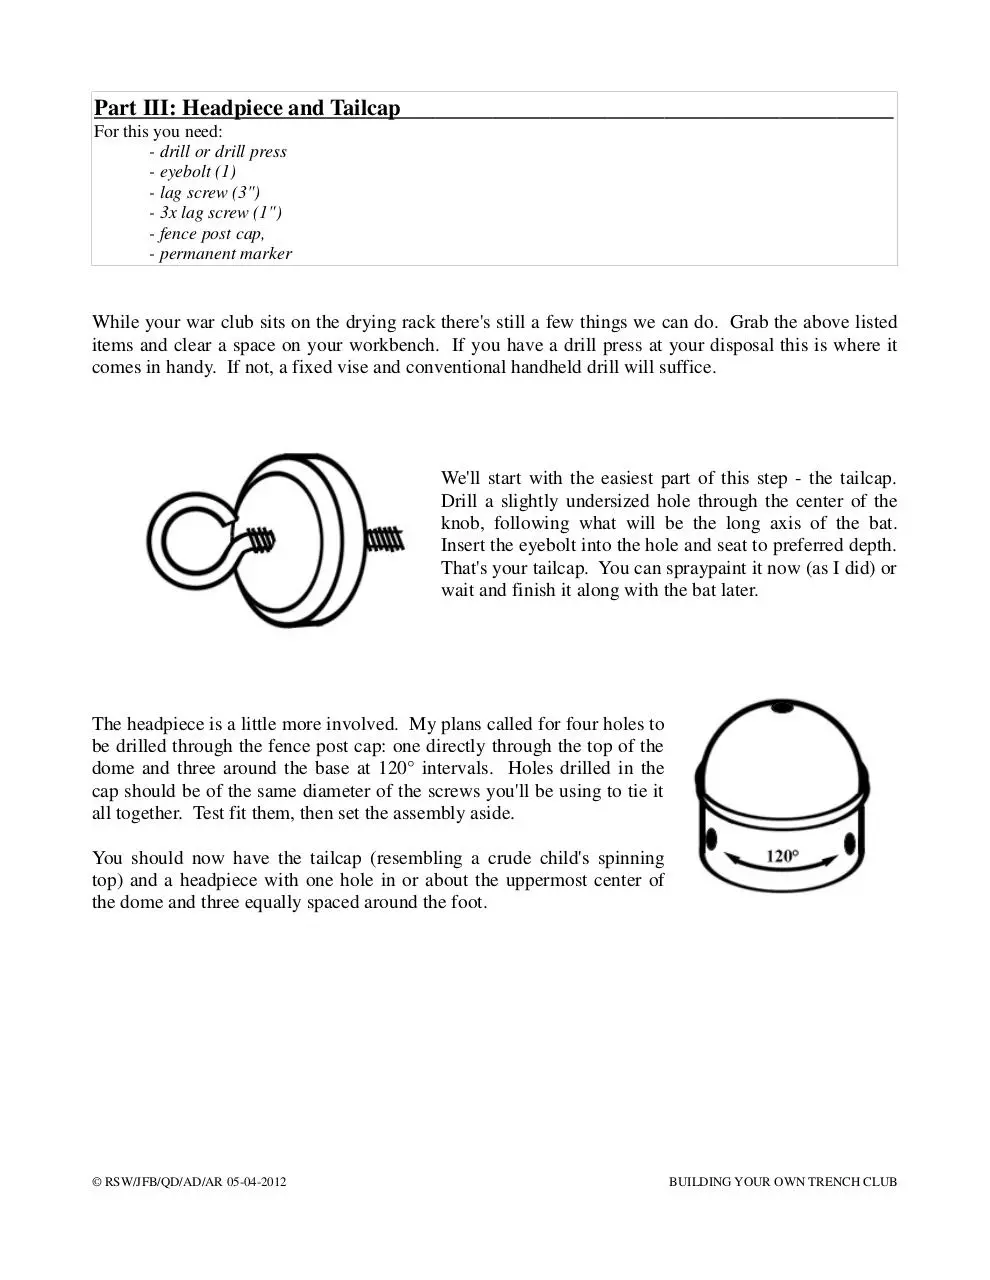
We'll start with the easiest part of this step - the tailcap.
Drill a slightly undersized hole through the center of the
knob, following what will be the long axis of the bat.
Insert the eyebolt into the hole and seat to preferred depth.
That's your tailcap. You can spraypaint it now (as I did) or
wait and finish it along with the bat later.
The headpiece is a little more involved. My plans called for four holes to
be drilled through the fence post cap: one directly through the top of the
dome and three around the base at 120° intervals. Holes drilled in the
cap should be of the same diameter of the screws you'll be using to tie it
all together. Test fit them, then set the assembly aside.
You should now have the tailcap (resembling a crude child's spinning
top) and a headpiece with one hole in or about the uppermost center of
the dome and three equally spaced around the foot.
© RSW/JFB/QD/AD/AR 05-04-2012
BUILDING YOUR OWN TRENCH CLUB
Part IV: Re-Finishing (optional)
For this you need:
- wood stain
- stain sealant
- high temperature engine spraypaint (black)
- rubber gloves
- paint stripper
- scouring pad
- tailcap (if desired)
The intended use of your club affects how you approach this step. If you mean to use it as a decorative
piece you may prefer a cleaner, more even look such as could be achieved with a Birchwood Casey
stock finishing kit. If you want the appearance of a battlefield relic (as mine was supposed to be) I'll
explain how I got that. If you want something to keep around the house as a possum defense you may
want to wait until it's finished and spray it one overall color (high-temperature engine paint can stand in
as a kind of poor-man's duracoat in this instance).
(**If you intend to refinish, you may want to skip a step ahead and affix the tailcap. This will give you a convenient ring
from which to hang your club while it dries.**)
The finish on my bat is the result of a three-step process.
Step one is to put on your rubber gloves and liberally cover the pieces with the stain of your choice.
Give it between five and ten minutes to dry. When you return the stain should be soaked in enough to
make the surface faintly spongy to the touch. When rubbed lightly with a paper towel some of the
color should come off without discoloring the wood underneath.
Next, hit the body with your spraypaint. Don't set it aside because we don't want it drying in place
Five minutes is probably good. You want the paint tacky enough to stick but wet enough to hold
fingerprints.
At this point you'll put a dab of paint stripper on your scouring pad and begin working back and forth
with the grain. This will pull up some of the stain and most of the paint. It will also coat the bat in a
semi-gelatinous grease comprised of the stripper, paint, and stain. Wipe away the excess but leave
enough to color the bat. That's your new (ugly) finish.
Repeat as needed until you have the shade you want, then set the bat aside to dry. Not too long - a few
hours should do it. When you return the mix of paint, stain, and stripper should be dry to the touch and
possibly somewhat uneven in color. If a pass with clean paper towel yields a smudge, give it a little
while longer.
Don't worry too much if the finish isn't what you expected. You can always come back later and throw
on a couple more coats after the hardware is in place. Though I opted to spray the entire tailcap
assembly, you can use this procedure there instead for a more uniform appearance.
© RSW/JFB/QD/AD/AR 05-04-2012
BUILDING YOUR OWN TRENCH CLUB
Part V: Principal Assembly
For this you need:
- headpiece assembly
- tailcap assembly
- bat
- 1x lag screw (3")
- 3x lag screw (1")
- vise,
- wrench,
- wood glue
- metallic tape
- razor
- drill or drill press
- rubber mallet
At this point the major assemblies of the club are ready and the body has been at least initially stained
and sealed. The following two procedures can be done in either order - one really has no bearing on
the next.
(**start here if skipping ahead from Part IV**)
I started by installing the tailcap. You can do this the easy way, by drilling a hole in the center of the
long axis from the grip end and screwing in the tailcap assembly. Or you can be a big dumb ox like me
and do it the hard way - clamp the ring of the eyebolt in a vise, get the hole started, and twist the main
body down onto the eyebolt. You may also wish to apply wood glue at the flat joining surfaces of the
bat and tailcap.
(**return to Part IV if you skipped ahead here**)
Before we get to the headpiece there are two items to address. First, you may choose to fill the void in
the head with sand, lead, or various other substances for more heft. Now would be the time for that.
Also, you may find that the base of the headpiece fits loosely around the bat. We'll use metallic tape to
fill the gap by wrapping the head until we have a snug fit.
Ensure that the headpiece is straight, hammer it down with the mallet, and place your 3" lag screw
through the pre-drilled hole atop the dome. This should hold it while you install the remaining 1"
screws around the base. Once all four screws are in place you may want to cut around the base of the
headpiece with a razor and remove any excess tape still showing.
At the end of this step all the essential pieces are in place and your club is functionally complete.
Everything beyond this point is more or less an extra feature.
© RSW/JFB/QD/AD/AR 05-04-2012
BUILDING YOUR OWN TRENCH CLUB
Part IV: Optional Stuff
For this you need:
- white glue
- suede lace (8 yds)
- 12x lag screw (1")
- sandpaper
Beyond the basic club, there are three additional modifications I made to my club.
My primary concern was the grip of the club, which seemed to me to be unnaturally thin and without
texture. To address this, I acquired a roll of suede lace (available from most craft stores). I began by
fixing the loose end at the base of the club just ahead of the knob. Once dry, spread regular white glue
over the area to be covered by the grip and began wrapping the lace tightly around the bat. You can do
as many layers as you prefer. I went with two.
Word of advice - put on a the television or the radio when you do this, because binding
the grip is a near rival for watching paint dry. Lots of repetition here.
After the grip had set I came back and slathered the outside in white glue. In addition to securing the
layers of suede it also fills gaps (and there are many) and provides some level of moisture protection to
the leather. Be generous with the glue; I used four or five coatings.
Once the glue is dry you'll notice that the grip fills the hand much better. You'll also notice that any
texture on the suede is lost. We're going to get it back. Taking a small section of coarse sandpaper,
sand along the length of the bat, perpendicular to the wrap. The eventual result will be a faint pebbly
surface that still sheds water. Any dried glue serving as filler between the rings will be unaffected.
Next, I wanted some additional teeth, so to speak. I decided a dozen extra screws should do the trick,
laid out in six rows below the headpiece. Placing the first six is easy - I lined up two below each lag
screw holding the cap. This should give you three columns of three, with the uppermost screw being
used to secure the headpiece. The remaining three columns (of two) I offset. This is pretty easy to
eyeball once you've got the first few in place.
If that's hard to follow don't worry - the pictures at the end explain it better than I can.
I was also concerned about the hollow head of the club and moisture. As a defense against water
seeping under the headpiece I began covering the gap (which we mostly filled with tape) with white
glue. Seven or eight coats had it sealed. In hindsight I realize that caulk probably would have worked
just as well - we'll try that next time.
Finally, I made one more refinishing pass using the process detailed above. This was less to change the
stain and coloration of the club and more camouflage the glue seal about the headpiece and tie the
pieces together visually.
And there you have it. One trench club.
© RSW/JFB/QD/AD/AR 05-04-2012
BUILDING YOUR OWN TRENCH CLUB
Picture Reference
Possible uses for your trench club:
- raiding Boche trenches
- raiding the refrigerator
- clearing brush with style
- table leg
- lamp stand
- party favors
- chasing snakes out of Ireland
- collecting dust
- mount to AR/AK-pattern rifles and/or Glock (I know somebody's going to try)
- burning ~$30 and a couple of hours in the shop
- zombies
© RSW/JFB/QD/AD/AR 05-04-2012
BUILDING YOUR OWN TRENCH CLUB
Download Trench Club
Trench Club.pdf (PDF, 969.4 KB)
Download PDF
Share this file on social networks
Link to this page
Permanent link
Use the permanent link to the download page to share your document on Facebook, Twitter, LinkedIn, or directly with a contact by e-Mail, Messenger, Whatsapp, Line..
Short link
Use the short link to share your document on Twitter or by text message (SMS)
HTML Code
Copy the following HTML code to share your document on a Website or Blog
QR Code to this page

This file has been shared publicly by a user of PDF Archive.
Document ID: 0000040571.