Shogi Ban creation version1 (PDF)
File information
Title: Shogi Ban creation-v29may14v2 1
Author: Pierre Alix
This PDF 1.3 document has been generated by FreePDF XP 3.24 - http://shbox.de / AFPL Ghostscript 8.53, and has been sent on pdf-archive.com on 09/06/2014 at 18:29, from IP address 178.51.x.x.
The current document download page has been viewed 1511 times.
File size: 1.97 MB (13 pages).
Privacy: public file


File preview
How to Build a
Foldable Large Size
Shogi Ban
Version1 - June 2014
Budget :
20euros in Europe. Most of the material can be recycled from remaining stock or some packaging items.
The one in picture as been built from non used old wood plates and cost finally 2 euros
Necessary Raw Material :
Wood
Accessories
2 wood plates for the board:
• 82 x 65 cm for 1st part
• 82 x 60 cm for 2nd part
I suggest using Medium-density fibreboard wood to use thin plates
and avoid twisting effect in time
8 metals
plates +
16 wood
screws
2 A4 sized wood plate 10 mm thick for pawns
81 nails (without head) – 15mm long
1A4 sized wood plate 12 mm thick for lances and knights
Varnish
1 A4 sized wood plate 16 mm thick for the generals
White acrylic paint (optionnal)
1 A4 sized wood plate 22 mm thick for rooks, bishops and kings
1 m of thin rope to do an handle
10x35cm + 2x82cm wood bars (section 22x14mm for all)
(82cm is linked to the board width and 35 is approximative )
2 belts
example
Necessary Tools :
A circular or a jigsaw
A Hammer
An electric drill (with a 2 & 8/10mm diameter drill) A tape measure
White glue for paper
A black ink permanent marker
Time : (depending your skills and tools)
1 day for the board and pieces
1 day for the pieces calligraphy and varnishing
Written by Pierre Alix
www.facebook.com/BelgianShogiFederation
Page 1 / 13
How to Build a
Foldable Large Size
Shogi Ban
1st STEP : THE PIECES CREATION
1. Print the A4 sized paper sheets with pieces patterns
See annex for the drawings of parts ready to be printed in final size
2. Glue each pattern on each wood plate
3. Use the 3 mil drill to do the 2 holes on each piece
The diameter must fit with the nails you will use for the board. Nails must be inserted inside.
The bigger these holes are the easiest it will be to clip pieces but the the more you will see
them (take in account holes will expand with time and manipulations)
4. Use the saw to cut each piece
5. Unglue the paper of each piece and do finishing (de-burring with a lime or some sand paper)
Finished part (before calligraphy step)
Written by Pierre Alix
www.facebook.com/BelgianShogiFederation
Page 2 / 13
How to Build a
Foldable Large Size
Shogi Ban
2nde
STEP : THE BOARD CREATION
1. Place the 2 wood plates on the floor
2. Cut 2 wood bars as long as the board is large and place them apart
3. Draw the squares with a pencil ;
The squares are 105x90mm (3 times normal size)
Use a long ruler or you can use the wood bars to draw them if they are clean
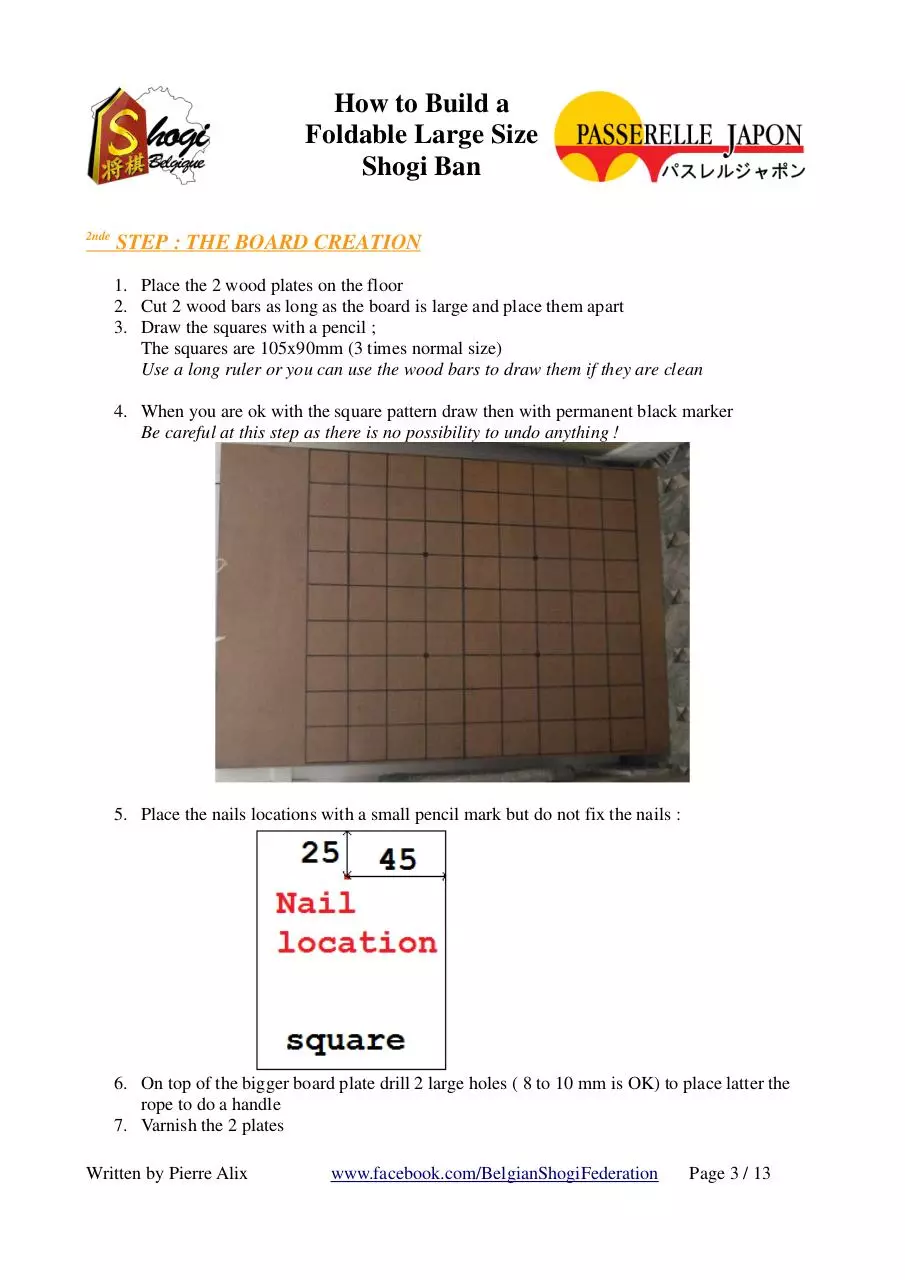
4. When you are ok with the square pattern draw then with permanent black marker
Be careful at this step as there is no possibility to undo anything !
5. Place the nails locations with a small pencil mark but do not fix the nails :
6. On top of the bigger board plate drill 2 large holes ( 8 to 10 mm is OK) to place latter the
rope to do a handle
7. Varnish the 2 plates
Written by Pierre Alix
www.facebook.com/BelgianShogiFederation
Page 3 / 13
How to Build a
Foldable Large Size
Shogi Ban
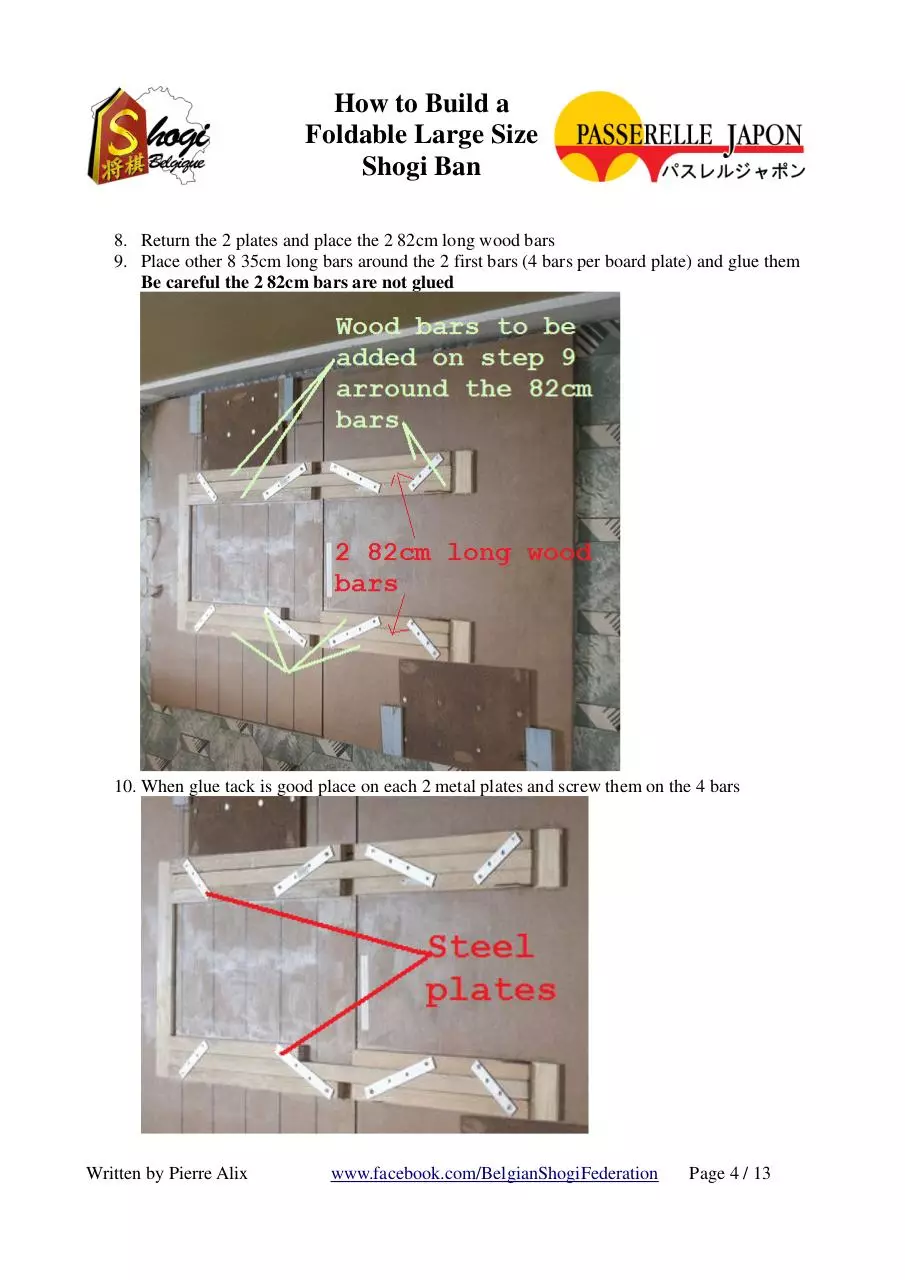
8. Return the 2 plates and place the 2 82cm long wood bars
9. Place other 8 35cm long bars around the 2 first bars (4 bars per board plate) and glue them
Be careful the 2 82cm bars are not glued
10. When glue tack is good place on each 2 metal plates and screw them on the 4 bars
Written by Pierre Alix
www.facebook.com/BelgianShogiFederation
Page 4 / 13
How to Build a
Foldable Large Size
Shogi Ban
11. Glue small bars on board plates to finish blocking the 2 first bars
Now your board must be in 1 piece and can stand by itself on a wall and you must be able to
separate the 2 board plates and the 2 central bars:
Front View
Rear View
12. Varnish the small bars added in step 11
13. Place the rope in the 2 large holes to create a handle
14. Show the board faces and nail the nails to the board. Nail must be 10 mm long
To have a good nailing (verticality) I used thid great small gadget from Ikea :
Written by Pierre Alix
www.facebook.com/BelgianShogiFederation
Page 5 / 13
How to Build a
Foldable Large Size
Shogi Ban
3rd STEP : THE PIECE CALLIGRAPHY
1. Place the pieces on the board
2. If necessary extend the holes you did to clip the pieces on the nails
3. Check if contrast between board and pieces is acceptable for you. If not you can clear your
pieces with a light white acrylic paint (as I did)
4. Paint the Kanjis of unpromoted pieces
5. After few hours, return the pieces and paint the promoted parts
I used red paint as I consider it is helpful for beginners (even more with non pro kanjis)
6. After few hours (I recommend 1 day) varnish the pieces once or twice (the more layers you
apply the more protected pieces are)
7. Check holes are not filled with paint or varnish (use nail to reopen the holes if necessary)
8. Place pieces on the board, take a picture and share it on Facebook prior to celebrate your
great achievement with a Tea – Beer – Sake (circle your best choice) :-)
Written by Pierre Alix
www.facebook.com/BelgianShogiFederation
Page 6 / 13
How to Build a
Foldable Large Size
Shogi Ban
HOW TO FOLD YOUR BAN ?
1.
2.
3.
4.
Remove pieces from the ban
Isolate the 2 board plates and the 2 wood bars
Place vertically the biggest board part on a wall
Place the the 2 belts around it by using the bar « channel » to fix them without closing them
Orange belts throught the “channel”
5. Place the 2 bars on top and bottom on the playing surface
6. Place the 2nd part of the board close to the bars (nails must not touch the other plate thanks to
the bar thickness)
7. Place the 2 belts through the channels of the 2nd plate and close them.
Final result must be like that :
Written by Pierre Alix
www.facebook.com/BelgianShogiFederation
Page 7 / 13
How to Build a
Foldable Large Size
Shogi Ban
ANNEXES
Following pages contains the paper sheet at 1:1 scale of the pieces patterns. Print them and glue
them of the wood plates to cut the pieces (there is no additional pawn in these pages).
Parts name are in French. Here is the translation:
Pion = Pawns
Lancier = Lance
Cavalier = Knight
Generaux = General
Fou = Bishop
Tour = Rook
Roi = King
Written by Pierre Alix
www.facebook.com/BelgianShogiFederation
Page 8 / 13
Download Shogi Ban creation-version1
Shogi Ban creation-version1.pdf (PDF, 1.97 MB)
Download PDF
Share this file on social networks
Link to this page
Permanent link
Use the permanent link to the download page to share your document on Facebook, Twitter, LinkedIn, or directly with a contact by e-Mail, Messenger, Whatsapp, Line..
Short link
Use the short link to share your document on Twitter or by text message (SMS)
HTML Code
Copy the following HTML code to share your document on a Website or Blog
QR Code to this page

This file has been shared publicly by a user of PDF Archive.
Document ID: 0000167914.