sc2 lecture (PDF)
File information
This PDF 1.4 document has been generated by Writer / OpenOffice 4.1.1, and has been sent on pdf-archive.com on 25/06/2015 at 04:35, from IP address 172.56.x.x.
The current document download page has been viewed 659 times.
File size: 508.96 KB (6 pages).
Privacy: public file


File preview
When you practice any skill, the most efficient way to improve is focused practice. In pedagogy,
the science of teaching, it has been found that we improve best when we isolate repeatable
actions and practice them. In the example of Starcraft, we learn the rigors of the ladder life and
how stressful the game gets at times. It's fast paced, chaotic, and it's also a game of incomplete
information so you never know for sure how something will play out. The best thing we can do
to improve our skill at the game is to break it down into individual parts and practice them in a
controlled environment. Musicians apply this concept all the time, learning an indivudal phrase
until it's metronome perfect with correct technique, only then do they move on to the next.
They understand that trying to do things quickly results in error, and you perform exactly as you
practice. If there are errors any errors at all, they will be magnified during performance. This
same idea can be applied to the game.
Isolate
Perfect
Perform
Doing something the same way every single time you practice it trains muscle memory.
Eventually this action becomes automatic and your mind is free to focus on other things. If your
mind is present on other things when your macro isn't muscle memory, you will fall apart.
When you are stressed in a game situation, you will be able to execute only muscle memory.
This is a focused approach at training muscle memory.
Do one thing at a time, do that thing very well and move on to the next. When practicing these
mechanics, go as slow as you need to to achieve perfection. Move your mouse exactly where it
needs to go, issue the order once, and then move on to the next. Make it your goal to have
complete smoothness in mouse precision. Utmost efficiency is important here. While
attempting this, you will feel slow and clumsy. Slow it down until you cannot make a mistake.
Become comfortable with that, and then speed it up.
The Setup
You can find a lot of information online about ergonomics. Match your setup to the information
you find online - wrists straight, elbows 90 degrees, etc. Your desk setup and posture are very
important, do not skip this. As you train your skills, you will be stressing your muscles beyond
the point of a normal person's endurance. People's hands are not built to play at 300 apm for 4
hours straight. I have developed light carpal tunnel in my left wrist from this game and my music
studies and I can speak from experience that this stuff does matter. Simply having a proper desk
setup, and stretching your wrists before you play will prevent any injury. This also allows you to
maximize your muscle efficiency so you can play faster and more accurately. Try playing a
mouse intensive first person shooter for an hour before you play Starcraft, you'll notice that
your mouse precision is much better than normal. You can replicate this with a few exercises
that you can do while your game is loading or during early game macro.
Your OS settings are important as well. Your Keyboard repeat rate needs to be set as follows to
allow for maximum macro speed. You'll get used to it on your computer. This setting allows you
to hold Z and suddenly have zerglings and helps with spreading creep.
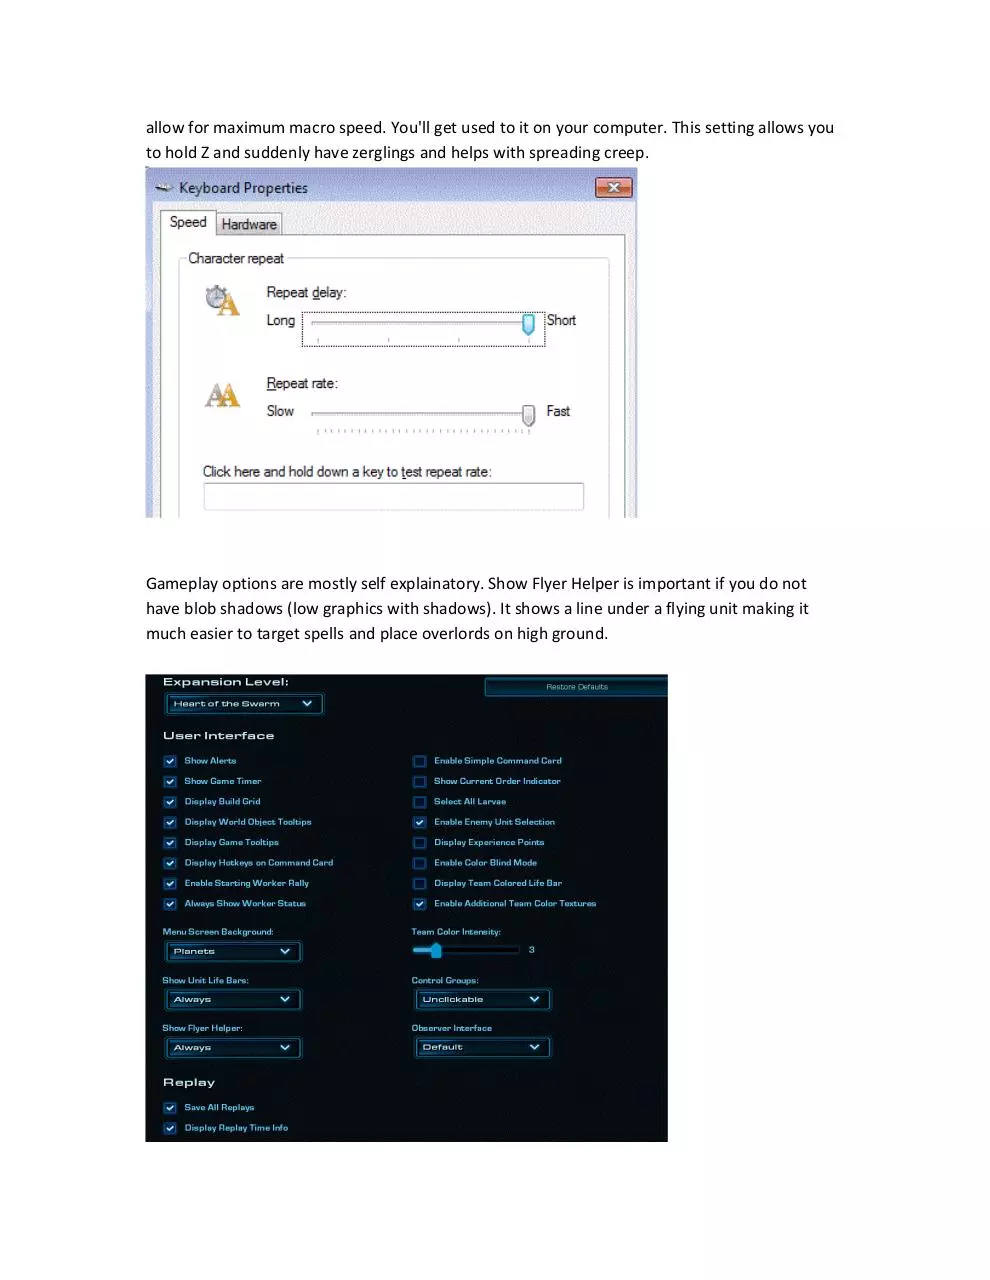
Gameplay options are mostly self explainatory. Show Flyer Helper is important if you do not
have blob shadows (low graphics with shadows). It shows a line under a flying unit making it
much easier to target spells and place overlords on high ground.
Hotkeys are a bit more of a personal thing, you can do whatever you would like if you can make
it work for you. They should maximize efficiency and reduce wasted hand movement. Below I
list a few useful keys to rebind.
Base camera is a very useful hotkey and should be bound to space bar, unbinding 'Jump to Last
Event.' Choose Ability or A.I. Target, found under Unit Management is an awesome trick. Leave
the main bind as Left Mouse Button and change the alternative to the same hotkey your creep
tumors use to spread, C in my case. Holding C now spams your left click. If I grab a bunch of
creep tumors and hold C towards the edge of my creep, it spreads itself. If I have my infestor's
Infested Terran hotkey set to C, holding c now spams infested terrans at the target location.
Infinitely useful for a lot of applications. More on how I use it for creep later. Unbind your 'Select
Army Units' under unit management. You won't be using it after you learn how to hotkey your
units correctly. It prevents any possibility of unit nuance and blobs your units together. You're a
zerg player, not a blob. Seriously, don't use it - stick your hand in a fire every time you click on
it, it's bad.
My hotkeys follow:
Hatcheries: T
All Queens: ` - this is tilde, next to 1
Creep Queens: 3
Main army: 1
Flying units: 2
Spellcasters: 4
I have every hotkey somewhere near the left side of the keyboard. As examples, lair has been
moved from L to H, Metabolic boost from M to E. My ` key is actually an alternate for my 0
control group, while my T key is an alternate for 9.
The Macro Cycle
When you keep your macro organized, you're able to execute in the same fashion every time.
This allows for muscle memory to develop and gives you a sort of grid to base your build off of.
As a Zerg player, almost everything you need to do can be achieved in a simple cycle based off of
your injects. Your build starts to flow relative to inject cycles rather than supply when you
practice this. Day9 has said a few different times that good macro is in the eyes. Your attention
follows your eyes. If you see creep that hasn't been spread, you should think about your macro,
and go inject - starting the cycle over.
Inject -> Overlords -> Larva -> Creep
It's very important to practice executing in this order, every time. In game you'll find wiggle
room and necessary pulls from your attention, but while you're training, doing it the same way
every time builds a very strong foundation that you will find to flexible when it needs to be. Each
part is a link to a chain, do this in the exact same order every time.
When you make units from your larva, press ctrl and left click on the wireframe eggs. This
selects only the eggs you just produced and deslects larva from your selection. Pressing shift+1
adds these units to your control group and they will be part of your army as soon as they hatch.
My hatchery hotkey is T, just substitute your own hotkeys. Here is what I'm doing when I'm
making ling muta. My lings go in 1, my mutas go into 2. By making them with their own
combination (instead of going tszzzzyyyy,) I can hotkey efficiently.
inject
tsvvv
tszzzz.. (ctrl+left click eggs ; shift+1)
tsyyyy (ctrl+left click eggs; shift +2)
33; spread creep
If you skip this step, you will have units laying around. This is probably the hardest part about
the macro cycle to get right in game, because you're stressed about other things. Grind it out in
practice, hotkey EVERY time you inject and you will not miss a single beat.
Injects
There is a lot of information available on the internet for methods to inject. I use the base
camera inject, also called backspace inject (bound to spacebar.) Liberal use of the S key for 'stop'
after injects prevents your queens from running around. If you're ever in doubt about
something that your queen has just done, tap S and reissue your injects. In later game situations
as you begin to miss injects, shift queueing injects becomes useful, especially for macro hatches.
You do this by selecting your queen with your mouse after centering on the base.
Overlords
After you inject, your eyes should move up to the top right and check your supply. Specific
overlords timings change slightly between builds and will be completely obsolete in LotV.
Instead, you should have an awareness of how much supply you need. I tend to follow this after
40 supply. Every inject round, make an overlord for each base you have a queen injecting. In the
practice map, you have 3 bases, so every inject round you will make 3 overlords. As you come to
around 120 supply if you are floating at all, max out on overlords to 120/200 supply so you
won't have to worry about this at all. During this step you can spread your overlords out from
the eggs, making your map vision that much easier to maintain. More on this later.
Larva (and hotkeying the eggs)
More accurately, spend the larva. This is the heart of the zerg production and the reason why
you inject so dilligently. Spending all of your larva maximizes your drone production and chunks
up your macro into parts that are very easy to understand. As a general rule of thumb, spend
your larva first before you spend your money elsewhere. Don't tech, expand, train extra queens,
or even think about engaging your opponent until you have spent your larva. Everything tends
to flow much better if you plan your macro this way. You'll notice that common timings that you
need a tech will line right up with your inject cycles and you'll have the money for it immediately
after spending your larva. If you find yourself supply blocked, spend your larva on overlords.
Don't be afraid to make 6 or more overlords, just spend the larva and move on.
Creep
Creep is much more about map control and awareness than anything else. Your units move
faster, but more importantly to our macro you have vision over everything that crosses creep.
As a zerg player, you want control and vision of the ENTIRE map, creep allows you to get a
foothold on everything, and the act of spreading creep reminds you to play for that space. I bind
my extra queens to 3, so after spending my larva and hotkeying my units, I tap 33. This centers
my camera on my creep queen and the edge of my creep. From here, you ctrl+left click an active
tumor and point your mouse cursor to just outside the edge of your creep. Hold C and wave it
around the edge to put the tumors as far out as possible. When you have many tumors in the
same location and you do this, you can spread all of them into the same general direction very
quickly. From here, use a combination of your minimap and mouse scroll to position your
camera over other 'lanes' of creep. You'll want to use the minimap mostly for this. When you
move your camera around and spread creep, you'll see different parts of the map. This enforces
map awareness. Pay attention to the map state as you spread creep and look for new ways to
spread it. You will see holes in your vision and should move overlords or individual zerglings to
ensure you can see everything. As you practice this you'll become faster and more efficient at
moving your camera around. Creeping up a whole map suddenly won't be so daunting and you
will be able to see attacks coming from miles away.
To do list
add links for further information (guide to perfecting mechanics, carpal tunnel stretches)
macro cycle demonstration
specific mechanics, aside from the macro cycle (using shift+left click deselect, ?)
proofread/spellcheck (lol)
Download sc2 lecture
sc2 lecture.pdf (PDF, 508.96 KB)
Download PDF
Share this file on social networks
Link to this page
Permanent link
Use the permanent link to the download page to share your document on Facebook, Twitter, LinkedIn, or directly with a contact by e-Mail, Messenger, Whatsapp, Line..
Short link
Use the short link to share your document on Twitter or by text message (SMS)
HTML Code
Copy the following HTML code to share your document on a Website or Blog
QR Code to this page

This file has been shared publicly by a user of PDF Archive.
Document ID: 0000283797.