AAMWBS QuickRlbk EN (PDF)
File information
This PDF 1.4 document has been generated by Adobe InDesign CS2 (4.0.2) / Adobe PDF Library 7.0, and has been sent on pdf-archive.com on 09/08/2015 at 00:00, from IP address 108.38.x.x.
The current document download page has been viewed 516 times.
File size: 5.01 MB (5 pages).
Privacy: public file


File preview
AGE 12+
Quick Start Guide
READ THIS FIRST!
Follow these steps in order.
1. Get Ready
The Axis & Allies™ Naval Miniatures game lets you build your own
fleet and send it into battle. You’ll need to combine Ships, Aircraft,
Submarines, and aggressive tactics to win. This booklet shows you
how combat works, and once you know how units attack each other,
learning the rest of the rules is a snap.
Set up your first battle.
Choose Your Unit: One player chooses an Allied unit and the other chooses an
Axis unit. Choose a unit with the Ship type—don’t pick a Submarine or an Aircraft.
Each player takes the chosen miniature and the stat card that goes with it. (The
miniatures have collector numbers on the bottom that you can match to the stat
cards, which tell you the type and nationality of your miniatures.) Look at each
unit’s cost in the upper right-hand corner of the stat card. Units with higher costs
are usually more powerful.
Open the Battle Map: Unfold one of the battle maps and place it face up between
you and your opponent.
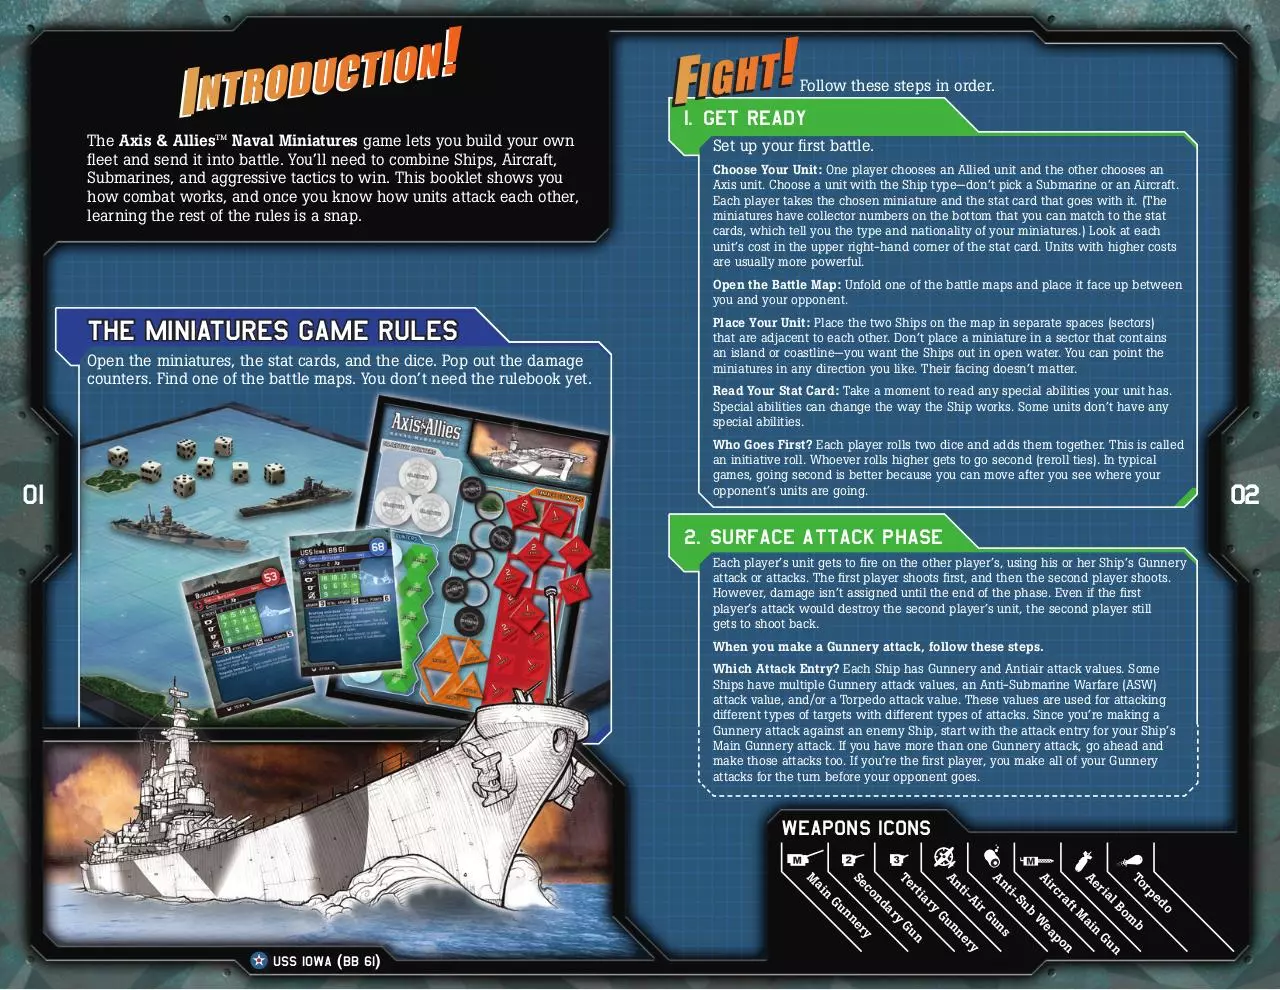
The Miniatures Game Rules
Open the miniatures, the stat cards, and the dice. Pop out the damage
counters. Find one of the battle maps. You don’t need the rulebook yet.
Place Your Unit: Place the two Ships on the map in separate spaces (sectors)
that are adjacent to each other. Don’t place a miniature in a sector that contains
an island or coastline—you want the Ships out in open water. You can point the
miniatures in any direction you like. Their facing doesn’t matter.
Read Your Stat Card: Take a moment to read any special abilities your unit has.
Special abilities can change the way the Ship works. Some units don’t have any
special abilities.
Who Goes First? Each player rolls two dice and adds them together. This is called
an initiative roll. Whoever rolls higher gets to go second (reroll ties). In typical
games, going second is better because you can move after you see where your
opponent’s units are going.
01
2. Surface Attack Phase
Each player’s unit gets to fire on the other player’s, using his or her Ship’s Gunnery
attack or attacks. The first player shoots first, and then the second player shoots.
However, damage isn’t assigned until the end of the phase. Even if the first
player’s attack would destroy the second player’s unit, the second player still
gets to shoot back.
When you make a Gunnery attack, follow these steps.
Which Attack Entry? Each Ship has Gunnery and Antiair attack values. Some
Ships have multiple Gunnery attack values, an Anti-Submarine Warfare (ASW)
attack value, and/or a Torpedo attack value. These values are used for attacking
different types of targets with different types of attacks. Since you’re making a
Gunnery attack against an enemy Ship, start with the attack entry for your Ship’s
Main Gunnery attack. If you have more than one Gunnery attack, go ahead and
make those attacks too. If you’re the first player, you make all of your Gunnery
attacks for the turn before your opponent goes.
Weapons Icons
r
To
Bo
do
al
pe
ri
n
b
ai
m
M
ea
W
ns
n
n
y
Gu
er
po
nn
n
y
Gu
Gu
y
er
Gu
b
ft
Su
ra
t i-
r
ry
Ai
t i-
tia
rc
Ae
Ai
An
An
r
Te
nn
ar
Gu
nd
n
co
ai
Se
M
USS iowa (bb 61)
02
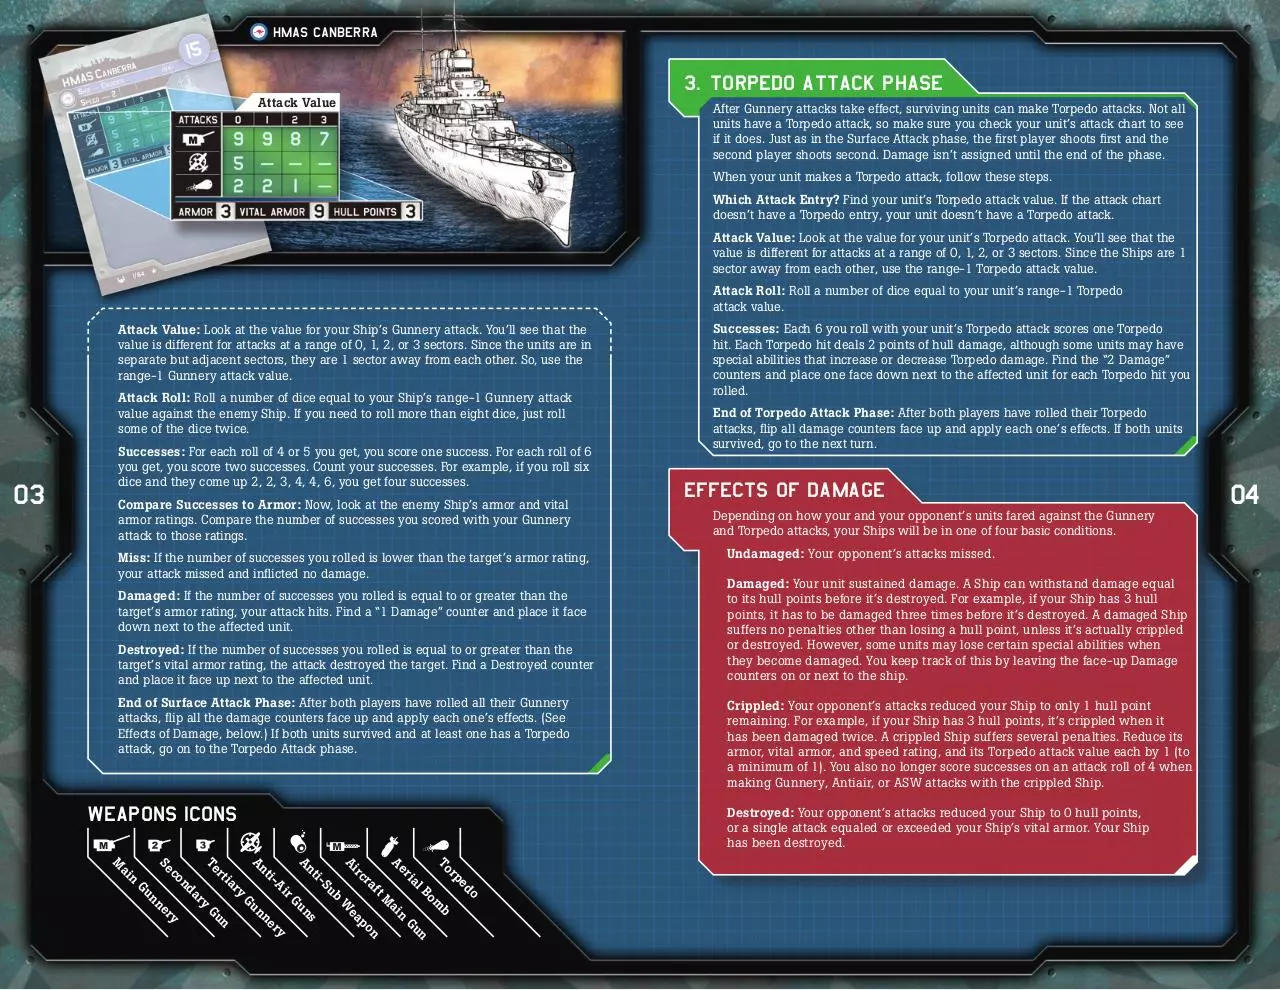
HMAS Canberra
3. Torpedo Attack Phase
Attack Value
After Gunnery attacks take effect, surviving units can make Torpedo attacks. Not all
units have a Torpedo attack, so make sure you check your unit’s attack chart to see
if it does. Just as in the Surface Attack phase, the first player shoots first and the
second player shoots second. Damage isn’t assigned until the end of the phase.
When your unit makes a Torpedo attack, follow these steps.
Which Attack Entry? Find your unit’s Torpedo attack value. If the attack chart
doesn’t have a Torpedo entry, your unit doesn’t have a Torpedo attack.
Attack Value: Look at the value for your unit’s Torpedo attack. You’ll see that the
value is different for attacks at a range of 0, 1, 2, or 3 sectors. Since the Ships are 1
sector away from each other, use the range-1 Torpedo attack value.
Attack Roll: Roll a number of dice equal to your unit’s range-1 Torpedo
attack value.
Attack Value: Look at the value for your Ship’s Gunnery attack. You’ll see that the
value is different for attacks at a range of 0, 1, 2, or 3 sectors. Since the units are in
separate but adjacent sectors, they are 1 sector away from each other. So, use the
range-1 Gunnery attack value.
Attack Roll: Roll a number of dice equal to your Ship’s range-1 Gunnery attack
value against the enemy Ship. If you need to roll more than eight dice, just roll
some of the dice twice.
03
Successes: For each roll of 4 or 5 you get, you score one success. For each roll of 6
you get, you score two successes. Count your successes. For example, if you roll six
dice and they come up 2, 2, 3, 4, 4, 6, you get four successes.
Compare Successes to Armor: Now, look at the enemy Ship’s armor and vital
armor ratings. Compare the number of successes you scored with your Gunnery
attack to those ratings.
Miss: If the number of successes you rolled is lower than the target’s armor rating,
your attack missed and inflicted no damage.
Damaged: If the number of successes you rolled is equal to or greater than the
target’s armor rating, your attack hits. Find a “1 Damage” counter and place it face
down next to the affected unit.
Destroyed: If the number of successes you rolled is equal to or greater than the
target’s vital armor rating, the attack destroyed the target. Find a Destroyed counter
and place it face up next to the affected unit.
End of Surface Attack Phase: After both players have rolled all their Gunnery
attacks, flip all the damage counters face up and apply each one’s effects. (See
Effects of Damage, below.) If both units survived and at least one has a Torpedo
attack, go on to the Torpedo Attack phase.
Weapons Icons
Successes: Each 6 you roll with your unit’s Torpedo attack scores one Torpedo
hit. Each Torpedo hit deals 2 points of hull damage, although some units may have
special abilities that increase or decrease Torpedo damage. Find the “2 Damage”
counters and place one face down next to the affected unit for each Torpedo hit you
rolled.
End of Torpedo Attack Phase: After both players have rolled their Torpedo
attacks, flip all damage counters face up and apply each one’s effects. If both units
survived, go to the next turn.
Effects of Damage
Depending on how your and your opponent’s units fared against the Gunnery
and Torpedo attacks, your Ships will be in one of four basic conditions.
Undamaged: Your opponent’s attacks missed.
Damaged: Your unit sustained damage. A Ship can withstand damage equal
to its hull points before it’s destroyed. For example, if your Ship has 3 hull
points, it has to be damaged three times before it’s destroyed. A damaged Ship
suffers no penalties other than losing a hull point, unless it’s actually crippled
or destroyed. However, some units may lose certain special abilities when
they become damaged. You keep track of this by leaving the face-up Damage
counters on or next to the ship.
Crippled: Your opponent’s attacks reduced your Ship to only 1 hull point
remaining. For example, if your Ship has 3 hull points, it’s crippled when it
has been damaged twice. A crippled Ship suffers several penalties. Reduce its
armor, vital armor, and speed rating, and its Torpedo attack value each by 1 (to
a minimum of 1). You also no longer score successes on an attack roll of 4 when
making Gunnery, Antiair, or ASW attacks with the crippled Ship.
Destroyed: Your opponent’s attacks reduced your Ship to 0 hull points,
or a single attack equaled or exceeded your Ship’s vital armor. Your Ship
has been destroyed.
04
r
To
Bo
do
al
pe
ri
n
b
ai
m
M
ea
W
ns
n
n
y
Gu
er
po
nn
n
y
Gu
Gu
y
er
Gu
b
ft
Su
ra
t i-
r
ry
Ai
t i-
tia
rc
Ae
Ai
An
An
r
Te
nn
ar
Gu
nd
n
co
ai
Se
M
d3a "val"
4. Next Turn
Each player rolls two dice again to see who goes first. Continue the engagement
with a new Surface Attack phase and a new Torpedo Attack phase. Keep on fighting
until one Ship or the other is destroyed. It’s possible that you and your opponent
destroy each other’s units in the same attack phase, in which case the player who
destroyed the Ship with the highest cost is the winner.
Aircraft: When using Aircraft, you must add four phases to the game, consisting of
an Air Mission phase, an Air Defense phase, an Air Attack phase, and an Air Return
phase. (See the rulebook for the full Sequence of Play.)
In the Air Mission phase, which occurs right after both players move their units,
both players take turns placing Aircraft in sectors with enemy units, starting with
the first player. During the Air Defense phase, units with an Antiair attack may fire
on enemy Aircraft in their sector. Each unit can make one Antiair attack per turn.
Then, in the Air Attack phase, Aircraft may attack enemy Ships and Submarines,
using ASW, Bomb, Gunnery, or Torpedo attacks. For most Aircraft to attack, they
must be in the same sector as the unit they’re attacking. The Air Return phase is
when you take your Aircraft off the battle map, simulating their return to a land
base or Carrier.
Aircraft don’t get damaged, but they can get aborted or destroyed. If an Antiair
attack scores successes at least equal to the Aircraft’s armor rating, its attack is
aborted, though it still may make its own Antiair attack. If this happens, place a
face-up Aborted counter beside the affected Aircraft.
05
More Battles
After your first fight, you can try other one-on-one fights or small battles with a few
units on each side.
Movement: The Sea Movement phase takes place right after the initiative roll. A
unit can move a number of sectors each turn equal to its speed. The first player
moves all of his or her units first, and then the second player moves all of his or her
units. Aircraft have a speed of “A” because you can place an Aircraft on any sector
on the map each turn.
Stacking: Each player can have only two Ships, one Submarine, and four Aircraft in
a single sector. Your opponent’s units don’t count against the stacking limit for your
units. If Ships are in the same sector, those Ships are at range 0 from each other.
Different Ranges: If you place your units at different ranges, they fight differently.
Make sure you refer to the correct range for your attacks. For example, if your unit is
making a Main Gunnery attack against an enemy Ship that’s 2 sectors away from it,
use the third column on your unit’s Main Gunnery attack chart entry.
Submarines: Submarines are hard to attack. A unit can only attack an enemy
Submarine if it has an ASW attack value or a special ability to do so. You’ll notice
that ASW attacks are always range 0, so a unit must be in the same sector as a
Submarine to attack that Submarine. ASW attacks work like Gunnery attacks.
An Antiair attack must get successes equal to or greater than that Aircraft’s vital
armor rating to destroy it. If this happens, place a face-up Destroyed counter beside
the affected unit. Apply the effects of Destroyed and Aborted counters at the end of
the Air Defense phase.
Your First Fleets
Each Axis & Allies™ Naval Miniatures Starter Set contains at least three Axis and
three Allied units. However, the two forces are rarely of equal strength in a given
Starter Set. To create a fair battle from a Starter Set, compare the costs of your Axis
units to those of your Allied units. Use all the miniatures of the side whose cost
total is lower. For the other side, set aside miniatures as necessary to get as close as
possible to the lower total without going below that total.
If you collect more miniatures, you will be able to build standard-sized fleets. A fleet
whose units total 100 points or less is suitable for the standard scenario (see the
Rulebook page 33).
Expanding the Game
When you’re ready to use the expanded rules and learn about fleet construction
and how to play different scenarios, look at the rulebook.
06
Questions
U.S., Canada, Asia Pacific,
& Latin America
www.wizards.com/customerservice
Wizards of the Coast, Inc.
P.O. Box 707
Renton, WA 98057-0707
U.S.A.
Tel: 1-800-324-6496 (within the U.S.)
1-206-624-0933 (outside the U.S.)
Fax: 1-425-204-5818
U.K., Eire, & South Africa
Wizards of the Coast, Inc.,
Consumer Affairs
P.O. Box 43
Newport NP19 4YD
UK
Tel: + 800 22 427276
Fax: + 44 1633 282693
Email: wizards@hasbro.co.uk
All Other European Countries
Wizards of the Coast
p/a Hasbro Belgium
’t Hofveld 6D
B-1702 Groot-Bijgaarden
BELGIUM
Tel: + 32.70.233.277
Fax: +32.2.464.09.59
Email: custserv@hasbro.co.uk
©2006 Wizards of the Coast, Inc., P.O. Box 707, Renton, WA 98057-0707, U.S.A. MADE IN CHINA. War at Sea and
its logo are trademarks of Wizards, Inc., in the U.S.A. and other countries. Axis & Allies and its logo are trademarks
of Hasbro, Inc., in the U.S.A. and other countries. All rights reserved. Cover illustration by John Van Flett. Card
illustrations by Langdon Foss. For Europe: Hasbro UK Ltd., P.O. Box 43, Newport NP19 4YD, UK. Keep this address
for your records.
30095808000002 EN
Download AAMWBS QuickRlbk EN
AAMWBS_QuickRlbk_EN.pdf (PDF, 5.01 MB)
Download PDF
Share this file on social networks
Link to this page
Permanent link
Use the permanent link to the download page to share your document on Facebook, Twitter, LinkedIn, or directly with a contact by e-Mail, Messenger, Whatsapp, Line..
Short link
Use the short link to share your document on Twitter or by text message (SMS)
HTML Code
Copy the following HTML code to share your document on a Website or Blog
QR Code to this page

This file has been shared publicly by a user of PDF Archive.
Document ID: 0000294295.