Blood Bowl Competition Rules Pack (PDF)
File information
Title: BB Competition Rules v2
Author: Jervis Johnson
This PDF 1.4 document has been generated by Microsoft Word / Mac OS X 10.5.6 Quartz PDFContext, and has been sent on pdf-archive.com on 12/12/2015 at 06:30, from IP address 73.2.x.x.
The current document download page has been viewed 1931 times.
File size: 5.33 MB (54 pages).
Privacy: public file


File preview
BLOO D B O WL
BLOOD BOWL COMPETITION RULES
This rules pack contains a set of alternative game rules that have been developed in order to maintain game balance
in leagues that last for long periods of time (e.g. for months or years rather than weeks), and for use in tournaments
where very precise play balance and exact wording of the rules are important. They have been heavily tested by
Blood Bowl coaches around the world, to ensure the best long-term balance and minimum of confusion. However, by
necessity this makes the competition rules longer and more complex than the standard rules, and because of this their
use is entirely optional. League commissioners and tournament organisers should therefore feel free to use either the
competition rules or the standard rules included with the Blood Bowl game, whichever they consider to be the most
appropriate for the league or tournament they plan to run.
Note that the Competition Rules pack only includes the information and rules that you will need during play. All
descriptions of game components, the history of Blood Bowl, and all illustrations and ‘Did You Knows’ have been
removed, both in order to save repeating information already in the Blood Bowl Rulebook, and to save time and
money when printing the document out. We recommend printing two pages to a sheet to save further paper. Also note
that the original page numbering has been preserved as much as possible, to ensure that page references in the text
remain correct, and this sometimes means that the page numbers ‘jump forward’ or that pages have a certain amount
of empty space. In other words, the Competition Rules pack is a functional document, rather than an attractive one!
TABLE OF CONTENTS
SETTING UP THE GAME ................................... 6
THE KICK-OFF ............................................... 6
THE SEQUENCE OF PLAY ................................ 7
MOVING THE TURN MARKER ................... 7
PLAYER ACTIONS ........................................ 7
TURNOVERS … ................................................ 7
MOVEMENT ........................................................ 8
TACKLE ZONES ................................................... 8
PICKING UP THE BALL ................................. 8
BLOCKS .............................................................. 9
BLITZ MOVES ................................................ 9
STRENGTH .................................................... 9
KNOCK DOWNS & INJURIES ............................ 11
INJURIES ....................................................... 11
SUBSTITUTES ............................................... 11
THE INJURY TABLES .................................... 11
THROWING THE BALL ....................................... 12
THROWING ..................................................... 12
CATCHING THE BALL .................................... 13
BOUNCING BALLS ........................................ 13
THROW-INS ................................................... 13
TURNOVERS ................................................. 13
RE-ROLLS ........................................................... 14
TEAM RE-ROLLS ........................................... 14
PLAYER RE-ROLLS ...................................... 14
SKILLS ............................................................ 14
WINNING THE MATCH ....................................... 15
SCORING TOUCHDOWNS
IN YOUR TURN ............................................... 15
SCORING ON THE OPPONENT’S
TURN ............................................................... 15
RESTARTING THE MATCH ........................... 15
CONCEDING THE MATCH ............................. 15
EXTRA RULES ......................................................... 16
CREATING A BLOOD BOWL TEAM .................... 16
TEAM ROSTER SHEETS .............................. 16
BUYING PLAYERS ........................................ 16
TEAM RE-ROLLS & FAN FACTOR ................ 16
COACHING STAFF ........................................ 16
APOTHECARY ............................................... 17
THE KICK-OFF TABLE ........................................ 18
THE FANS ...................................................... 18
THE WEATHER ................................................... 20
HANDING-OFF THE BALL .................................. 20
GOING FOR IT! ................................................... 20
ASSISTING A BLOCK ..........................................21
INTERCEPTIONS & FUMBLES ............................22
FOULS....................................................................23
SKILLS .....................................................................23
BLOOD BOWL LEAGUES .......................................24
STARTING THE LEAGUE ...................................24
TEAM ROSTER ...................................................24
TREASURY ....................................................24
TEAM VALUE .................................................25
MATCH RECORDS ........................................25
INJURIES ............................................................25
CASUALTY TABLE ........................................25
STAR PLAYER POINTS ......................................25
HOW TO EARN STAR PLAYER POINTS ...........26
STAR PLAYER POINTS TABLE ..........................26
IMPROVEMENT ROLLS .......................................26
IMPROVEMENT TABLE .................................. 26
NEW SKILLS ....................................................26
CHARACTERISTIC INCREASES....................26
ROLLING DOUBLES .......................................27
IMPROVEMENTS & PLAYER VALUES ..........27
VALUE MODIFIERS TABLE ............................27
PLAYING LEAGUE MATCHES ...............................28
PRE-MATCH SEQUENCE....................................28
THE WEATHER ...............................................28
PETTY CASH ...................................................28
INDUCEMENTS ...............................................28
POST-MATCH SEQUENCE ................................. 29
IMPROVEMENT ROLLS.................................. 29
UPDATING TEAM ROSTER............................29
JOURNEYMEN ................................................29
SPIRALLING EXPENSES.....................................29
CONCEDING ........................................................29
TOURNAMENTS .....................................................30
RUNNING A TOURNAMENT................................30
THE GLITTERING PRIZES .................................. 31
OPTIONAL LEAGUE RULES .................................. 32
AWARDING THE MVP.........................................32
SPIRALLING EXPENSE MODIFICATION............32
EXCLUDING INDUCEMENTS IN
LEAGUE PLAY.................................................32
INDUCEMENT USE IN ONE-OFF PLAY..............32
FREE FAN FACTOR.............................................32
ADDITIONAL WINNINGS FOR
SHORT LEAGUES ...........................................32
SPECIAL PLAY CARDS ..........................................55
MISCELLANEOUS MAYHEM DECK ....................55
SPECIAL TEAM PLAYS DECK.............................56
MAGIC ITEMS DECK............................................57
DIRTY TRICKS DECK...........................................58
GOOD KARMA DECK...........................................59
RANDOM EVENTS DECK ....................................61
DESPERATE MEASURES DECK ........................62
SKILL DESCRIPTIONS ............................................63
INDUCEMENT DESCRIPTIONS .............................69
BLOODWEISER BABES.......................................69
BRIBES..................................................................69
EXTRA TEAM TRAINING .....................................69
HALFLING MASTER CHEF ..................................69
IGOR......................................................................69
MERCENARIES ....................................................69
STAR PLAYERS ...................................................69
WANDERING APOTHECARIES..........................69
WIZARD................................................................70
TEAM ROSTERS .....................................................71
AMAZON TEAMS .................................................71
CHAOS TEAMS....................................................71
CHAOS DWARF TEAMS .....................................71
DARK ELF TEAMS...............................................72
DWARF TEAMS ...................................................72
ELF TEAMS..........................................................72
GOBLIN TEAMS...................................................73
HALFLING TEAMS...............................................73
HIGH ELF TEAMS................................................73
HUMAN TEAMS ...................................................73
KHEMRI TEAMS ..................................................74
LIZARDMAN TEAMS ...........................................74
NECROMANTIC TEAMS .....................................74
NORSE TEAMS....................................................74
NURGLE TEAMS .................................................75
OGRE TEAMS......................................................75
ORC TEAMS ........................................................75
SKAVEN TEAMS..................................................76
UNDEAD TEAMS .................................................76
VAMPIRE TEAMS ................................................76
WOOD ELF TEAMS .............................................76
FREQUENTLY ASKED QUESTIONS ......................78
STAR PLAYER LIST ................................................80
Games Workshop and Blood Bowl are trademarks of Games Workshop Ltd.
The copyright in the contents of this product are the exclusive property of Games Workshop Ltd. © 2010. All rights reserved.
REPRODUCTION ALLOWED FOR PERSONAL USE
BLOO D B O WL
SETTING UP THE GAME
Before you start, it’s a good idea to read through these rules at
least once so you get some idea of what you are doing. Once
you have done this, lay out the board and assemble the players.
The owner of the game always gets the first choice as to which
team he will play! Each coach will also need a Dugout, the
appropriate team card and a set of counters. Each coach should
place his or her Dugout behind one of the End Zones. This
shows which half of the pitch belongs to each team. You score a
touchdown by getting the ball into the opposing team’s End
Zone.
Each coach should place a Turn marker in the First Half square
on the turn track, and a Score counter in the Score track on the
board nearest their own End Zone. Finally, each coach should
refer to their team roster to see how many Re-roll counters their
team is entitled to, and should place that many counters on the
Re-roll track of the Dugout.
Flip the Blood Bowl coin or roll a D6 to see which coach will
choose who will set up first. The team that sets up first is called
the kicking team, because they will kick-off the ball. The other
team is called the receiving team, because they will receive the
kick-off. Each coach must set up 11 players, or if they can't field
11 then as many players as they have in Reserves, between
their end zone and the halfway line, and within the following
restrictions:
1. The kicking team always sets up first.
2. No more than two players may be set up in each wide zone
(i.e., a maximum of four players may be split wide, two on each
flank).
3. At least three players must be set up next to the half way line,
on the line of scrimmage.
If you cannot set up 3 players on the Line of Scrimmage you
must either concede the match (see page 15 (or page 29 if you
are using the Extra Rules)), or carry on playing by placing as
many players on the line of scrimmage as possible.
THE KICK-OFF
After both teams have set up, the coach of the kicking team
places the ball in any square in the opponent’s half of the pitch,
including the opponent’s End Zone if he likes. The ball will then
scatter in a random direction. Using the Scatter template, roll the
eight-sided dice once for the direction of scatter, and then roll a
D6 to see how many squares the ball will go.
Important note: The kick-off is the only time that you roll a D6
to see how many squares the ball moves when it scatters. This is
because kicks are very inaccurate. When rolling scatter for a
missed pass, or when the ball bounces, the ball only moves one
square per Scatter roll.
A kick-off must land in the opponent's half of the pitch. Assuming
the ball lands in the receiving team’s half of the pitch, then it will
either land in an empty square or a square occupied by a player.
If the ball lands in an empty square it will bounce one more
square (see Bouncing Balls on page 13). If the ball lands on a
square occupied by a player, the player must try to catch the ball
(see Catching the Ball on page 13). If the ball scatters or
bounces off the pitch or into the kicking team’s half, the receiving
coach is awarded a ‘touchback’ and must give the ball to any
player in his team. Once the kick-off has been taken you are
ready to proceed to the first turn of the game.
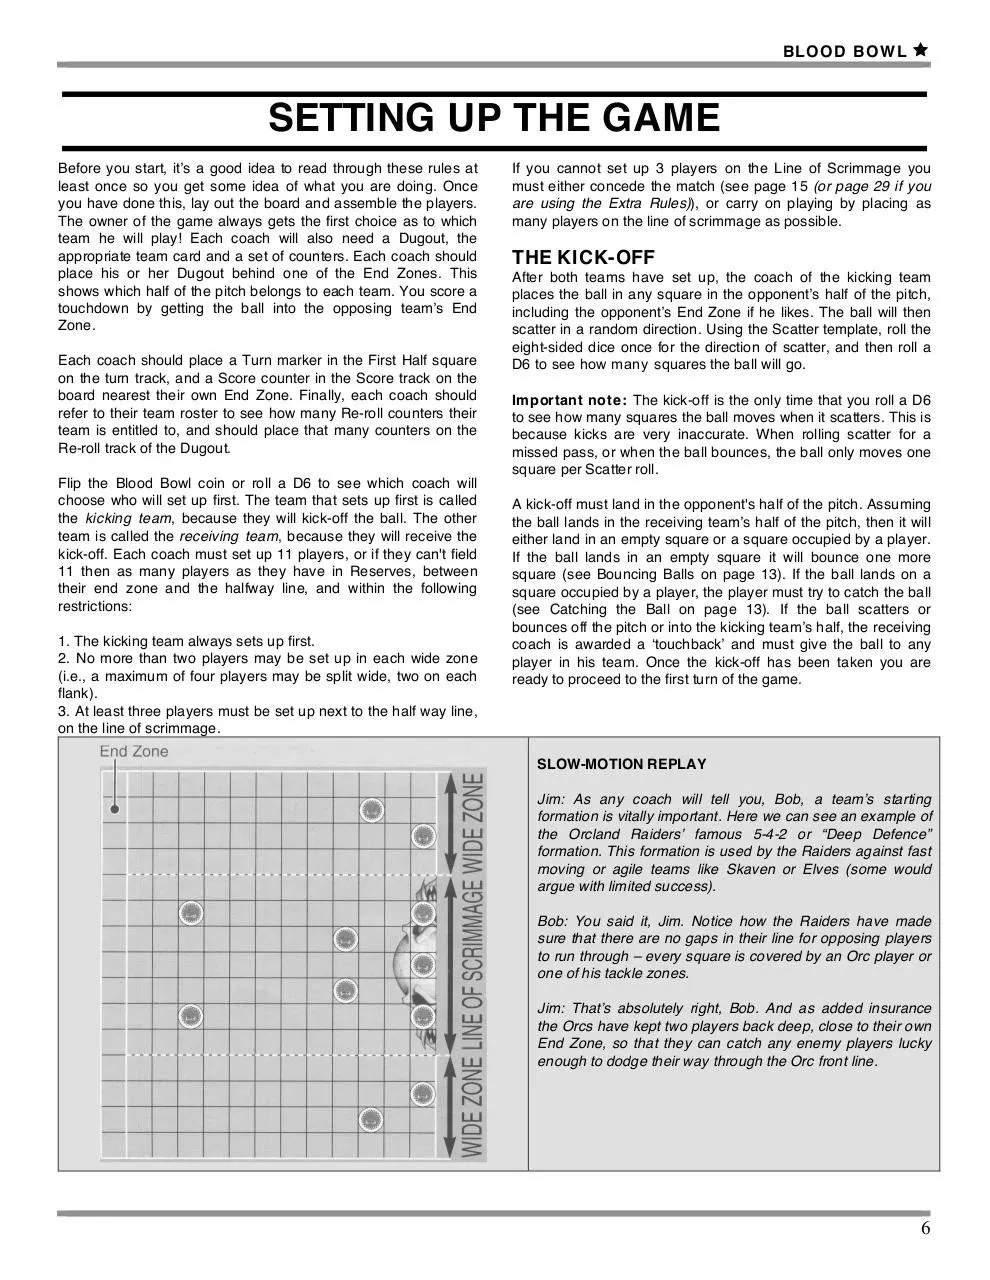
SLOW-MOTION REPLAY
Jim: As any coach will tell you, Bob, a teamʼs starting
formation is vitally important. Here we can see an example of
the Orcland Raidersʼ famous 5-4-2 or “Deep Defence”
formation. This formation is used by the Raiders against fast
moving or agile teams like Skaven or Elves (some would
argue with limited success).
Bob: You said it, Jim. Notice how the Raiders have made
sure that there are no gaps in their line for opposing players
to run through – every square is covered by an Orc player or
one of his tackle zones.
Jim: Thatʼs absolutely right, Bob. And as added insurance
the Orcs have kept two players back deep, close to their own
End Zone, so that they can catch any enemy players lucky
enough to dodge their way through the Orc front line.
6
BLOO D B O WL
THE SEQUENCE OF PLAY
Blood Bowl is split into two halves of sixteen turns each (i.e.,
eight turns per coach). At the end of the second half the team
with the most touchdowns is the winner. The game is played
using a simple but strict sequence of play, which runs as follows:
LIST OF ACTIONS
Move: The player may move a number of squares equal to their
Movement Allowance (MA) (including moving zero squares).
A. Receiving Team's Turn
B. Kicking Team's Turn
Block: The player may make a single block against a player in
an adjacent square. Players that are Prone may not perform this
Action.
Repeat A and B, one after the other, until the end of the drive.
NOTE: A drive is defined as playing until a touchdown is scored
or the half ends.
Blitz: The player may move a number of squares equal to their
MA. He may make one block during the move. The block may be
made at any point during the move, and ‘costs’ one square of
movement.
During a turn, the team in play may perform one Action with each
player in the team. A coach is only allowed four minutes to
complete his turn. The players on the other team may not take
any Actions until their own turn comes around.
IMPORTANT: This Action may not be declared by more than
one player per turn. However, any player may perform a Blitz –
the player doesn’t have to be a Blitzer (Blitzers are just better at
it than other players).
MOVING THE TURN MARKER
Pass: The player may move a number of squares equal to his
MA. At the end of the move the player may pass the ball.
Each coach is responsible for keeping track of how many turns
his team has used, and must move the Turn marker one space
along the track provided on his Dugout at the start of each and
every one of his turns. If he forgets to move the counter before
starting a play with one or more of his players, then the opposing
coach is allowed to call for an ‘illegal procedure’ penalty as soon
as he spots the mistake. A play is considered to be moving a
player one or more squares, standing up a player or rolling the
dice during your turn.
A coach who is called for an illegal procedure must either end his
turn or immediately lose one re-roll, which will count as the use
of a team re-roll for the turn if one has not already been used. If
the coach chooses to not end his turn and has no re-rolls left,
then the opposing coach gains a re-roll. If a coach forgets to
move the Turn marker, but rectifies his mistake before the
opposing coach spots the error, then he cannot be called for an
illegal procedure. If a coach incorrectly calls an illegal procedure
then he must lose a re-roll immediately, if he has no re-rolls
remaining his opponent gains a re-roll.
PLAYER ACTIONS
Each player in a team may perform one Action per turn. The
Actions that may be performed are described below. When all of
the players in a team have performed an Action then the turn
ends and the opposing coach is allowed to take a turn.
You must declare which Action a player is going to take before
carrying out the Action. For example, you might say, “This player
is going to take a Block Action.”
Players perform Actions one at a time. In other words, the coach
may perform an Action with one player, and then perform an
Action with another player, and so on. This carries on until all of
the players have performed an Action, or the coach does not
want to perform an Action with any more players. Note that a
player must finish his Action before another player can take one.
Each player may only perform one Action per turn. Only one Blitz
and one Pass Action may be taken in each turn. These Actions
must be taken by separate players; a player cannot perform a
Blitz Action and a Pass Action in the same turn.
IMPORTANT: This Action may not be declared by more than
one player per turn.
NOTE: The Extra Rules section adds two additional Actions:
Hand-off (see page 20) and Foul (see page 23). Neither of
these Actions may be declared by more than one player per turn.
TURNOVERS
Normally, a turn only ends when all of the players in the team
have performed an Action. However, certain events cause the
turn to end before all of the players have taken an Action. These
events are called turnovers. The following events cause a
turnover:
1. A player on the moving team is Knocked Down (being injured
by the crowd or being Placed Prone is not a turnover unless it is
a player from the active team holding the ball; e.g. skills like
Diving Tackle, Piling On and Wrestle count as being Placed
Prone) or
2. A passed ball, or hand-off, is not caught by any member of
the moving team before the ball comes to rest or
3. A player from the moving team attempts to pick up the ball
and fails (note: failing a catch roll, as opposed to a pick up, is by
itself never a turnover) or
4. A touchdown is scored or
5. The four-minute time limit for the turn runs out or
6. A pass attempt is fumbled even if a player from that team
catches the fumbled ball or
7. A player with the ball is thrown or is attempted to be thrown
using Throw Team-Mate and fails to land successfully (including
being eaten or squirming free from an Always Hungry roll) or
8. A player is ejected by the referee for a foul.
A coach that suffers a turnover is not allowed to take any further
Actions that turn, and any Action being taken ends immediately
even if it was only partially completed. Make armour and injury
rolls for players that were knocked down, and if the ball was
dropped then roll to see where it bounces to normally. Stunned
players should be turned face up, and then the opposing coach
may start to take his turn.
7
BLOO D B O WL
MOVEMENT
A player may move a number of squares equal to his Movement
Allowance. Players may move in any direction or combination of
directions, including diagonally, as long as they do not enter a
square that holds another player (from either team). Players do
not have to use up all of their Movement Allowance in their turn;
they don’t need to move at all if his coach does not want them to.
TACKLE ZONES
A standing player exerts individual tackle zones on each of the
eight adjacent squares, as shown in the diagram below. A player
who is Prone or Stunned does not exert any tackle zones.
AGILITY TABLE _______________________________
Player’s AG
D6 Roll Required
1
6+
2
5+
3
4+
4
3+
5
2+
6+
1+
Dodging Modifiers
Making a Dodge roll .................................... +1
Per opposing tackle zone on the square
that the player is dodging to ........................ –1
PI CKING UP THE BALL
If a player moves into a square in which the ball is lying, they
must attempt to pick it up, and – if they wish and are able – carry
on moving.
Players that move into the square with the ball at other times
(e.g., when pushed back, thrown by another player with Throw
Team-Mate, etc.) cannot pick up the ball, and instead it will
bounce one square. This does not cause a turnover. See
Bouncing Balls on page 13.
Look up the player’s Agility on the Agility table to find the score
required to successfully pick up the ball. Roll a D6, and add or
subtract any of the modifiers that apply to the D6 roll. A roll of 1
before modification ALWAYS fails and a roll of 6 before
modification ALWAYS succeeds for any Agility roll made
during a game.
In order to leave a square that is in one or more opposing tackle
zones, a player must dodge out of the square. The player only
has to dodge once in order to leave the square, no matter how
many opposing tackles zones are on it. Note that you must
always make a Dodge roll when you leave a tackle zone, even if
there aren’t any tackle zones on the square you are moving to
(see the slow-motion replay).
Look up the player’s Agility on the Agility table opposite to find
the score required to successfully dodge out of the square. For
example, if the player had an Agility of 3 he would need to roll a
4 or more to dodge out of the square. Roll a D6, and add or
subtract any of the modifiers that apply to the D6 roll. A roll of 1
before modification ALWAYS fails and a roll of 6 before
modification ALWAYS succeeds.
If the final modified score equals or beats the required roll, the
player may carry on moving (and dodging if required) until he
has used up his full Movement Allowance. If the D6 roll is less
than the required total, then the player is Knocked Down in the
square he was dodging to and a roll must be made to see if he
was injured (See Knock Downs & Injuries). If the player is
Knocked Down then his team suffers a turnover and their turn
ends immediately.
If the final modified score equals or beats the required roll, then
the player succeeds in picking up the ball. Place the ball on the
player’s base to show that he has picked it up and carry on with
the player’s turn. If the D6 roll is less than the required total, then
the player drops the ball, which will bounce one square. If the
player drops the ball then his team suffers a turnover and their
turn ends immediately.
AGILITY TABLE _______________________________
Player’s AG
D6 Roll Required
1
6+
2
5+
3
4+
4
3+
5
2+
6+
1+
Pick-up Modifiers
Picking up the ball ....................................... +1
Per opposing tackle zone on the player ...... –1
IMPORTANT: The Agility table is used to work out the success
or failure of a number of different Actions in Blood Bowl including
dodging, picking up the ball, and throwing or catching the ball to
name but a few. Each Action has its own set of modifiers, and it
is only these modifiers which apply to the D6 roll (i.e., do not use
any of the dodging modifiers when attempting to pick up the
ball).
8
BLOO D B O WL
SLOW-MOTION REPLAY
Jim: There goes Dieter Blunt, of the Reikland Reavers and it
looks to me, Bob, like heʼs going to try to move through the
tackle zones of two Orcland Raiders players! First he tries to
move to square 1. Dieter has an Agility of 3, which means that
he needs to roll a basic 4 or more to dodge successfully out of
the square. He gets a +1 to the roll for making a dodge, but has
to subtract 2 because there are two Orc tackle zones on the
square he is moving to, for a final modifier of -1. Dieter makes
the move – the crowd holds its breath – and the D6 roll is a 5,
which means that Dieter successfully dodges into the square!
Bob: Too right! Dieter moves to square 1 and decides to keep
on going to square 2. Dieter must still make a Dodge roll,
though there arenʼt any tackle zones on square 2, because he is
leaving the tackle zones on square 1. There are no tackle zones
on square 2, which means that Dieter gets a +1 modifier to his
D6 roll. OH NO! Dieter rolls a 1 and comes crashing down. Now
heʼs lying prone in square 2 after an unsuccessful armour roll,
and whatʼs more that causes a turnover for the Reavers, so itʼs
the Orcland Raiders to move next!
AGILITY
1
DODGING ROLL
6+
DODGING MODIFIERS
2
5+
3
4+
4
3+
5
2+
Making a dodge roll
Per enemy tackle zone on the square
that the player is dodging to
6+
1+
+1
-1
BLOCKS
Instead of moving, a player may throw a block at an opposing
player who is in an adjacent square. You may only make a block
against a standing player – you may not block a player who has
already been Knocked Down. A block is a very rough tackle,
designed to really stop an opponent in his tracks! To see if a
block works you will need to use the special Block dice included
with the game.
BLITZ MOVES
Once per turn a player on the moving team is allowed to make a
special Blitz move. A blitz allows the player to move and make a
block. The block may be made at any point during the move, but
costs one square of movement for the player to make. The
player may carry on moving after the effects of the block have
been worked out if he has any squares of movement left.
STRENGTH
The number of dice that are rolled depends on the strengths of
the two players involved. Obviously, if one player is stronger than
the other he is more likely to knock down their opponent when he
makes a block. To represent this, the number of Block dice that
are rolled varies depending on the relative strengths of the
players. However, no matter how many dice are rolled, only one
of them is ever used to decide the result of the block. The coach
of the stronger player chooses which of the dice is used.
If the players’ strengths are EQUAL, one dice is rolled.
If one player is STRONGER, two dice are rolled and the coach of
the stronger player may choose which one is used.
If one player is MORE THAN TWICE AS STRONG, three dice
are rolled and the coach of the stronger player may choose
which is used.
Note that the coach of the player making the block always rolls
the dice, but that the coach of the stronger player may choose
which is used.
NOTE: Extra rules on page 21 allow players not involved in the
block to assist the blocking players which can alter the number of
dice rolled.
9
BLOO D B O WL
The Result
Roll the appropriate number of dice and look up the result on the
table below. On the table, the player making the block is referred
to as the attacker, while his target is the defender.
Symbol
Result
ATTACKER DOWN: The attacking player is
Knocked Down.
BOTH DOWN: Both players are Knocked Down,
unless one or both of the players involved has the
Block skill. If one player uses the Block skill then
he is not Knocked Down by this result, though his
opponent will still go down. If both the players use
the Block skill then neither player is Knocked
Down.
PUSHED: The defending player is pushed back
one square by the blocking player. The attacking
player may follow up the defender.
DEFENDER STUMBLES: Unless the defender
uses the Dodge skill he is pushed back and then
Knocked Down. If he does use the Dodge skill
then he is only pushed back. The attacking player
may follow up the defender.
DEFENDER DOWN: The defending player is
pushed back and then Knocked Down in the
square they are moved to. The attacking player
may follow up the defender.
SLOW-MOTION REPLAY
Jim: And there goes Skurf Limbrender, the Orcland Raidersʼ
star Black Orc Blocker. Heʼs just blitzed down the pitch and
now heʼs going to throw a block at Jacob von Altdorf, the
Reaversʼ Thrower. Skurfʼs got a Strength of 4, compared to
Jacobʼs 3, which means that Skurf can roll two Block dice
and choose which one he will use. He rolls a
(Attacker
Down) and a
(Defender Down), and uses the ʻDefender
Downʼ result to smash Jacob back a square and knock him
flat on his back in the mud – KERRUNCH!
Push Backs: A player that is pushed back as a result of a block
must be moved one square away from the player making the
block, as shown in the diagrams. The coach of the player who
made the block may decide which square the player is moved to.
The player must be pushed back into an empty square if
possible. A square containing only the ball is considered empty
and a player pushed to it will cause the ball to bounce (see page
13). If all such squares are occupied by other players, then the
player is pushed into an occupied square, and the player that
originally occupied the square is pushed back in turn. This
secondary push back is treated exactly like a normal push back
as if the second player had been blocked by the first (prone and
stunned players may be pushed this way as well.). The coach of
the moving team decides all push back directions for secondary
push backs unless the pushed player has a skill that overrides
this.
Players must be pushed off the pitch if there are no eligible
empty squares on the pitch. A player pushed off the pitch, even if
Knocked Down, is beaten up only by the crowd and receives one
roll on the Injury table (see Injuries, opposite). The crowd does
not have any injury modifying skills.
Note that no Armour roll is made for a player that is pushed off
the pitch, they are automatically injured. If a ‘Stunned’ result is
rolled on the Injury table the player should be placed in the
Reserves box of the Dugout, and must remain there until a
touchdown is scored or the half ends. If the player who is holding
the ball is pushed out of bounds, then he is beaten up by the
fans, who are more than happy to throw the ball back into play!
The Throw-in template is centred on the last square the player
was in before he was pushed off the pitch.
The shaded squares in the diagrams above show the
squares a player can be pushed back into.
Knock Downs: A player that is Knocked Down should be placed
on their side in the square, face up. The player may be injured
(see Injuries, page 11). If the player who is Knocked Down
comes from the moving team, then this caused a turnover and
the moving team's turn ends immediately!
PLAYERS’ STRENGTHS
Both players equal strength
One player stronger
One player more than twice as
strong
ROLL:
One Block Dice
Two Block Dice*
Three Block Dice*
*The coach of the stronger player picks which Block dice is used.
Follow Up Moves: A player who has made a block is allowed to
make a special follow up move and occupy a square vacated by
the player that he has pushed back. The player’s coach must
decide whether to follow up before any other dice rolls are made.
This move is free, and the player can ignore enemy tackle zones
when he makes the move (i.e., he does not have to dodge to
enter the square). A player that is blitzing is allowed to make a
follow up move, and the move does not cost him any additional
movement (as he paid a square in order to make the block, he
has effectively already paid for the move).
10
BLOO D B O WL
KNOCK DOWNS & INJURIES
Players that are Knocked Down or Placed Prone for any reason
should be placed face up on the pitch in the square they were in
when they fell over. While Prone, the player loses his tackle
zones and may do nothing before standing up at a cost of three
squares of his movement when he next takes an Action. Players
may stand up in an opposing player’s tackle zone without having
to make a Dodge roll (they will have to dodge if they
subsequently leave). Note that a player who stands up may not
take a Block Action, because you may not move when you take
a Block Action. The player may take any Action other than a
Block Action.
2D6
2-7
8-9
If a player carrying the ball is Knocked Down or Placed Prone,
he will drop the ball in the square where he falls. The dropped
ball will bounce one square in a random direction (see Bouncing
Balls, page 13) after the player’s armour and injury rolls (if any)
are fully resolved.
10-12
Left: Player on his side, lying face up (Prone). Right: Standing player.
INJURY TABLE
Result
Stunned – Leave the player on the pitch, but
turn him face-down. All face-down players are
turned face up at the end of their team's next
turn, even if a turnover takes place. Note that a
player may not turn face up on the turn he is
Stunned. Once face-up he may stand up on any
subsequent turn using the normal rules.
KO’d – Take the player off the pitch and place
him in the Dugout in the KO’d Players box. At
the next kick-off, before you set up any players,
roll for each of your players that have been
KO’d. On a roll of 1-3 he must remain in the
KO’d box and may not be used, although you
may roll again for him at the next kick-off. On a
roll of 4-6 you must return the player to the
Reserves box and can use him as normal from
now on.
Casualty – Take the player off the pitch and
place him in the Dugout in the Dead & Injured
Players box. The player must miss the rest of
the match. In league play roll on the Casualty
table (see page 25) to see exactly what has
happened to the player.
INJURIES
Unless the rules state otherwise, any player that is Knocked
Down may be injured. The opposing coach rolls two D6 and
adds their scores together in an attempt to try to beat the
Knocked Down player’s Armour value. If the roll succeeds, then
the opposing coach is allowed to roll on the Injury table in the
next column to see what injury the player has suffered.
STANDING UP
The only time a player can stand up is at the beginning of an
Action at a cost of three squares from his movement. If the
player has less than three squares of movement, he must roll 4+
to stand up - if he stands up successfully, he may not move
further squares unless he Goes For It (see Extra Rules page 20).
Failure to stand successfully for any reason is not a turnover.
SUBSTITUTES
A coach may not substitute fit players for injured players or
players that have been sent off while a drive is in progress. The
only time that a coach may add reserves is when setting up after
a touchdown has been scored, or when setting up after half time
or for overtime.
11
BLOO D B O WL
THROWING THE BALL
Once per turn a player on the moving team is allowed to make a
Pass Action. The player is allowed to make a normal move, and
after he has completed the move he may throw the ball even if
the receiver is in an adjacent square. Note that the player does
not have to be holding the ball at the start of the Action; he could
use his move to run over and pick up a ball on the ground and
then throw it, for example.
THROWING
First of all, the coach must declare that the player is taking a
Pass Action. The player can throw the ball to another player in
his own team (or another player in the opposing team if he really
wants to), or simply to an empty square, though obviously the
first of these options will be the most useful – and may keep him
from being attacked by his own team members! The ball may
only be passed once per turn.
Next, the coach must measure the range using the range ruler,
by placing the O at on end over the centre of the square of the
player throwing the ball, and the red line that runs up the centre
of the ruler over the centre of the square the ball is being thrown
to. If the line between two passing ranges crosses any part of the
receiving player’s square, the higher range should be used. It is
perfectly acceptable to pre-measure the range to several players
at any point during the throwing player's move before you
declare the target of the pass. Once you have thrown the ball,
however, you may not move the throwing player any farther that
turn, even if he has spare MA left.
Look up the player’s Agility on the Agility table to find the score
required to successfully pass the ball. Roll a D6, and add or
subtract any of the modifiers that apply to the D6 roll. A roll of 1
before modification always fails and a roll of 6 before
modification always succeeds.
If the final modified score equals or beats the required roll, the
pass is accurate and lands in the target square. If the D6 roll is
less than the required total, then the pass is not accurate and will
scatter. Roll for scatter three times, one after the other, to see
where the ball ends up. Note that each of the Scatter rolls is
made separately, so it is possible for the ball to end up back in
the target square (though it will be harder to catch). The ball can
only be caught in the final square where it ends up – if it scatters
through a player’s square then the player is not allowed to try
and catch the ball.
NOTE: Extra rules on page 22 allow for throwers to fumble the
pass and for opponents to attempt pass interceptions.
SLOW-MOTION REPLAY
Bob: And thereʼs Grishnak Goblin-Throttler for the Orcland Raiders, who
has an Agility of 3 and is attempting to throw the ball four squares to
Urgash Axebiter. The range ruler shows that this falls just on the
boundary between a Quick and a Short Pass, so the longer of the two
ranges must be used.
Jim: Thatʼs right, Bob. Grishnakʼs Agility of 3 means that he must roll a 4
or more to be on target. No modifiers apply to the D6 roll because
Grishnak is not in any tackle zones, and the modifier for a Short Pass is
+0. Grishnakʼs arm goes back and he throws a 6. Look at that ball go,
bam!, right on target!! Now all Axebiter has to do is catch it...
Bob: You said it, Jim. Itʼs an accurate pass so Urgash gets a +1 to his D6
roll, but thereʼs Griff Oberwald next to him, so his chances of catching
suffers a -1 modifier, which means that Urgash needs a 4+ to catch the
ball. The crowd goes quiet as the dice are rolled. A 3 – heʼs dropped it,
and the ball bounces away one square.
Jim: And if I can just butt in here, Bob, that missed pass causes a
turnover, which ends the Orcland Raidersʼ turn...
AGILITY
1
PASSING ROLL
6+
PASSING MODIFIERS
2
5+
3
4+
4
3+
5
2+
6+
1+
AGILITY
1
CATCHING ROLL
6+
CATCHING MODIFIERS
Throwing a Quick Pass
+1
Catching an accurate pass
Throwing a Short Pass
+0
Throwing a Long Pass
-1
Catching a scattered pass,
bouncing ball or throw-in
Throwing a Long Bomb
-2
Per enemy tackle zone
on the player throwing the ball
-1
2
5+
3
4+
4
3+
5
2+
6+
1+
+1
+0
Per enemy tackle zone
on the player catching the ball
-1
12
BLOO D B O WL
AGILITY TABLE ________________________________
Player’s AG
D6 Roll Required
1
6+
2
5+
3
4+
4
3+
5
2+
6+
1+
Passing Modifiers
Throwing a Quick Pass ............................... +1
Throwing a Short Pass................................ +0
Throwing a Long Pass.................................. -1
Throwing a Long Bomb ............................... -2
Per opposing tackle zone on the player ...... -1
CATCHING THE BALL
If the ball lands in a square occupied by a standing player, then
the player must attempt to catch the ball. Prone and Stunned
players may never attempt to catch the ball. Either team’s
players may attempt to catch the ball (if a player from the other
team manages to catch the ball he can yell and jump around a
lot).
Look up the player’s Agility on the Agility table to find the score
required to successfully catch the ball. Roll a D6, and add or
subtract any of the modifiers that apply to the D6 roll. A roll of 1
before modification always fails and a roll of 6 before
modification always succeeds.
If the final modified score equals or beats the required roll, then
the player succeeds in catching the ball. Place the ball on the
player’s base to show that he has caught it and carry on with the
turn. If the player who caught the ball has not taken an Action
yet, he may do so as normal. If the D6 roll is less than the
required total, then the player drops the ball and it will bounce
(see Bouncing Balls, below).
THROW-INS
When a ball scatters or bounces off the pitch it is immediately
thrown back in by the eager spectators! Use the Throw-in
template to work out where the ball goes, using the last square
the ball crossed before going off as a starting point (see page 3
for how the Throw-in template is used to throw-in the ball 2d6
squares). If the ball is thrown into a square occupied by a
standing player, that player must attempt to catch the ball as
described earlier. If the ball lands in an empty square or a square
occupied by a Prone or Stunned player, then it will bounce. If a
throw-in results in the ball going off the pitch again, it will be
thrown in again, centred on the last square it was in before it left
the pitch. Throw-ins cannot be intercepted.
TURNOVERS
If a ball thrown by a player isn’t caught by a player from the
moving team, this causes a turnover and the moving team’s turn
ends. The turnover does not take place until the ball finally
comes to rest. This means that if the ball misses the target but is
still caught by a player from the moving team, then a turnover
does not take place. The ball could even scatter or bounce out of
bounds, be thrown back into an empty square, and as long as it
was caught by a player from the moving team then the turnover
would be avoided!
AGILITY TABLE ________________________________
Player’s AG
D6 Roll Required
1
6+
2
5+
3
4+
4
3+
5
2+
6+
1+
Catching Modifiers
Catching an accurate pass.......................... +1
Catching a missed pass, kick-off,
bouncing ball or throw-in............................. +0
Per opposing tackle zone on the player ...... –1
BOUNCING BALLS
If the ball is dropped or not caught, or the ball bounces to a
square with a Prone or Stunned player, or a player is pushed to
or lands in the ball’s square, or the square where a thrown ball
lands is unoccupied (or is occupied by a Prone or Stunned
player) then it will bounce. This is a technical term for the thing
jumping about all over the place while the players stumble about
trying to grab it! To find out where the ball bounces to, roll for
scatter one more time. If the ball bounces into an occupied
square, then the player in the square must attempt to catch it, as
described above. If the player fails to catch the ball, then it will
bounce again until it is either caught or bounces into an empty
square or off the pitch.
13
Download Blood Bowl Competition Rules Pack
Blood Bowl Competition Rules Pack.pdf (PDF, 5.33 MB)
Download PDF
Share this file on social networks
Link to this page
Permanent link
Use the permanent link to the download page to share your document on Facebook, Twitter, LinkedIn, or directly with a contact by e-Mail, Messenger, Whatsapp, Line..
Short link
Use the short link to share your document on Twitter or by text message (SMS)
HTML Code
Copy the following HTML code to share your document on a Website or Blog
QR Code to this page

This file has been shared publicly by a user of PDF Archive.
Document ID: 0000323666.