HIOKI 3030 10 ENG (PDF)
File information
Title: 3030-10 HiTESTER
Author: HIOKI
This PDF 1.6 document has been generated by / Acrobat Distiller 4.05 for Macintosh, and has been sent on pdf-archive.com on 24/12/2015 at 15:39, from IP address 5.18.x.x.
The current document download page has been viewed 685 times.
File size: 925.37 KB (4 pages).
Privacy: public file


File preview
3030-10 HiTESTER
Field Measuring Instruments
Tough and Reliable multimeter
Only from
p
o
r
D roof!
p
!
e
f
Sa
o
t
y
s
Ea se !
u
Rugged and easy to use, this meter can withstand a 1 meter
drop onto a concrete floor. The 3030-10 has enhanced safety
features and complies with a wide range of safety standards.
HIOKI has long experience in the analog tester market, and
now brings to it enhanced safety and usability.
e
ith thds:
w
s
e
ar
pli
Com ing stand
follow
0
1
0
1
IEC C
EM
60 years of Technology and Reliability
● Drop-proof design allows meter to
withstand a 1m drop onto a concrete
floor.
● Protected against transient voltages up
to 250 V AC, preventing electric shock
accidents before they can happen
The internal circuit protects the resistance and milliamp
ranges against transient voltages up to 250 V AC,
preventing electric shock accidents before they can
happen. Even in the event of an internal short-circuit, a
current-limiting resistor is provided, to restrict shortcircuit currents.
● LED check function
Visual check function available to confirm the LED light
emission.
● Battery check function
Battery level can be checked even when a real load is
applied.
● Temperature measurement support (with
optional probes)
● CE marking
Assured for safe use by anyone, anywhere in the world.
Carrying handle of the supplied
case becomes a stand.
■Specification
Item
Max. scale reading
Tolerance
DC voltage
0.3/3/12/30/120/
300/600V
Notes
±2.5% of full scale 20 kΩ (16.7 kΩ in
0.3 V range)
AC voltage
12/30/120/300/
600V
±2.5% of full scale
9 kΩ/V
(12 V ±4%)
DC current
60µ/30/300mA
±3% of full scale
Internal voltage drop
300 mV
Resistance
3k/30k/300k/3MΩ
±3% of scale length
Internal voltage 3 V
Temperature −50 ∼ 150˚C
scale
±3% of scale length
With optional temperature
measurement probes
Battery check 0.9 ∼ 1.8V
±6% of scale length
Load resistance 10 Ω
LED check
Yes
Safety
standards
IEC 61010, CAT III 600V
Batteries
R6P/AA × 2
Dimensions
95(W) × 141(H) × 39(D) , approx. 280g
3030-10 HiTESTER
(Supplied with 9207 test leads and 9390 carrying case)
Options
9021-01 Thermister Temperature Probe
* 9005-01 Clamp on Probe
* 9017
High-Voltage Probe
*
These products are not CE-marked.
9021-01
Notes on measuring power line.
DANGER
Accessories 9207 Test Leads (1 set); 9390 Carrying Case (1)
Before taking a measurement, check the position of the range switch. Do not measure
voltage outside the set voltage range or voltage at levels in excess of the measurement
limit. Doing so may damage the unit or cause an accident resulting in injury or death.
Do not input voltage to the current measurement, resistance measurement, and battery test
ranges. Doing so may damage the unit or cause an accident resulting in injury or death.
NOTE: Protective system: The Ω and mA ranges are protected up to 250 VAC
commercial power input and Meter overload protection.
РАДАР - ОФИЦИАЛЬНЫЙ ДИЛЕР HIOKI
HEAD OFFICE :
81 Koizumi, Ueda, Nagano, 386-1192, Japan
TEL +81-268-28-0562 / FAX +81-268-28-0568
E-mail: os-com@ hioki.co.jp
HIOKI USA CORPORATION :
6 Corporate Drive, Cranbury, NJ 08512 USA
TEL +1-609-409-9109 / FAX +1-609-409-9108
E-mail: hioki@ hiokiusa.com
Shanghai Representative Office :
1704 Shanghai Times Square Office
93 Huaihai Zhong Road
Shanghai, 200021, P.R.China
TEL +86-21-6391-0090, 0092
FAX +86-21-6391-0360
E-mail: info@hioki.cn
All information correct as of May. 20, 2004. All specifications are subject to change without notice.
РОССИЯ, 198152, Санкт-Петербург
Краснопутиловская ул., д.25
Тел./факс +7 (812) 600-48-89
Тел.: +7 (812) 375-32-44
www.radar1.ru
303010E3-45M-03K Printed in Japan
info@radar1.ru
3030-10
Use of a measurement instrument that is not CAT-rated in CAT
II to CAT IV measurement applications could result in a severe
accident, and must be carefully avoided.
CAUTION
HiTESTER
Instruction Manual
April 2015 Revised edition 14
Printed in Japan
3030E981-14 15-04H
This manual contains information and warnings essential for safe
operation of the instrument and for maintaining it in safe operating
condition. Before using it, be sure to carefully read the following safety
precautions.
Safety symbols
The
symbol printed on the instrument indicates that the
user should refer to a corresponding topic in the manual
(marked with the
symbol) before using the relevant
function.
In the manual, the
symbol indicates particularly important
information that the user should read before using the
instrument.
Indicates a grounding terminal.
Indicates a double-insulated device.
Indicates DC (Direct Current).
Indicates AC (Alternating Current).
The following symbols in this manual indicate the relative importance of
cautions and warnings.
Warranty
Warranty malfunctions occurring under conditions of normal
use in conformity with the Instruction Manual and Product
Precautionary Markings will be repaired free of charge. This
warranty is valid for a period of three (3) years from the date of
purchase. Please contact the distributor from which you
purchased the product for further information on warranty
provisions.
Introduction
Thank you for purchasing the HIOKI 3030-10 HiTESTER. To
obtain maximum performance from the instrument, please read
this manual first, and keep it handy for future reference.
60014966B
Safety
DANGER
This instrument is designed to comply with IEC 61010
Safety Standards, and has been thoroughly tested for safety
prior to shipment. However, mishandling during use could
result in injury or death, as well as damage to the
instrument. Be certain that you understand the instructions
and precautions in the manual before use. We disclaim any
responsibility for accidents or injuries not resulting directly
from instrument defects.
Measurement categories
This instrument complies with CAT III safety requirements.
To ensure safe operation of measurement instruments, IEC
61010 establishes safety standards for various electrical
environments, categorized as CAT III to CAT IV, and called
measurement categories..
CAT II: Primary electrical circuits in equipment connected to
an AC electrical outlet by a power cord (portable tools,
household appliances, etc.
CAT II covers directly measuring electrical outlet
receptacles.
CAT III: Primary electrical circuits of heavy equipment (fixed
installations) connected directly to the distribution
panel, and feeders from the distribution panel to
outlets.
CAT IV: The circuit from the service drop to the service
entrance, and to the power meter and primary
overcurrent protection device (distribution panel).
Using a measurement instrument in an environment designated
with a higher-numbered category than that for which the
instrument is rated could result in a severe accident, and must
be carefully avoided.
WARNING
To prevent electric shock, do not allow the instrument to
become wet and do not use the instrument when your
hands are wet.
DANGER
WARNING
Indicates that incorrect operation presents an
extreme hazard that could result in serious injury or
death to the user.
Indicates that incorrect operation presents a
significant hazard that could result in serious injury or
death to the user.
CAUTION
Indicates that incorrect operation presents a
possibility of injury to the user or damage to the
instrument.
NOTE
Indicates advisory items related to performance or
correct operation of the instrument.
Inspection
When you receive the instrument, inspect it carefully to ensure that no
damage occurred during shipping. If damage is evident, or if it fails to
operate according to the specifications, contact your dealer or Hioki
representative.
Precautions
DANGER
Observe the following precautions to avoid electric shock.
Always verify the appropriate setting of the range selector
switch before connecting the test leads. Disconnect the
test leads from the measurement object before switching
the range selector switch.
Before taking a measurement, check the position of the
range switch. Do not measure voltage outside the set
voltage range or voltage at levels in excess of the
measurement limit. Doing so may damage the instrument
or cause an accident resulting in injury or death.
Do not input voltage to the current measurement,
resistance measurement, and battery test ranges. Doing
so may damage the instrument or cause an accident
resulting in injury or death.
NOTE: The built-in fuse prevents a short-circuit in a power
line resulting from a malfunction or misuse of the
instrument. However, this built-in fuse protection is
effective for up to 250 VAC commercial power
input.
If the end of a test lead short-circuits lines with a voltage
between them, this is very dangerous and can lead to a serious
accident. Exercise great care when measuring voltage.
If the protective functions of the instrument are damaged,
either remove the instrument from service or post warnings
to prevent others from using the instrument inadvertently.
Note that the instrument may be damaged if voltage or
current in excess of the measurement range is input.
Do not store or use the instrument where it will be exposed
to direct sunlight, high temperatures, high humidity, or
condensation. If exposed to such conditions, the instrument
may be damaged, the insulation may deteriorate, and the
instrument may no longer satisfy its specifications.
After use, always turn OFF the power.
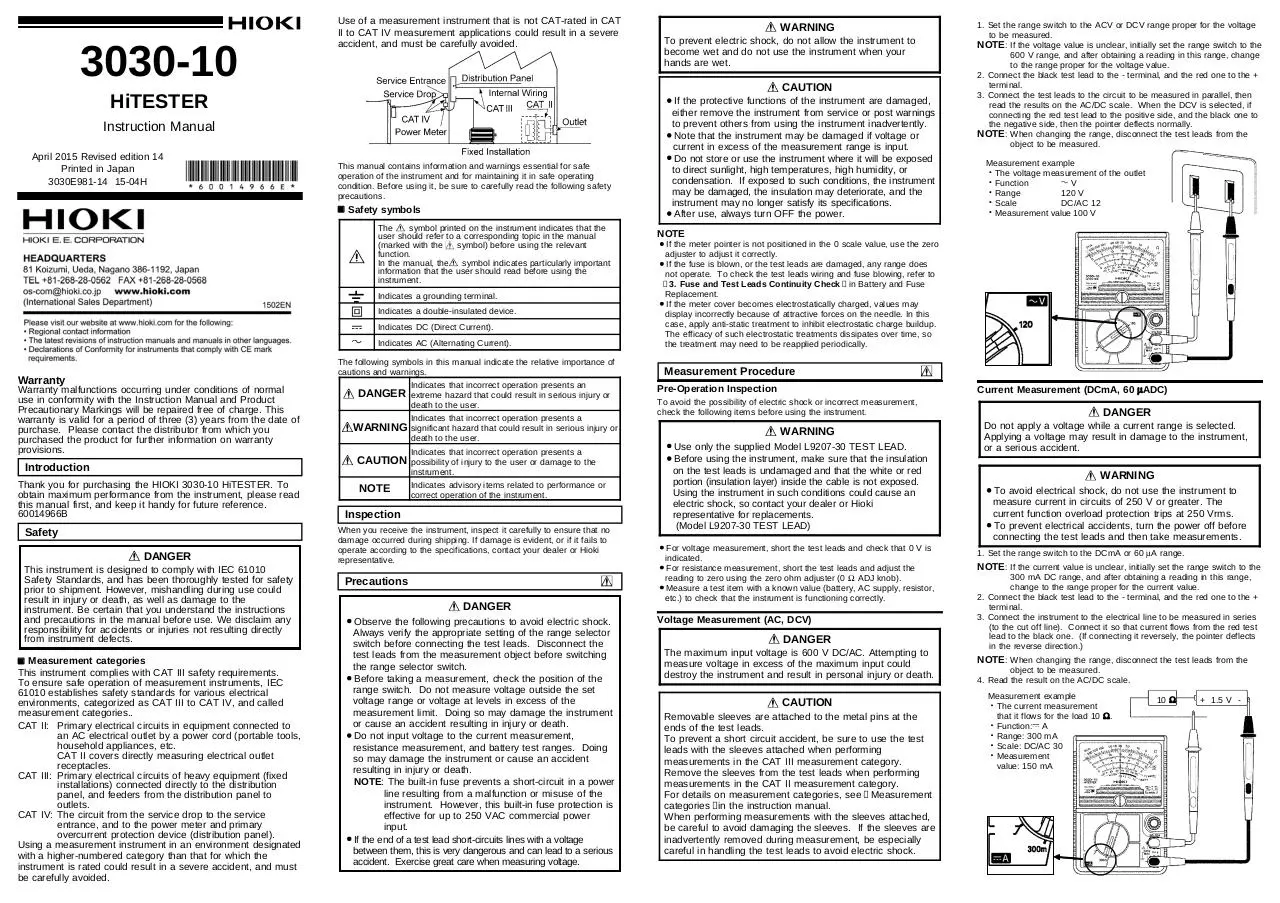
1. Set the range switch to the ACV or DCV range proper for the voltage
to be measured.
NOTE: If the voltage value is unclear, initially set the range switch to the
600 V range, and after obtaining a reading in this range, change
to the range proper for the voltage value.
2. Connect the black test lead to the - terminal, and the red one to the +
terminal.
3. Connect the test leads to the circuit to be measured in parallel, then
read the results on the AC/DC scale. When the DCV is selected, if
connecting the red test lead to the positive side, and the black one to
the negative side, then the pointer deflects normally.
NOTE: When changing the range, disconnect the test leads from the
object to be measured.
Measurement example
The voltage measurement of the outlet
Function
V
Range
120 V
Scale
DC/AC 12
Measurement value 100 V
NOTE
If the meter pointer is not positioned in the 0 scale value, use the zero
adjuster to adjust it correctly.
If the fuse is blown, or the test leads are damaged, any range does
not operate. To check the test leads wiring and fuse blowing, refer to
“3. Fuse and Test Leads Continuity Check”in Battery and Fuse
Replacement.
If the meter cover becomes electrostatically charged, values may
display incorrectly because of attractive forces on the needle. In this
case, apply anti-static treatment to inhibit electrostatic charge buildup.
The efficacy of such electrostatic treatments dissipates over time, so
the treatment may need to be reapplied periodically.
Measurement Procedure
Current Measurement (DCmA, 60 μADC)
Pre-Operation Inspection
To avoid the possibility of electric shock or incorrect measurement,
check the following items before using the instrument.
WARNING
Use only the supplied Model L9207-30 TEST LEAD.
Before using the instrument, make sure that the insulation
on the test leads is undamaged and that the white or red
portion (insulation layer) inside the cable is not exposed.
Using the instrument in such conditions could cause an
electric shock, so contact your dealer or Hioki
representative for replacements.
(Model L9207-30 TEST LEAD)
For voltage measurement, short the test leads and check that 0 V is
indicated.
For resistance measurement, short the test leads and adjust the
reading to zero using the zero ohm adjuster (0 Ω ADJ knob).
Measure a test item with a known value (battery, AC supply, resistor,
etc.) to check that the instrument is functioning correctly.
Voltage Measurement (AC, DCV)
DANGER
The maximum input voltage is 600 V DC/AC. Attempting to
measure voltage in excess of the maximum input could
destroy the instrument and result in personal injury or death.
CAUTION
Removable sleeves are attached to the metal pins at the
ends of the test leads.
To prevent a short circuit accident, be sure to use the test
leads with the sleeves attached when performing
measurements in the CAT III measurement category.
Remove the sleeves from the test leads when performing
measurements in the CAT II measurement category.
For details on measurement categories, see“Measurement
categories”in the instruction manual.
When performing measurements with the sleeves attached,
be careful to avoid damaging the sleeves. If the sleeves are
inadvertently removed during measurement, be especially
careful in handling the test leads to avoid electric shock.
DANGER
Do not apply a voltage while a current range is selected.
Applying a voltage may result in damage to the instrument,
or a serious accident.
WARNING
To avoid electrical shock, do not use the instrument to
measure current in circuits of 250 V or greater. The
current function overload protection trips at 250 Vrms.
To prevent electrical accidents, turn the power off before
connecting the test leads and then take measurements.
1. Set the range switch to the DCmA or 60 μA range.
NOTE: If the current value is unclear, initially set the range switch to the
300 mA DC range, and after obtaining a reading in this range,
change to the range proper for the current value.
2. Connect the black test lead to the - terminal, and the red one to the +
terminal.
3. Connect the instrument to the electrical line to be measured in series
(to the cut off line). Connect it so that current flows from the red test
lead to the black one. (If connecting it reversely, the pointer deflects
in the reverse direction.)
NOTE: When changing the range, disconnect the test leads from the
object to be measured.
4. Read the result on the AC/DC scale.
Measurement example
The current measurement
that it flows for the load 10 Ω.
Function: A
Range: 300 mA
Scale: DC/AC 30
Measurement
value: 150 mA
10 Ω
+ 1.5 V -
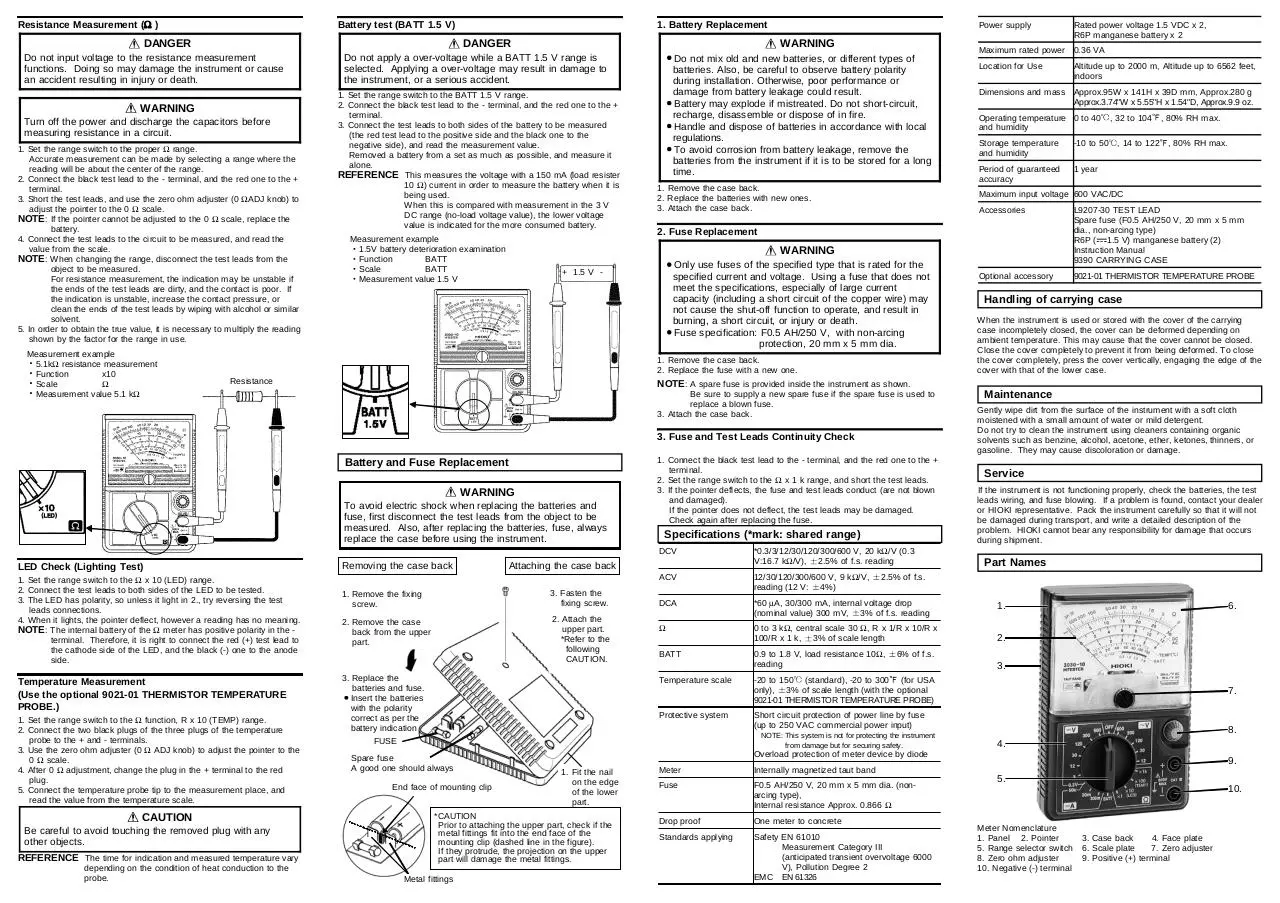
Resistance Measurement (Ω )
Battery test (BATT 1.5 V)
DANGER
DANGER
Do not input voltage to the resistance measurement
functions. Doing so may damage the instrument or cause
an accident resulting in injury or death.
WARNING
Turn off the power and discharge the capacitors before
measuring resistance in a circuit.
1. Set the range switch to the proper Ω range.
Accurate measurement can be made by selecting a range where the
reading will be about the center of the range.
2. Connect the black test lead to the - terminal, and the red one to the +
terminal.
3. Short the test leads, and use the zero ohm adjuster (0 ΩADJ knob) to
adjust the pointer to the 0 Ω scale.
NOTE: If the pointer cannot be adjusted to the 0 Ω scale, replace the
battery.
4. Connect the test leads to the circuit to be measured, and read the
value from the scale.
NOTE: When changing the range, disconnect the test leads from the
object to be measured.
For resistance measurement, the indication may be unstable if
the ends of the test leads are dirty, and the contact is poor. If
the indication is unstable, increase the contact pressure, or
clean the ends of the test leads by wiping with alcohol or similar
solvent.
5. In order to obtain the true value, it is necessary to multiply the reading
shown by the factor for the range in use.
Measurement example
5.1kΩ resistance measurement
Function
x10
Scale
Ω
Measurement value 5.1 kΩ
1. Battery Replacement
WARNING
Do not apply a over-voltage while a BATT 1.5 V range is
selected. Applying a over-voltage may result in damage to
the instrument, or a serious accident.
1. Set the range switch to the BATT 1.5 V range.
2. Connect the black test lead to the - terminal, and the red one to the +
terminal.
3. Connect the test leads to both sides of the battery to be measured
(the red test lead to the positive side and the black one to the
negative side), and read the measurement value.
Removed a battery from a set as much as possible, and measure it
alone.
REFERENCE This measures the voltage with a 150 mA (load resister
10 Ω) current in order to measure the battery when it is
being used.
When this is compared with measurement in the 3 V
DC range (no-load voltage value), the lower voltage
value is indicated for the more consumed battery.
Measurement example
1.5V battery deterioration examination
Function
BATT
Scale
BATT
Measurement value 1.5 V
Do not mix old and new batteries, or different types of
batteries. Also, be careful to observe battery polarity
during installation. Otherwise, poor performance or
damage from battery leakage could result.
Battery may explode if mistreated. Do not short-circuit,
recharge, disassemble or dispose of in fire.
Handle and dispose of batteries in accordance with local
regulations.
To avoid corrosion from battery leakage, remove the
batteries from the instrument if it is to be stored for a long
time.
1. Remove the case back.
2. Replace the batteries with new ones.
3. Attach the case back.
Only use fuses of the specified type that is rated for the
specified current and voltage. Using a fuse that does not
meet the specifications, especially of large current
capacity (including a short circuit of the copper wire) may
not cause the shut-off function to operate, and result in
burning, a short circuit, or injury or death.
Fuse specification: F0.5 AH/250 V, with non-arcing
protection, 20 mm x 5 mm dia.
+ 1.5 V -
Be sure to supply a new spare fuse if the spare fuse is used to
replace a blown fuse.
3. Attach the case back.
WARNING
To avoid electric shock when replacing the batteries and
fuse, first disconnect the test leads from the object to be
measured. Also, after replacing the batteries, fuse, always
replace the case before using the instrument.
CAUTION
Be careful to avoid touching the removed plug with any
other objects.
REFERENCE The time for indication and measured temperature vary
depending on the condition of heat conduction to the
probe.
Altitude up to 2000 m, Altitude up to 6562 feet,
indoors
Dimensions and mass Approx.95W x 141H x 39D mm, Approx.280 g
Approx.3.74"W x 5.55"H x 1.54"D, Approx.9.9 oz.
Operating temperature 0 to 40
and humidity
Storage temperature
and humidity
-10 to 50
Period of guaranteed
accuracy
1 year
, 32 to 104
, 14 to 122
, 80% RH max.
, 80% RH max.
Accessories
L9207-30 TEST LEAD
Spare fuse (F0.5 AH/250 V, 20 mm x 5 mm
dia., non-arcing type)
R6P ( 1.5 V) manganese battery (2)
Instruction Manual
9390 CARRYING CASE
Optional accessory
9021-01 THERMISTOR TEMPERATURE PROBE
Handling of carrying case
When the instrument is used or stored with the cover of the carrying
case incompletely closed, the cover can be deformed depending on
ambient temperature. This may cause that the cover cannot be closed.
Close the cover completely to prevent it from being deformed. To close
the cover completely, press the cover vertically, engaging the edge of the
cover with that of the lower case.
NOTE: A spare fuse is provided inside the instrument as shown.
Battery and Fuse Replacement
1. Set the range switch to the Ω function, R x 10 (TEMP) range.
2. Connect the two black plugs of the three plugs of the temperature
probe to the + and - terminals.
3. Use the zero ohm adjuster (0 Ω ADJ knob) to adjust the pointer to the
0 Ω scale.
4. After 0 Ω adjustment, change the plug in the + terminal to the red
plug.
5. Connect the temperature probe tip to the measurement place, and
read the value from the temperature scale.
0.36 VA
Location for Use
2. Fuse Replacement
3. Fuse and Test Leads Continuity Check
Temperature Measurement
(Use the optional 9021-01 THERMISTOR TEMPERATURE
PROBE.)
Maximum rated power
WARNING
Resistance
1. Set the range switch to the Ω x 10 (LED) range.
2. Connect the test leads to both sides of the LED to be tested.
3. The LED has polarity, so unless it light in 2., try reversing the test
leads connections.
4. When it lights, the pointer deflect, however a reading has no meaning.
NOTE: The internal battery of the Ω meter has positive polarity in the terminal. Therefore, it is right to connect the red (+) test lead to
the cathode side of the LED, and the black (-) one to the anode
side.
Rated power voltage 1.5 VDC x 2,
R6P manganese battery x 2
Maximum input voltage 600 VAC/DC
1. Remove the case back.
2. Replace the fuse with a new one.
LED Check (Lighting Test)
Power supply
Removing the case back
1. Connect the black test lead to the - terminal, and the red one to the +
terminal.
2. Set the range switch to the Ω x 1 k range, and short the test leads.
3. If the pointer deflects, the fuse and test leads conduct (are not blown
and damaged).
If the pointer does not deflect, the test leads may be damaged.
Check again after replacing the fuse.
Specifications (*mark: shared range)
3. Fasten the
fixing screw.
2. Remove the case
back from the upper
part.
2. Attach the
upper part.
*Refer to the
following
CAUTION.
3. Replace the
batteries and fuse.
Insert the batteries
with the polarity
correct as per the
battery indication
FUSE
*0.3/3/12/30/120/300/600 V, 20 kΩ/V (0.3
V:16.7 kΩ/V), 2.5% of f.s. reading
ACV
12/30/120/300/600 V, 9 kΩ/V,
reading (12 V: 4%)
DCA
*60 μA, 30/300 mA, internal voltage drop
(nominal value) 300 mV, 3% of f.s. reading
Ω
0 to 3 kΩ, central scale 30 Ω, R x 1/R x 10/R x
100/R x 1 k, 3% of scale length
2.
BATT
0.9 to 1.8 V, load resistance 10Ω,
reading
3.
Temperature scale
-20 to 150 (standard), -20 to 300 (for USA
only), 3% of scale length (with the optional
9021-01 THERMISTOR TEMPERATURE PROBE)
Protective system
End face of mounting clip
1.
6.
6% of f.s.
7.
Short circuit protection of power line by fuse
(up to 250 VAC commercial power input)
8.
4.
Overload protection of meter device by diode
1. Fit the nail
on the edge
of the lower
part.
*CAUTION
Prior to attaching the upper part, check if the
metal fittings fit into the end face of the
mounting clip (dashed line in the figure).
If they protrude, the projection on the upper
part will damage the metal fittings.
Metal fittings
Part Names
2.5% of f.s.
NOTE: This system is not for protecting the instrument
from damage but for securing safety.
Spare fuse
A good one should always
Service
If the instrument is not functioning properly, check the batteries, the test
leads wiring, and fuse blowing. If a problem is found, contact your dealer
or HIOKI representative. Pack the instrument carefully so that it will not
be damaged during transport, and write a detailed description of the
problem. HIOKI cannot bear any responsibility for damage that occurs
during shipment.
DCV
Attaching the case back
1. Remove the fixing
screw.
Maintenance
Gently wipe dirt from the surface of the instrument with a soft cloth
moistened with a small amount of water or mild detergent.
Do not try to clean the instrument using cleaners containing organic
solvents such as benzine, alcohol, acetone, ether, ketones, thinners, or
gasoline. They may cause discoloration or damage.
Meter
9.
Internally magnetized taut band
Fuse
F0.5 AH/250 V, 20 mm x 5 mm dia. (nonarcing type),
Internal resistance Approx. 0.866 Ω
Drop proof
One meter to concrete
Standards applying
Safety EN 61010
Measurement Category III
(anticipated transient overvoltage 6000
V), Pollution Degree 2
EMC EN 61326
5.
10.
Meter Nomenclature
1. Panel 2. Pointer
5. Range selector switch
8. Zero ohm adjuster
10. Negative (-) terminal
3. Case back
4. Face plate
6. Scale plate
7. Zero adjuster
9. Positive (+) terminal
Download HIOKI 3030-10 ENG
HIOKI_3030-10_ENG.pdf (PDF, 925.37 KB)
Download PDF
Share this file on social networks
Link to this page
Permanent link
Use the permanent link to the download page to share your document on Facebook, Twitter, LinkedIn, or directly with a contact by e-Mail, Messenger, Whatsapp, Line..
Short link
Use the short link to share your document on Twitter or by text message (SMS)
HTML Code
Copy the following HTML code to share your document on a Website or Blog
QR Code to this page

This file has been shared publicly by a user of PDF Archive.
Document ID: 0000326463.