read me (PDF)
File information
Author: Goldenhands
This PDF 1.5 document has been generated by Microsoft® Word 2013, and has been sent on pdf-archive.com on 29/01/2016 at 09:20, from IP address 203.177.x.x.
The current document download page has been viewed 595 times.
File size: 1.57 MB (10 pages).
Privacy: public file


File preview
Ocnarf CoinCafe Software for Windows
Supports later versions of Windows, both x86 and x64
Uses .Net Framework 4.5
Uses MS SQL CE 4.0 embedded database
Protected by UAC and process whitelisting
Both coin-operated and via time code
Installed on Standard windows user account to secure system from unauthorized access
Supports 2 coin slots in 1 port
Beautiful lock screen with image slideshow
Option to auto-kill running applications on timeout at configurable time
Option to auto-shutdown after timeout at configurable time
Uses Gmail account to send report
Low memory and CPU usage
Connecting Coin Slot
Things needed:
1. Coin Slot
2. USB to serial cable if built in COM port is not available
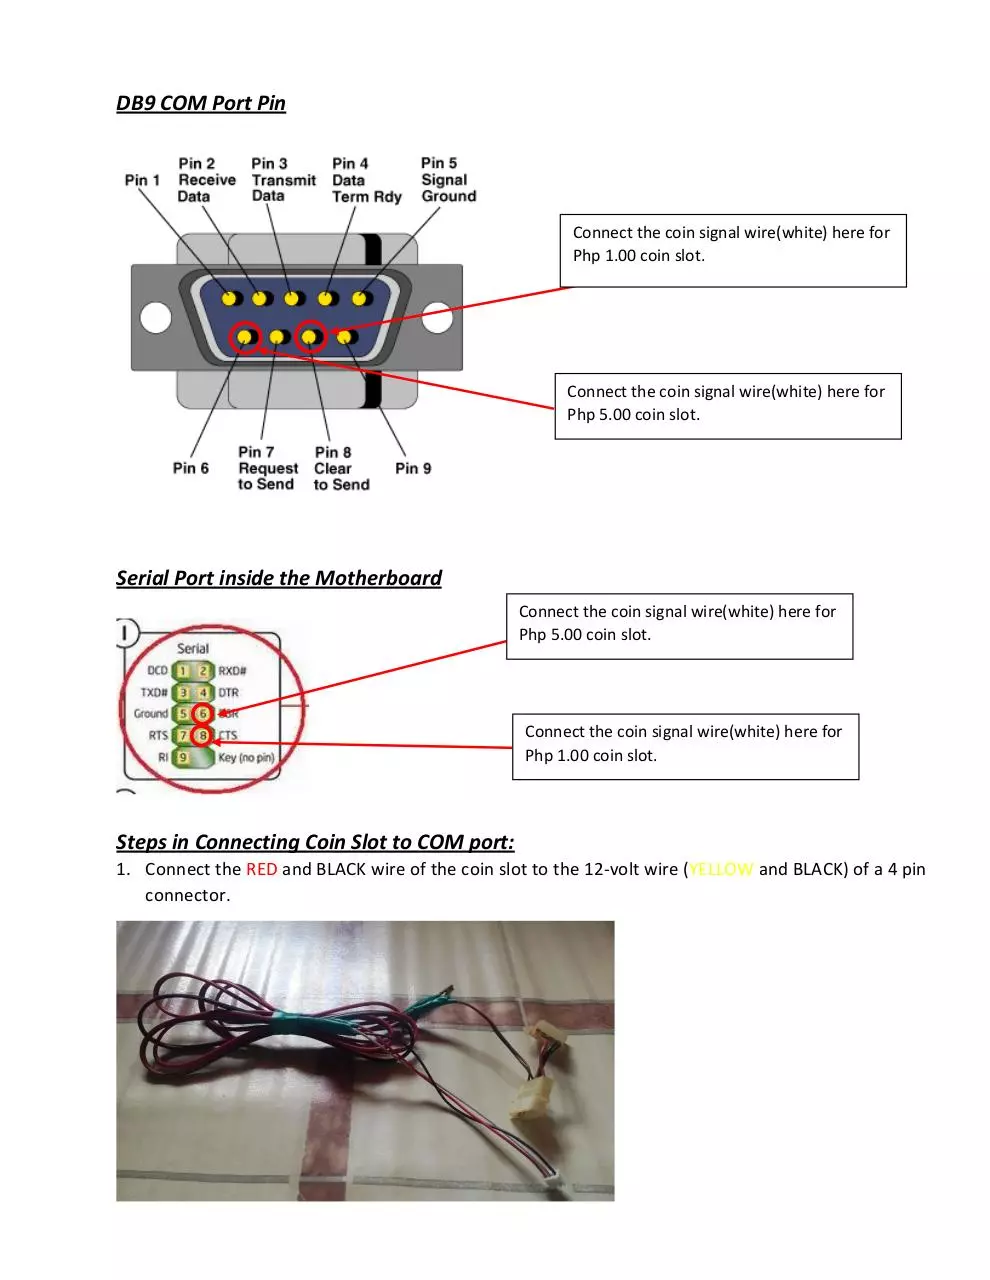
DB9 COM Port Pin
Connect the coin signal wire(white) here for
Php 1.00 coin slot.
Connect the coin signal wire(white) here for
Php 5.00 coin slot.
Serial Port inside the Motherboard
Connect the coin signal wire(white) here for
Php 5.00 coin slot.
Connect the coin signal wire(white) here for
Php 1.00 coin slot.
Steps in Connecting Coin Slot to COM port:
1. Connect the RED and BLACK wire of the coin slot to the 12-volt wire (YELLOW and BLACK) of a 4 pin
connector.
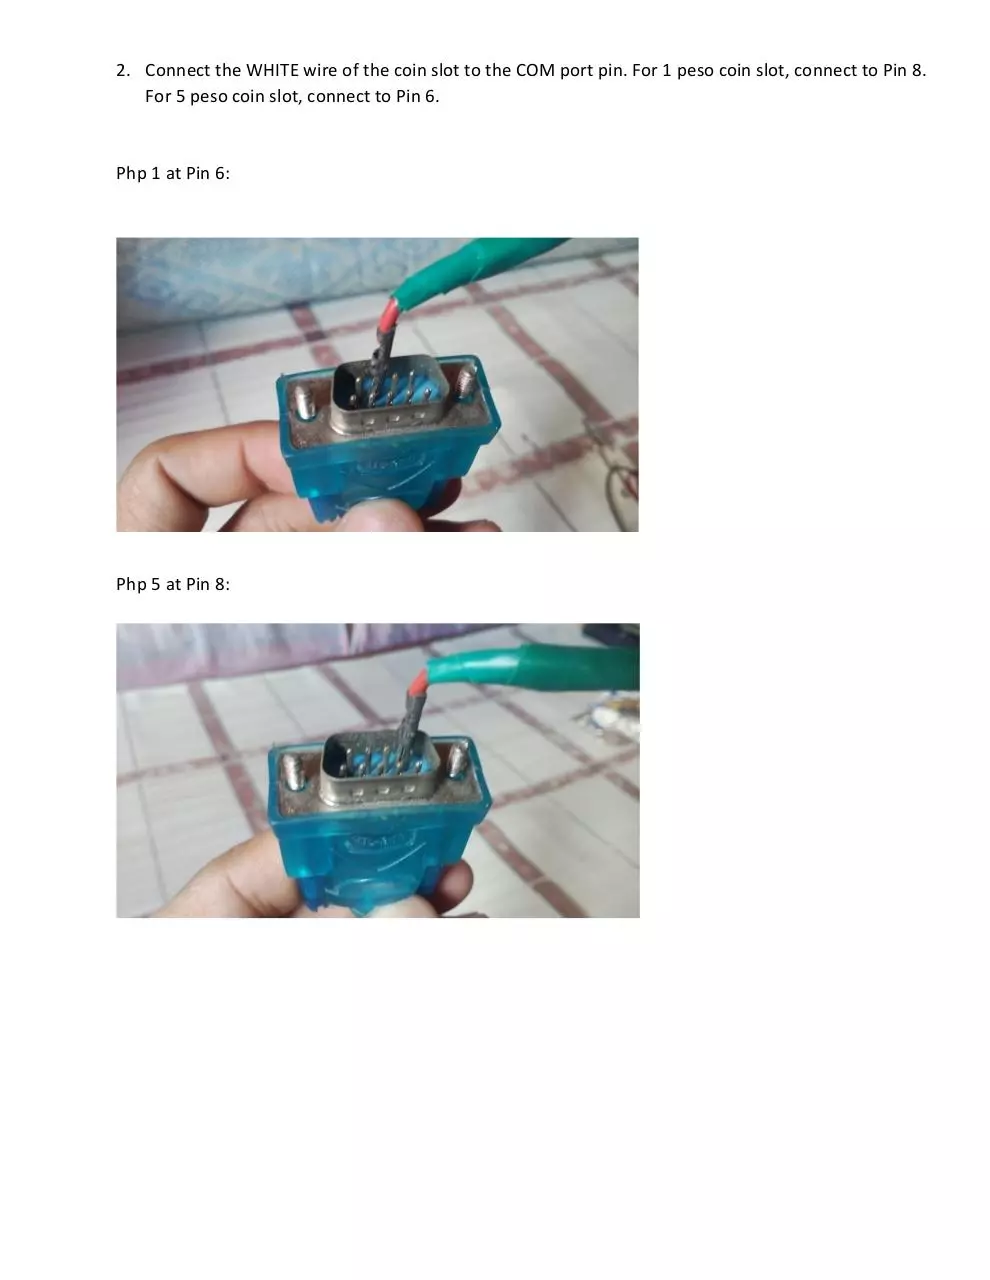
2. Connect the WHITE wire of the coin slot to the COM port pin. For 1 peso coin slot, connect to Pin 8.
For 5 peso coin slot, connect to Pin 6.
Php 1 at Pin 6:
Php 5 at Pin 8:
COM Port connection inside Motherboard:
Connect the coin
signal wire(white)
here if
motherboard has
built in COM port
Connection will now look like below:
3. Connect the 4-pin connector to the 4-pin socket of the motherboard and plug the USB.
Configuring the COM Port:
1. Install the rs232toUSB driver if serial port used is via USB-to-RS232 cable.
2. Go to Device Manager and check if the driver is installed. If it is, it will look like below.
Otherwise, there’s a yellow exclamation that will appear on the port.
3. Open the Settings of the CoinCafe in Start Menu. Login using “admin” and password “admin”
without quotes and change the COM port of the timer based on the name of port displayed in
the Device Manager. Note: You need to activate your copy first before you are allowed to
change configurations.
Installing the CoinCafe software
1. Login on Standard windows user account and run the installer. Due to Windows restrictions,
you should NOT install the software in Drive C.
2. When installation is complete, Settings window will open. You can also find the Setting in the
Start Menu. Warning: Do NOT run ocnarfCoinCafe if software copy is not yet activated. It will
auto-logoff.
3. Go to Registration tab and copy the Machine ID and email it to me or you may click the Request
Serial button if your connected to the internet. Note: Please observe if the Machine ID does not
change by hitting the refresh button twice. Also, please include your Name and Email address.
4. Enter the serial and click the Activate button. Once activated, the word “Activated” will appear.
5. Close the Settings application and relaunch it.
6. Select General Settings tab and click Configure System Protection button.
7. Add the files or directories you want to restrict. Of course, include the installation folder of the
software. Note that you can’t open restricted directories. But you can access the files inside via
its shortcut. Thus, to open Settings, you can open it in Start Menu.
8. Configure the rest of the settings, especially the user accounts. Please note: guest accounts can
only send report and generate Time Codes.
Download read me
read me.pdf (PDF, 1.57 MB)
Download PDF
Share this file on social networks
Link to this page
Permanent link
Use the permanent link to the download page to share your document on Facebook, Twitter, LinkedIn, or directly with a contact by e-Mail, Messenger, Whatsapp, Line..
Short link
Use the short link to share your document on Twitter or by text message (SMS)
HTML Code
Copy the following HTML code to share your document on a Website or Blog
QR Code to this page

This file has been shared publicly by a user of PDF Archive.
Document ID: 0000336063.