Onga Great White Cleaner Owners Manual (PDF)
File information
Title: PoolShark.indd
Author: pwhitwood
This PDF 1.4 document has been generated by PScript5.dll Version 5.2 / Acrobat Distiller 7.0.5 (Windows), and has been sent on pdf-archive.com on 19/04/2016 at 04:50, from IP address 218.214.x.x.
The current document download page has been viewed 583 times.
File size: 1.12 MB (8 pages).
Privacy: public file


File preview
Please do not return Warranty - Retain for your records.
Purchased From ......................................................................................................................
Purchase Date..................................... Serial No.............................. Model No........................
Pacific
Australia
Head Office
Pentair Water Australia Pty Ltd
Notting Hill Victoria, Australia
Tel: +61 3 9574 4000 Fax: +61 3 9562 7237
Email: Sales@pentairwater.com.au
www.pentairwater.com.au
Pentair Water New Zealand Ltd
Penrose Auckland New Zealand
Tel: +64 9 579 6254 Fax: +64 9 579 6497
Email: auckland@pentairwater.com.au
Americas
Pentair, Inc.
www.pentair.com
Europe
Pentair Pumps S.p.A
www.Pentairpumps.it
Asia
China
www.pentairwater.com
© information contained here-in remains the property of Pentair Water Pty Ltd. Any reproduction,
display, publication, modification or distribution is strictly prohibited without the prior written
permission of Pentair Water Pty Ltd.
Disclaimer: Every endeavour has been made to publish the correct details in this Owner’s Manual.
No responsibility will be taken for errors, omissions or changes in product specifications. Pentair
Water reserves the right to change specifications
L300130 1106
India
www.pentairwater.com
OWNER’S MANUAL
IMPORTANT
Please attach your sales invoice/docket here as proof of purchase should warranty service
be required.
Installation and User’s
Guide for
POOLSHARK
Automatic Pool Cleaner
Should you the installer or owner be unfamiliar with the correct
installation or operation of this type of equipment you should contact
the distributor/manufacturer for the correct advice before proceeding
with the installation or operation of this product.
Pentair Water Product Warranty (Continued)
TABLE OF CONTENTS
About your Pool and Filter System
Installation
Service and Maintenance
Troubleshooting
Warranty
2
3
8
11
13
2)
3)
h)
water ingression or exposure to abnormal corrosive conditions or “run dry” conditions;
i)
any other cause which does not relate to a product defect.
Damage caused to the product as a consequence of use of another manufacturer’s product used in
conjunction with Pentair Water and affiliate companies.
Ingress of insects into the unit causing electrical malfunction is not warranted, care should be taken
to avoid this occurrence.
Spare Parts:
Spare parts are usually stocked for a reasonable period of time following last production.
Pentair Water does not warrant that spare parts will be made available for the whole of the reasonable
period and reserves its right to cease supplying spare parts or providing facilities for repair of spare parts
in circumstances which are beyond its control including the requirement to remove spare parts from sale
as a consequence of changes in the law or otherwise as it deems fit.
How to get service:
In Australia please contact 1800 664 266 In New Zealand please contact 0800 664 269
Claims under this warranty must give evidence of date of purchase, model and serial number of the
product and the claimants name, address and telephone number.
1) To obtain warranted service, you will be required to provide to either Pentair Water state office or
recommended service agent:a)
the product;
b)
confirmation in writing specifying the nature of your claim;
c)
proof providing date of original purchase;
d)
full contact details including name and address;
e)
the serial number of the product if any.
2) Warranty service work will be denied or suspended, on equipment not readily accessible to service
personnel, that is products that are behind barriers, tiled or bricked in, installed in roofs or second
story external walls including inaccessible power points.
3) Any service of any product which is found to be faulty due to abuse, fair wear & tear, misuse or improper
installation will be charged to the owner at the service agents current servicing hourly rate.
Limitation of implied warranties:
THERE ARE NO WARRANTIES, EXPRESSED OR IMPLIED, WHICH EXTEND BEYOND THE DESCRIPTION
CONTAINED HEREIN INCLUDING THE IMPLIED WARRANTY OF MERCHANTABILITY AND FITNESS FOR A
PARTICULAR PURPOSE.
Exclusion of damages:
PENTAIR WATER’S LIABILITY IS LIMITED TO THE COST OF REPAIR OR REPLACEMENT OF THE PRODUCT.
ONGA SHALL NOT BE LIABLE FOR:
1) DAMAGE TO OTHER PROPERTY CAUSED BY ANY DEFECTS IN THE PRODUCT, DAMAGES BASED
UPON INCONVENIENCE, LOSS OF USE OF THE PRODUCT, LOSS OF TIME, LOSS OF PROFITS, LOSS
OF BUSINESS OPPORTUNITY, LOSS OF GOODWILL, INTERFERENCE OF BUSINESS RELATIONSHIPS,
OR OTHER COMMERCIAL LOSS, EVEN IF ADVISED OF THE POSSIBILITY OF SUCH DAMAGE.
2) ANY OTHER DAMAGES, WHETHER INCIDENTAL, CONSEQUENTIAL OR OTHERWISE.
3)
ANY CLAIM AGAINST THE CUSTOMER BY ANY OTHER PARTY.
Effective law:
This warranty gives you specific legal rights, and you may also have other rights which vary from state
to state. Nothing in this warranty limits or restricts, or is intended to derogate from, any right or remedy
which the purchaser or ultimate user of the product may have pursuant to Australian state and/or Australian
federal consumer protection legislation, New Zealand Sale of Goods Act, Consumer Guarantees Act, Fair
Trading Act or any other relevant and applicable New Zealand legislation or authority and where necessary
shall so be read and construed.
1
14
Pentair Water Product Warranty
Pentair Water warrants that, when this product is used for the purpose it was designed, is correctly housed and vented against
weather, vermin, dust etc., that it will be free of material and manufacturing defects at the time of the original purchase.
This warranty is limited to the cost of the product and does not cover third party costs including the costs of
electricians, plumbers, etc. unless authorised by Pentair Water.
TERMS AND CONDITIONS APPLICABLE INTERNATIONALLY
How long the warranty is effective Internationally
1) This Pentair Water product is warranted for 12 months for all parts from the date of the first consumer purchase. Should
any parts fail as a result of such defects within the specified period, the part will be replaced free of charge. (This does
not include travel charges, removal and reinstallation charges.)
TERMS AND CONDITIONS APPLICABLE IN AUSTRALIA AND
NEW ZEALAND
1)
YOU SHOULD CAREFULLY READ THE INSTRUCTIONS SUPPLIED PRIOR TO USING THIS PENTAIR
WATER PRODUCT.
This product is to be installed and operated in accordance with the instructions
provided. This warranty will not apply if it is used in a manner other than in
accordance with the instructions.
What the warranty covers:
Pentair Water warrants its products to be free of defects in material and workmanship during the warranty period.
If a product proves to be defective in material or workmanship during the warranty period, then Pentair Water
will, at its sole option repair or replace the product with a like product. Replacement product or parts may include remanufactured or refurbished parts or components.
How long the warranty is effective:
1)
This Pentair Water product is warranted for 24 months (Footpad and Seal flaps - 12 months) from
the date of the first consumer purchase.
2)
Authorised workshop labour will be free of charge for the first 12 month period from date of the first
consumer purchase when unit is found to have failed due to defective workmanship or material
supplied by Pentair Water Australia.
Infield service by an authorised Pentair Water Service Agent will incur a travel, removal &
reinstallation fee payable by customer.
3)
Where this Pentair Water product is sold for commercial application as defined in the relevant Trade
Practices and Consumer Protection legislation the warranty shall be for a period of six months from
the date of purchase by the end user.
About your Pool and Filter System
Before installing your cleaner, review and understand all warnings and safety
information displayed at the beginning of each section.
Pre-installation check list
Before installing the cleaner in a vinyl liner pool:
Check liner closely for signs of deterioration or damage from age, chemicals, pool
wall damage, etc. If any damage is found, have a qualified pool professional make all
necessary repairs. Also, if there are stones, roots, etc., under the liner, remove them
before installing the cleaner.
Before installing the cleaner in a concrete pool or a pool that is partially or completely
tiled:
Repair loose tiles and tighten any loose light rings.
Before installing the cleaner, clean your filter system:
Make sure you have cleaned the filter, including backwashing, rinsing, and emptying
all baskets. A clean system is necessary for proper cleaner operation and coverage.
Before installing the cleaner, fill the hose with water:
Always make sure the cleaner head is submerged and the hose is full of water
before connecting the hose to the filtration system (whether through a skimmer or
dedicated wall fitting). Air in the system can damage the pump through dry running
and overheating.
Before installing the cleaner, understand cleaner coverage:
The cleaner is designed to rid your pool of debris in approximately 4-6 hours. Less
time could be needed, depending on the pool size.
The cleaner was not designed to automatically clean steps or swimouts or to work
under a solar cover. It was also not designed to do initial cleanup for a new pool or
when opening your pool for the season.
Who the warranty protects:
This warranty is valid only for the consumer purchaser.
What the warranty does not cover:
1)
Damage, deterioration or malfunction resulting from:
a)
accident, misuse, negligence, fire, water, lightning, or other acts of nature, unauthorised product
modification or failure to follow instructions supplied with the product;
b)
repair or attempted repair by anyone not authorised by Pentair Water;
c)
any damage to the product due to shipment;
d)
removal or installation of the product;
e)
causes external to the product such as electric power fluctuations or failure;
f)
use of supplies or parts not meeting Pentair Water specifications;
g)
normal wear and tear;
13
Suction entrapment, injury, and drowning hazard. If your pool has a dedicated
suction port (“vac port”) for vacuuming or for an automatic pool cleaner, it must
be covered when not in use.
A spring loaded safety cover (a “vac port fitting”) is included with your cleaner. Install
it on the suction port to prevent entrapment and injury. If the cover provided does not
fit, purchase one that does from your local pool store and install it instead.
2
Installation
Damaged Hose
Check the PoolShark’s hose to be
sure that it has not become bent
or kinked. Do not coil the hose,
as it will retain the coiled shape
and reduce the cleaning coverage.
To check the hose, lay each hose
section flat on the pool deck (or
another flat surface) and look down
the length of the hose. It should be
perfectly flat and straight. Replace
any sections which are bent or
kinked.
Pool sealing around
the oscillator
Check the oscillator for: damage,
lost seals (there should be 4 seals):
obstructed seals (seals should
slide freely on the oscillator).
Be sure that the short, soft leader
hose section is the first section
in the hose assembly (next to the
cleaner).
Hazardous Suction
Can trap and tear hair or body parts.
Can cause drowning
Do not let children use or apply to
body.
Do not let children use or play with
pool cleaner.
Stop pumping before attempting to
clean unit.
Do not allow swimmers in pool while
pool cleaner is operating.
Oscillator may injure hands or fingers.
Stop pump before attempting to clean
out pool cleaner head.
Should problems persist, contact your nearest Pentair Water Service Agent.
Hose can trip or entangle swimmers.
Do not allow swimmers in pool while
pool cleaner is operating
Step 1: Install vacuum port door fitting
Square Bottom Pools Only
If the transition radius between your pool’s floor and wall is small and the PoolShark
will not climb the pool walls, then you have a square bottom pool. If so, remove the
cleaner from the pool and drill two holes in the indentations in the bumper. This will
provide an outlet for air which would otherwise accumulate in the hollow bumper. This
air, from microscopic bubbles suspended in the pool water, is normally able to escape
when the PoolShark climbs the pool walls.
NOTICE: DO NOT drill the holes if your PoolShark CAN climb the pool walls.
If there is no spring-loaded door on the vacuum port,
install the included cover.
If your pool only has a skimmer, and no dedicated
vacuum port, proceed to Step 2.
1.
Screw the fitting into the port
opening.
2.
Orient the fitting so the arrow on
the door points up.
3.
Secure the cover by tightening
the allen-screw below the door.
3
12
D.
Replace the lock rings and tighten them. Be sure that the openings
of the eyeball diverters point down or to the side (9:00 O’clock
position), before fully tightening the rings.
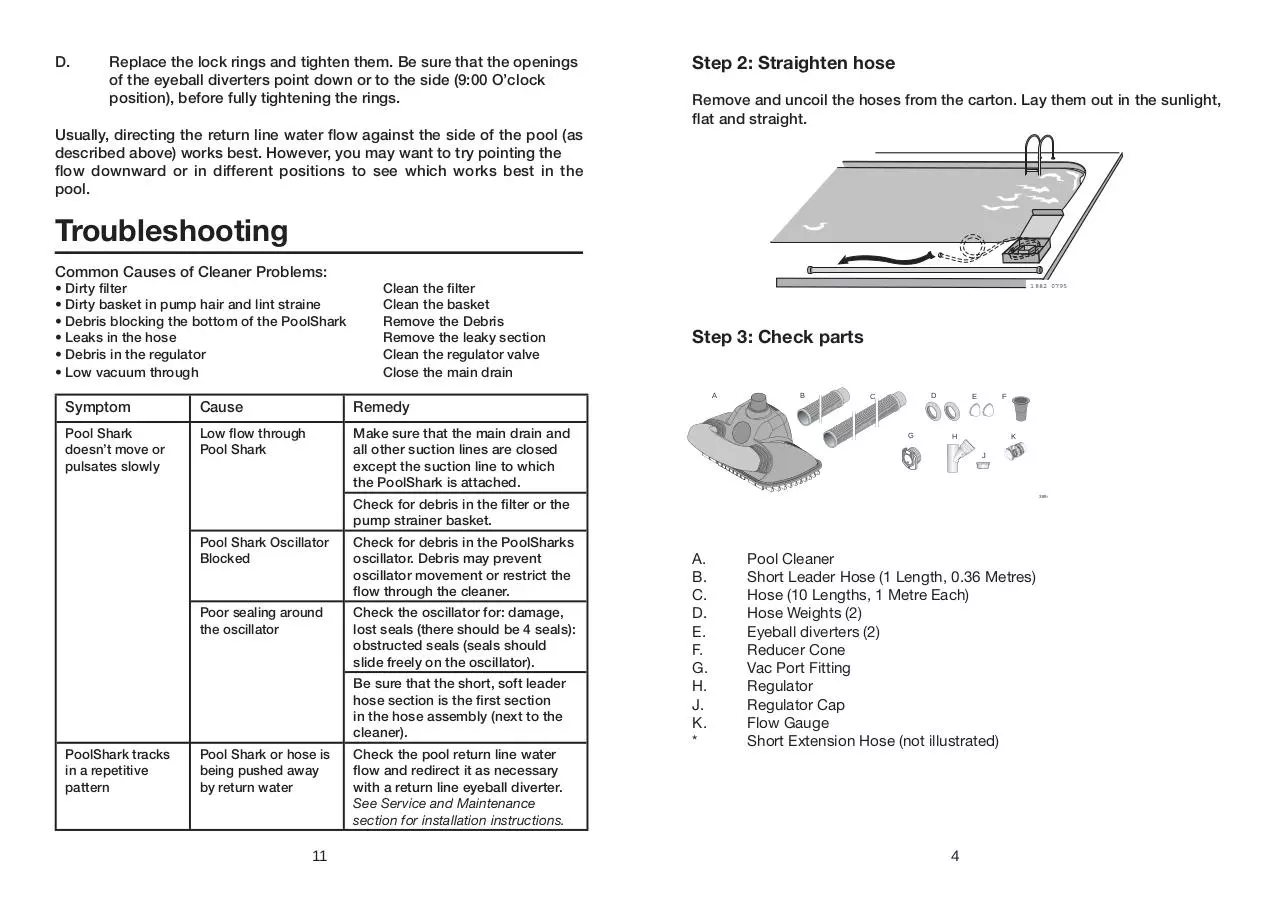
Step 2: Straighten hose
Remove and uncoil the hoses from the carton. Lay them out in the sunlight,
flat and straight.
Usually, directing the return line water flow against the side of the pool (as
described above) works best. However, you may want to try pointing the
flow downward or in different positions to see which works best in the
pool.
Troubleshooting
Common Causes of Cleaner Problems:
1882 0795
Step 3: Check parts
A
Pool Shark
doesn’t move or
pulsates slowly
Low flow through
Pool Shark
Make sure that the main drain and
all other suction lines are closed
except the suction line to which
the PoolShark is attached.
B
D
C
G
E
F
H
K
J
O
M FL
Remedy
OW
M FL
Cause
W
Symptom
MAXIMU
Clean the filter
Clean the basket
Remove the Debris
Remove the leaky section
Clean the regulator valve
Close the main drain
MINIMU
• Dirty filter
• Dirty basket in pump hair and lint straine
• Debris blocking the bottom of the PoolShark
• Leaks in the hose
• Debris in the regulator
• Low vacuum through
3894
Check for debris in the filter or the
pump strainer basket.
Pool Shark Oscillator
Blocked
Check for debris in the PoolSharks
oscillator. Debris may prevent
oscillator movement or restrict the
flow through the cleaner.
Poor sealing around
the oscillator
Check the oscillator for: damage,
lost seals (there should be 4 seals):
obstructed seals (seals should
slide freely on the oscillator).
Be sure that the short, soft leader
hose section is the first section
in the hose assembly (next to the
cleaner).
PoolShark tracks
in a repetitive
pattern
Pool Shark or hose is
being pushed away
by return water
11
A.
B.
C.
D.
E.
F.
G.
H.
J.
K.
*
Pool Cleaner
Short Leader Hose (1 Length, 0.36 Metres)
Hose (10 Lengths, 1 Metre Each)
Hose Weights (2)
Eyeball diverters (2)
Reducer Cone
Vac Port Fitting
Regulator
Regulator Cap
Flow Gauge
Short Extension Hose (not illustrated)
Check the pool return line water
flow and redirect it as necessary
with a return line eyeball diverter.
See Service and Maintenance
section for installation instructions.
4
Once you have found the correct valve settings for best operation, we suggest
you mark the valves to ensure repeated success.
Step 4: Clean filter system
Backwash and clean filter; rinse; clean all baskets, etc. Start pump.
Skimmer
Step 5: Adjust valves for vacuuming
Decide on the vacuum connection you are
going to use (either a skimmer or a dedicated
wall fitting) and adjust the pump valves
(if your system has valves) to direct all
vacuum there. Close the main drain.
Dedicated suction line/vac port/vac fitting
Vac
Port
Some pools have a dedicated wall fitting just for vacuuming. If the wall fitting
connection is used, you may notice that the clear pump lid shows signs of
bubbles or what appears to be the presence of air. To eliminate this, slightly
open the main drain valve to supplement the water intake. The cleaner may
slow down a bit when you change the suction.
Step 6: Install Regulator in Pools with a Dedicated Vacuum
Port
The pool regulator adjusts the amount of vacuum in the line for optimum
cleaning. If your pool has a dedicated wall fitting in addition to the
skimmer, follow the procedure below.
Skimmer
1.
Turn off the pool pump.
2.
Place the regulator in the skimmer as
shown. The cap must be placed in
the top.
Use the adapter cone if needed.
In-Line leaf canisters
If your pool is exposed to large quantities of leaves, we suggest purchasing
and installing an in-line leaf canister. A leaf canister will provide more debrisloading capacity and also provides a water by-pass when the canister is full.
It is very important that the pump is not starved of water!
Skimmer vac plates
Some pool owners connect the hose to a skimmer vac plate, which allows
the skimmer basket to remain in the skimmer. If this method is used, empty
the basket frequently. Also make sure that the vacuum regulator provided
is completely submerged so that it will not suck air and damage the pump.
Skimmer vac plate vacuum control adjusters
Cap
Regulator
3.
Attach one length of hose to the
vacuum port.
Some pool owners use one of a variety of manufacturer’s skimmer vac plates.
Some have a vacuum control adjuster, and some do not. The adjuster could
be a screw-type, a spring loaded apparatus, or a dial design. For those vac
plates with adjusters, it is important to adjust them when fine tuning the
vacuum for the cleaner.
Adapter Cone
To install the eyeball diverter
To Pump
The water flow from the return line can push the PoolShark’s hose, causing
the PoolShark to steer away from the return line or to remain in one area of
the pool. To correct this, adjust your existing return line diverters or install
the eyeball diverters supplied with the PoolShark as follows:
A.
Turn off the main circulation pump.
B.
Unscrew the lock rings from the pool’s return line fittings and
remove the original eyeball diverters.
C.
Replace them with the PoolShark’s eyeball diverters.
Hose
End
5
10
Step 7: Pools with only a Skimmer
Skimmer
Pool pump suction is hazardous and can cause entrapment with severe
personal injury or drowning. Use regulator in pool cleaner system at all
times.
1.
Turn off the pool pump.
2.
Place the regulator in the
skimmer as shown. Do not
install the cap.
Use the adapter cone if
needed.
3.
Submerge one length of hose
so it becomes filled with water.
4.
Insert the “male” end of the hose
into the regulator.
NOTICE: Each pool’s hydraulic system and vacuum connections are different.
Be sure you have installed the regulator before you “fine-tune” the system.
This not only regulates vacuum, but also acts as a safety device.
About “Fine-Tuning” Vacuum Adjustments and
Connections
Suction entrapment, injury, and drowning hazard. If your pool has a dedicated
suction port (“vac port”) for vacuuming or for an automatic pool cleaner, it
must be covered when not in use. Purchase a spring loaded safety cover from
your local pool store and install it on the suction port to prevent entrapment
and injury.
For the “NOVICE POOL OWNER” where vacuuming is a new experience,
please read all of the following points, the installation instructions, and the
trouble shooting guide carefully. Please note the following:
•
•
•
“Vacuum” and “suction” are two words meaning the same thing.
“Dedicated suction line”, “vac port”, and “vac fitting” are different
terms for a hole in the side wall of pool; this hole is connected to
the pump suction and is dedicated to vacuuming.
Some pools do not have a vac port. If your pool does have one,
please read the “Suction Entrapment” warning, above.
For the “SEASONED POOL OWNER”: The automatic pool cleaner connection
and vacuum adjustments can be similar to using your manual pool vacuum.
Please read on.
Valves (pump, skimmer, and main drain) and vacuum
adjustments
Regulator
Adapter Cone
To Pump
Step 8: Connect the hose sections
For best results and to maintain
proper operation, use only original
hoses, or direct replacements.
Join the hose sections one to another
by fitting the male end to the female
end of the added section
Make sure the connections are snug.
The number of lengths that you will
need depends on the size of your
pool.
The overall length of hose needed will be the distance from the point at
which you will attach the
hose to the suction
connection, to the furthest
Hose
must
point in the pool from,
equal
longe
st stre
plus one hose length.
tc
h
plus 1
length
.
You may need to spend some time adjusting the skimmer and main drain
valves in order to obtain the best vacuum setting for good cleaner operation.
®
9
6
Submerge the hose so it fills with water and expels air from the hose. Attach
one end of the hose to the vacuum source as descrbed in Steps 2 and 3.
Keep the other end of the hose accessible.
Step 9: Adjust flow
1.
2.
3.
Insert the flow gauge into the open end of the hose, still
underwater.
Start the pump.
Turn the adjustment knob on the flow regulator until the indicator
on the flow gauge is between the maximum and minimum flow.
Service & Maintenance
Hazardous suction. Suction through the PoolShark can entrap
bathers, causing severe injuries or drowning. Do not operate the
PoolShark cleaner while people are using the swimming pool. Do
not allow anyone to play with the PoolShark or its hoses.
Your PoolShark can stay in the pool at all times except during chemical
shock treatments. However, when people are using the pool, disconnect the
PoolShark and pull it to one side of the pool.
Disc Indicator
The PoolShark requires almost no maintenance. Manually open and close the
regulator valve from time to time to flush away accumulated dirt and debris
and ensure smooth operation. Also, from time to time, visually inspect the
PoolShark to be sure that:
• The oscillator moves freely and is not obstructed by debris.
• The vacuum pad is not excessively worn. When the traction pads on the
bottom have worn down, it’s time for replacement.
NOTE: If you have a very strong pump and the flow is still too fast, slightly
open the main drain.
4.
5.
Turn off the pump.
Remove the flow gauge and attach the hose to the cleaner.
Step 10: Connect Hose to Cleaner.
Connect the hose cuff of the 14” (0.36m)
hose to the cleaner (correct end of hose
is marked). Add other hose sections.
Fill the cleaner with water and let it sink
to the bottom.
Verify hose connections as shown on
the following page, and that gate valves
are fully open in the suction line.
7
Hose Cu
marked
"Connect
to Cleaner"
NOTICE: When storing the PoolShark, do not coil the hose. Instead, lay it out
straight and flat in an area protected from direct sunlight. Use only a genuine
PoolShark hose. The warranty is void if the cleaner is operated with other
than a genuine PoolShark hose.
Balancing the hose
It may or may not be necessary to add weight to your hose, depending on your
pool’s size, shape, and depth. Try the cleaner first without any hose weights.
If the hose is too buoyant, add the weight as shown below.
Pool Shark cleaner
No weight on these
Short leader
Second hose
Section
1" back from the end of
the third hose section
Third hose
Section
Fourth hose
Section
Attach second hoseweight 1” back from the
8
Download Onga Great White Cleaner Owners Manual
Onga Great White Cleaner Owners Manual.pdf (PDF, 1.12 MB)
Download PDF
Share this file on social networks
Link to this page
Permanent link
Use the permanent link to the download page to share your document on Facebook, Twitter, LinkedIn, or directly with a contact by e-Mail, Messenger, Whatsapp, Line..
Short link
Use the short link to share your document on Twitter or by text message (SMS)
HTML Code
Copy the following HTML code to share your document on a Website or Blog
QR Code to this page

This file has been shared publicly by a user of PDF Archive.
Document ID: 0000361834.