XGB pack tutorial (PDF)
File information
Title: Microsoft Word - 4767DF7A-660D-0834FC.doc
Author: www
This PDF 1.3 document has been generated by PScript5.dll Version 5.2.2 / http://createpdf.adobe.com V5.6.4, and has been sent on pdf-archive.com on 19/08/2016 at 08:33, from IP address 73.20.x.x.
The current document download page has been viewed 1463 times.
File size: 3.9 MB (15 pages).
Privacy: public file


File preview
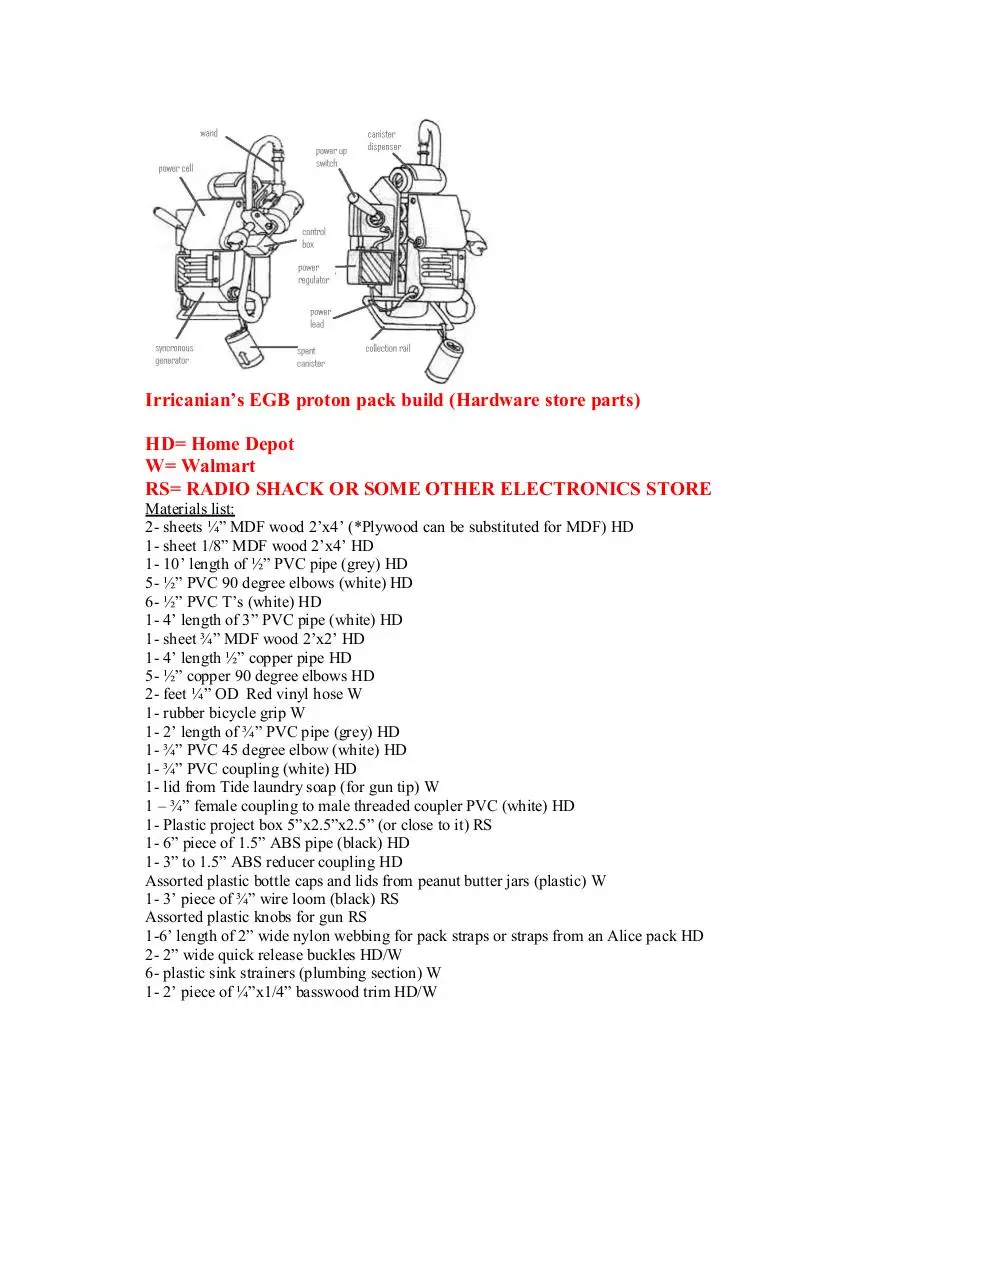
Irricanian’s EGB proton pack build (Hardware store parts)
HD= Home Depot
W= Walmart
RS= RADIO SHACK OR SOME OTHER ELECTRONICS STORE
Materials list:
2- sheets ¼” MDF wood 2’x4’ (*Plywood can be substituted for MDF) HD
1- sheet 1/8” MDF wood 2’x4’ HD
1- 10’ length of ½” PVC pipe (grey) HD
5- ½” PVC 90 degree elbows (white) HD
6- ½” PVC T’s (white) HD
1- 4’ length of 3” PVC pipe (white) HD
1- sheet ¾” MDF wood 2’x2’ HD
1- 4’ length ½” copper pipe HD
5- ½” copper 90 degree elbows HD
2- feet ¼” OD Red vinyl hose W
1- rubber bicycle grip W
1- 2’ length of ¾” PVC pipe (grey) HD
1- ¾” PVC 45 degree elbow (white) HD
1- ¾” PVC coupling (white) HD
1- lid from Tide laundry soap (for gun tip) W
1 – ¾” female coupling to male threaded coupler PVC (white) HD
1- Plastic project box 5”x2.5”x2.5” (or close to it) RS
1- 6” piece of 1.5” ABS pipe (black) HD
1- 3” to 1.5” ABS reducer coupling HD
Assorted plastic bottle caps and lids from peanut butter jars (plastic) W
1- 3’ piece of ¾” wire loom (black) RS
Assorted plastic knobs for gun RS
1-6’ length of 2” wide nylon webbing for pack straps or straps from an Alice pack HD
2- 2” wide quick release buckles HD/W
6- plastic sink strainers (plumbing section) W
1- 2’ piece of ¼”x1/4” basswood trim HD/W
Supplies:
Hot glue sticks HD/W
PVC cement HD
Assorted screws,washers HD/W
1-can Krylon fusion yellow spray paint HD/W
1-can Krylon fusion orange spray paint HD/W
1- can grey primer HD/W
1-can Silver/Aluminum spray paint HD/W
1- 3’ roll of yellow reflector tape W
1-3’ roll of red reflector tape W
Bondo or wood filler HD/W
Tools:
Jigsaw with wood blade
Handsaw
Exacto knife
Ruler or tape measure
Hot glue gun
Cordless or corded 3/8 Drill
Drill bit set up to 3/8” or ½”
Spade bit set up to 1.5”
Dust mask
Hacksaw or pipe cutter
Sandpaper
File
Okay that’s about it for materials and supplies, you may need to use your
imagination for some items if you can’t find them, use the best you can find
as a substitute. Be creative. Note**I am NOT an expert at drawing plans
Pack frame is cut from ¼” mdf using jigsaw.
1.5” holes are cut in the sides
Boxes are cut from ¼” mdf, Handle on the power box requires 1 piece of ½” pvc cut 6” long, 90 degree
elbow and one piece cut 2” long, bicycle grip. I used a peanut butter plastic lid for the recessed area where
the lever goes. Cut a piece of ¼” mdf circle 3.5” od and 2.5” id for the trim around the switch. The 4 trim
strip pieces go on side of power switch box.
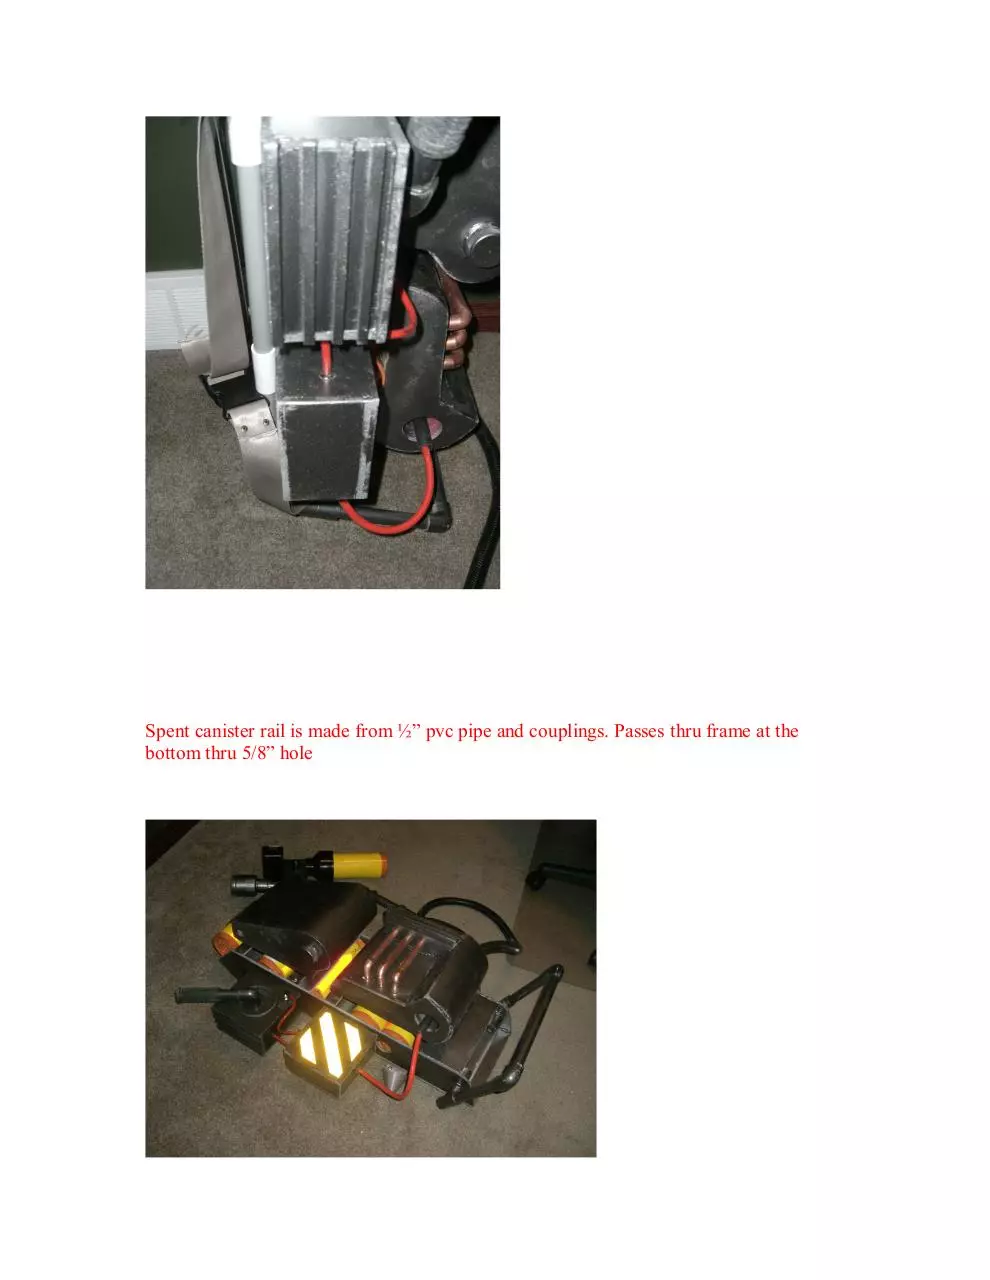
Spent canister rail is made from ½” pvc pipe and couplings. Passes thru frame at the
bottom thru 5/8” hole
Backpack frame is made from ½” pvc pipe with elbows and t’s.
You will need the quick release buckles here, sew or rivet loops onto the ends of the webbing and install
buckles at chest height. You can put a waist strap in also for extra support.
Canisters, you will need to make 6, 7 if you want to hang a spent one from the rail. Five to go onto the pack
and one for the gun. These are made from 3” PVC pipe with some wood circle plugs glued into the ends set
back ¼” or so. I then glued the sink strainer, seen here
These are 2.25” in diameter. For the other end try to make it look like this
I used cut down Noma moonray garden light lenses but you may need to substitute for something else. As
you can see they are painted yellow with orange ends, I then cut out a red arrow with the reflective tape 6”
long to go on each canister to finish them off. Note* When using PVC pipe try to get the inked writing off
before painting, it bleeds thru ☺
You can also see the grab bar on top of the pack, made with the ½” copper pipe and 90 degree elbows. You
will need one piece 6” long, 2 elbows and 2 pieces 2” long. 5/8” holes are drilled into the top of the frame
and its hot glued in place.
Try to put yours in straight, I measured mine from the wrong side and glued it in before realizing it was
crooked
The top plate on the frame measures 8.5” x 4.5”
Now comes the tricky parts
Power cell and synchronous generator
Here are some basic measurements but the curved portions are a bit tricky, I cut the back, sides, top and
bottom first
For the curved portion you will need to fill it in and finish off with Bondo or wood filler to give it the
rounded appearance.
Download XGB pack tutorial
XGB_pack_tutorial.pdf (PDF, 3.9 MB)
Download PDF
Share this file on social networks
Link to this page
Permanent link
Use the permanent link to the download page to share your document on Facebook, Twitter, LinkedIn, or directly with a contact by e-Mail, Messenger, Whatsapp, Line..
Short link
Use the short link to share your document on Twitter or by text message (SMS)
HTML Code
Copy the following HTML code to share your document on a Website or Blog
QR Code to this page

This file has been shared publicly by a user of PDF Archive.
Document ID: 0000414703.