The mission to enjoy painting tanks again (PDF)
File information
Author: Kieran Byrne
This PDF 1.5 document has been generated by Microsoft® Word 2013, and has been sent on pdf-archive.com on 26/09/2016 at 15:58, from IP address 212.159.x.x.
The current document download page has been viewed 255 times.
File size: 699.04 KB (4 pages).
Privacy: public file


File preview
The mission to enjoy painting tanks again?
So what is this all about? Well to be honest I have always had a bit of a well phobia of
painting large vehicles, it was not as though I was scared of it but knew that the end result
would not be something I would be totally happy with no matter how many techniques with
different paints, filters, inks, washes, or weathering powders I threw at it. To be honest I just
didn’t want to bother.
Some of you may be like me in that your painting standard is as high as its going to get and
you don’t really have the skill set to push it on.
You don’t want, can’t afford to invest, or have the space at home to set up a proper painting
and modelling area with all the airbrushes and modelling doodads that you think that you will
need.
Then couple with this some of the amazing work that people put out and it just make you
sometimes a little disheartened with the whole look of what you put on the table.
Now rule number one should always be that at the end of the day as long as your happy with
the look of what you put out then that should be the only defining factor and you should
never compare to what someone else can produce as there will always be someone who is
better at it than you.
Even the top guys say this so you will never reach the perfect output and why should you
have to.
I am going to preface this run down by saying all the techniques used in this write up are
nicked off of other guys out there, and special kudos has to be given to Patch Adams from
the Bolt Action Alliance as I think I have plagiarised him the most! (Thanks Patch )
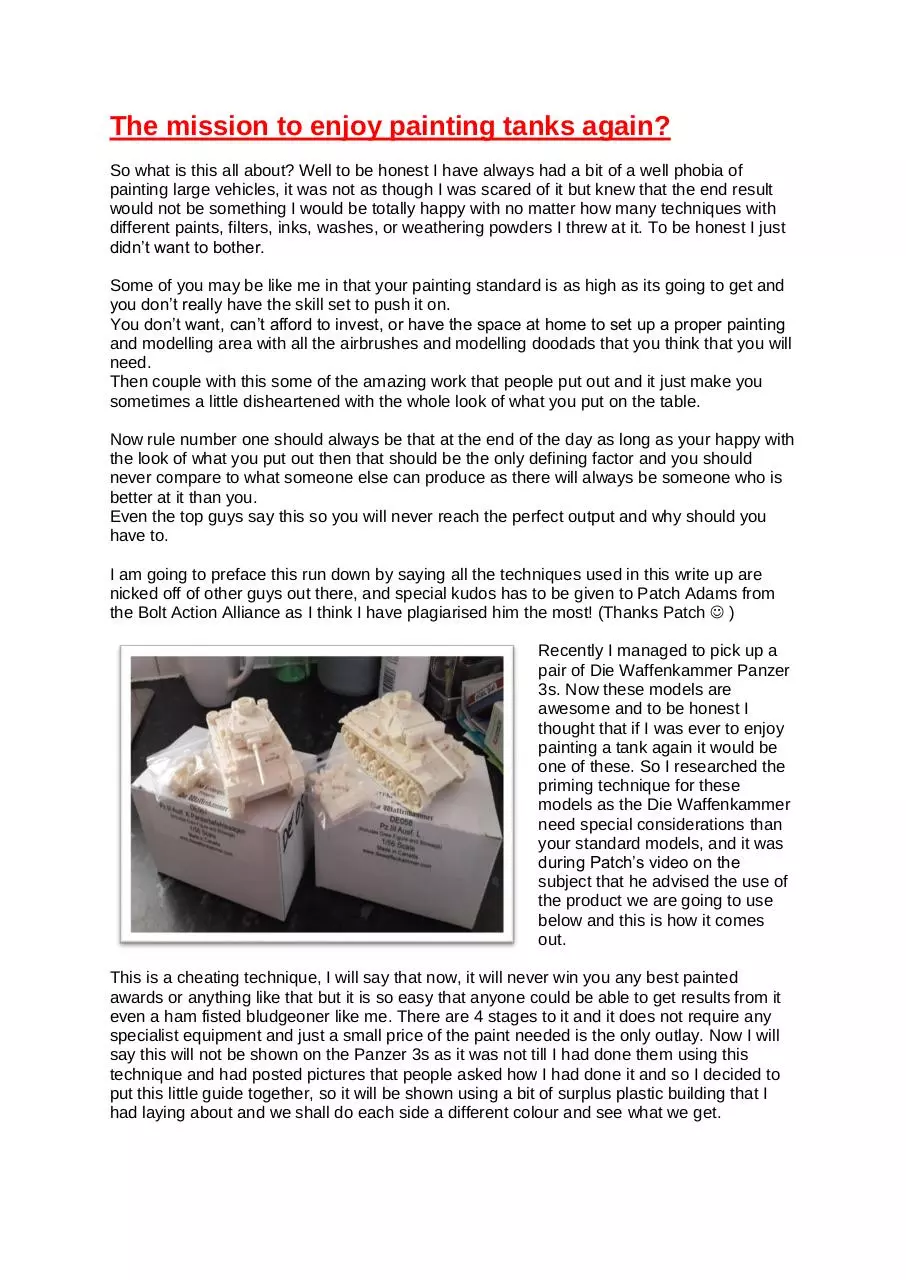
Recently I managed to pick up a
pair of Die Waffenkammer Panzer
3s. Now these models are
awesome and to be honest I
thought that if I was ever to enjoy
painting a tank again it would be
one of these. So I researched the
priming technique for these
models as the Die Waffenkammer
need special considerations than
your standard models, and it was
during Patch’s video on the
subject that he advised the use of
the product we are going to use
below and this is how it comes
out.
This is a cheating technique, I will say that now, it will never win you any best painted
awards or anything like that but it is so easy that anyone could be able to get results from it
even a ham fisted bludgeoner like me. There are 4 stages to it and it does not require any
specialist equipment and just a small price of the paint needed is the only outlay. Now I will
say this will not be shown on the Panzer 3s as it was not till I had done them using this
technique and had posted pictures that people asked how I had done it and so I decided to
put this little guide together, so it will be shown using a bit of surplus plastic building that I
had laying about and we shall do each side a different colour and see what we get.
1) Base Colour.
I had primed the model and have given half a coat of
Vallejo Green Ochre and the other Vallejo German Field
Grey.
2) Wash. For this I have given it a wash using army painter
dark tone. Honestly neatness is not an issue as you’re
using it more for darkening the base colour rather than
anything.
3) Patch’s Tip 1. Sponging.
Now what I have done here is I had a bit of foam from and
army tray laying about ever since Patch had explained
about the use for this in doing chipping on you models. But
what you can also do is build up a set of dappled highlights
for the washed base colour.
So first dip the sponge in some of the original base colour,
make sure you blot off the sponge on a cloth or on the
board you are working on as you don’t want it full of paint,
(you can see evidence of me blotting of the sponge on the
work board in the photo below)
The best way to get this to the point you want is not to try
and do it on one pass. It is better to lightly dab the sponge
on the model and work the highlight up going over it as
many times until you are happy.
Now there is no reason why the highlight coat should not
end there but if you want to do it mix a little white in with
the base colour and just lightly go over the model again
maybe spending more time at the high areas on the model.
Don’t worry if you out too much white in for the second
highlight also as the last stage will help bring this back so it
is a bit forgiving that way.
4) Patch’s Tip 2. The Oil Wash.
Now this is the new
technique that I have
used on these vehicles
and the one that has
given the effect that the
people who have asked
wanted to know.
Basically it’s an oil paint
available from any good
stationers or art shop.
For this demo we will be
using a dark brown on
the Green Ochre side
and very dark grey for
the German Grey.
Get a pallet, mixing bowl, or just a paper plate as I have here. Squeeze a tiny amount of
paint out then using an odourless solvent (again should be in the same place in the store
you get the paint from) dilute it down to a thick wash consistency. Now for this sometimes it
may be better to work in small areas of the models but for this we will do the whole thing. So
apply the diluted oil paint all over the respective colour, it doesn’t have to be too neat at this
point as that will be sorted below.
Using a flat head brush get a little of the solvent on it, the less the better, then in long strokes
start going over the areas. Make sure you try and do long strokes evenly on the surface as
this helps the finish to the model. Keep making passes over each area and what you will do
is a) start removing the excess oil, b) dilute the oil to a thinner wash, and c) leave streaks of
the darker colour on the surface.
The final bit and this is really important because the paint is an oil it will take a period to dry. I
recommend at least 24 hours. Do not be tempted think it looks dry to try it with you finger
only to leave finger prints in it (yes I found that out the hard way)
Once fully dry it will be ok to handle without effect but if you find that you have left too much
of the oil on the model you can quite easily give it another pass with the solvent and it will
remove more of the paint so you can do it in little stages if you want. Also if you do too much
and are not happy with it you can dampen a cloth with the solvent and remove it all and start
again so it’s a bit of a forgiving technique until you get your eye in with it.
I have used this on the tanks as shown below and you can see the finished item. By no
means is this going to be the super top level finish that guys get with all the different
products they can use but if like me you are not fully confident to use those then this is a
great substitute.
Pretty much what you have done with this is apply a filter, a wash, and a streaking effect all
in one and I know I will be using this technique a lot going forward with different projects. So
have fun with it! Mess about and see what different colours give you on different vehicles. If
you so wanted if you apply a satin varnish once you have done one colour there is no reason
why you could not try another colour over the top and see what effects you can build up.
I hope this has been useful for anyone out there like me and again I must pay homage to
Patch for the simple and easy way he explained it in the first place and gave the confidence
to give it a go so I hope this helps you do that too.
Cheers, Kieran.
Download The mission to enjoy painting tanks again
The mission to enjoy painting tanks again.pdf (PDF, 699.04 KB)
Download PDF
Share this file on social networks
Link to this page
Permanent link
Use the permanent link to the download page to share your document on Facebook, Twitter, LinkedIn, or directly with a contact by e-Mail, Messenger, Whatsapp, Line..
Short link
Use the short link to share your document on Twitter or by text message (SMS)
HTML Code
Copy the following HTML code to share your document on a Website or Blog
QR Code to this page

This file has been shared publicly by a user of PDF Archive.
Document ID: 0000487140.