Etesia ETM105 + Multizone Engels (PDF)
File information
This PDF 1.7 document has been generated by Adobe InDesign CS6 (Windows) / Adobe PDF Library 10.0.1, and has been sent on pdf-archive.com on 01/11/2016 at 15:39, from IP address 145.131.x.x.
The current document download page has been viewed 955 times.
File size: 11.28 MB (56 pages).
Privacy: public file


File preview
GB
Original user
manual
Please read carefully before using your machine
ET MOWER
ETM105
SOMMAIRE
YOUR SAFETY AND THAT OF OTHERS ............................................................................................................................. 3
SET-UP INSTRUCTIONS FOR THE ETM105 ETESIA
1.
Key to diagrams............................................................................................................................................................................. 4
2.
Usual distances.............................................................................................................................................................................. 6
3.
Setting up the peripheral wire: Islands........................................................................................................................................ 10
4.
Setting up the charging station.................................................................................................................................................... 11
5.
Safety alert: Error message.......................................................................................................................................................... 12
6.
Important points to verify............................................................................................................................................................ 13
OPERATING AND MAINTENANCE MANUAL FOR THE ETM105 ROBOTIC ETESIA
1.
Description................................................................................................................................................................................... 15
2.
Pictures........................................................................................................................................................................................ 16
3.
Technical characteristics.............................................................................................................................................................. 20
4.
Operating instructions.................................................................................................................................................................. 20
5.
Settings........................................................................................................................................................................................ 26
6.
Multizone Option......................................................................................................................................................................... 28
7.
Maintenance................................................................................................................................................................................. 34
8.
Troubleshooting........................................................................................................................................................................... 36
INSTALLATION AND OPERATING INSTRUCTIONS FOR THE GPS / GPRS MODULE
AND THE TRACK&TRACE INTERNET APPLICATION
1.
Introduction.................................................................................................................................................................................. 40
2.
Installing the GPS / GPRS module.............................................................................................................................................. 40
3.
Using text messages to control the GPS / GPRS module ........................................................................................................... 40
4.
Using ‘Track&Trace’ server on the web...................................................................................................................................... 46
5.
Frequent issues and questions...................................................................................................................................................... 51
WARRANTY............................................................................................................................................................................................... 53
T
HANK YOU !
You are now the proud owner of an Etesia automatic robot mower!
This extremely reliable and tough machine has been specially designed
to give many years of service.
• In order to prolong the life of your mower and keep it in excellent
working order, read this manual carefully and always follow the
safety recommendations and maintenance instructions.
• As part of our commitment to excellence, we are constantly
seeking new ways of improving our products. For this reason, your
model may differ slightly from the description in this manual.
• Up-to-date technical information can be obtained from your
dealer.
• He will be happy to resolve any queries you may have.
• In accordance with article L.111-3 of the consumer code,
ETESIA undertakes to supply your dealership with spare parts,
original or compatible, indispensable for the use of your product
over a period of 10 years, as from the date of the invoice issued
by our company.
MOWER IDENTIFICATION
• The identification number of your mower is located on the
descriptive plate next to the control keypad.
• Always quote this number when seeking advice from your
dealer.
YOUR SAFETY AND THAT OF OTHERS
The Robot mower ETM105 has been designed to be safe for the
user. It is the subject, amongst other things, of a specific patent
concerning the cutting blades. In short, when they are in contact
with objects, the blades retract automatically, which is one of its
great advantages.
Furthermore, its sonar system enables it to perceive the presence
of people or objects nearby, which instantly makes it slow down.
When coming into slight contact with an obstacle, it stops and
automatically changes direction.
Unlike traditional garden maintenance machines, the Robot mower
ETM105 offers tranquillity and safety on the lawn. However, it is
still important to take certain precautions when handling the machine.
1. BEFORE USING YOUR ROBOT
- Familiarise yourself with the controls. Make sure you are fully
aware of the function which stops the machine safely.
- Ensure that there are no objects on the lawn (toys, branches, clothes,
etc.).
- If there is an automatic sprinkler system on your lawn, programme
your robot to return to the charging station at least 1 hour before the
sprinkler system starts.
- Check the gradient of the ground and ensure that it does not exceed
the maximum acceptable value, so that using the robot does not
present a hazard.
- Ensure that there are no other risks, in particular to children, pets
and belongings.
2. USE
- Even after reading the instructions for use thoroughly, it is
recommended to carry out a few test runs the first time you use the
robot in order to locate the controls and the key functions.
- WARNING! Never put your hand or foot underneath the robot
whilst it is turned on, particularly near the wheels.
- Turn off the robot safely and wait until the cutting blades have
stopped completely before lifting up, moving, or before any other
operation.
These precautions are essential for your safety. This advice is not,
however, exhaustive; always use your robot with caution.
3. MAINTENANCE AND STORAGE
- Carry out the recommended maintenance operations for your robot:
good maintenance will keep your robot in its best working order
and will get the best performance and a longer life.
- Disconnect the electricity supply before all operations on the
recharging station.
- Always turn the main switch to the OFF position before carrying
out any operation on the robot.
- Regularly check that the screws which attach the main parts are
tightly screwed.
- Your robot is an electrical appliance: never clean it with running
water.
- Wear protective gloves when handling the cutting blades.
- Always replace worn out parts with ETESIA spare parts to guarantee
the function and safety level intended.
Not following these recommendations could cause serious damage to
your robot or even expose you to serious bodily harm.
4. RESPONSIBILITY
- If the mower is not used in conformity with the instructions
manual and the regulation in force, ETESIA cannot accept any
responsibility.
- You must not make any modifications to your mower without the
prior agreement of ETESIA. Any modification not authorised by
ETESIA can render the machine dangerous and result in severe
injury during use.
- The use of any part “not of origin”, in addition to the risks incurred
by the user, would involve the cancellation of the guarantee for any
damage which results from it.
In the event of failure to abide by these instructions, ETESIA cannot
accept any responsibility.
3
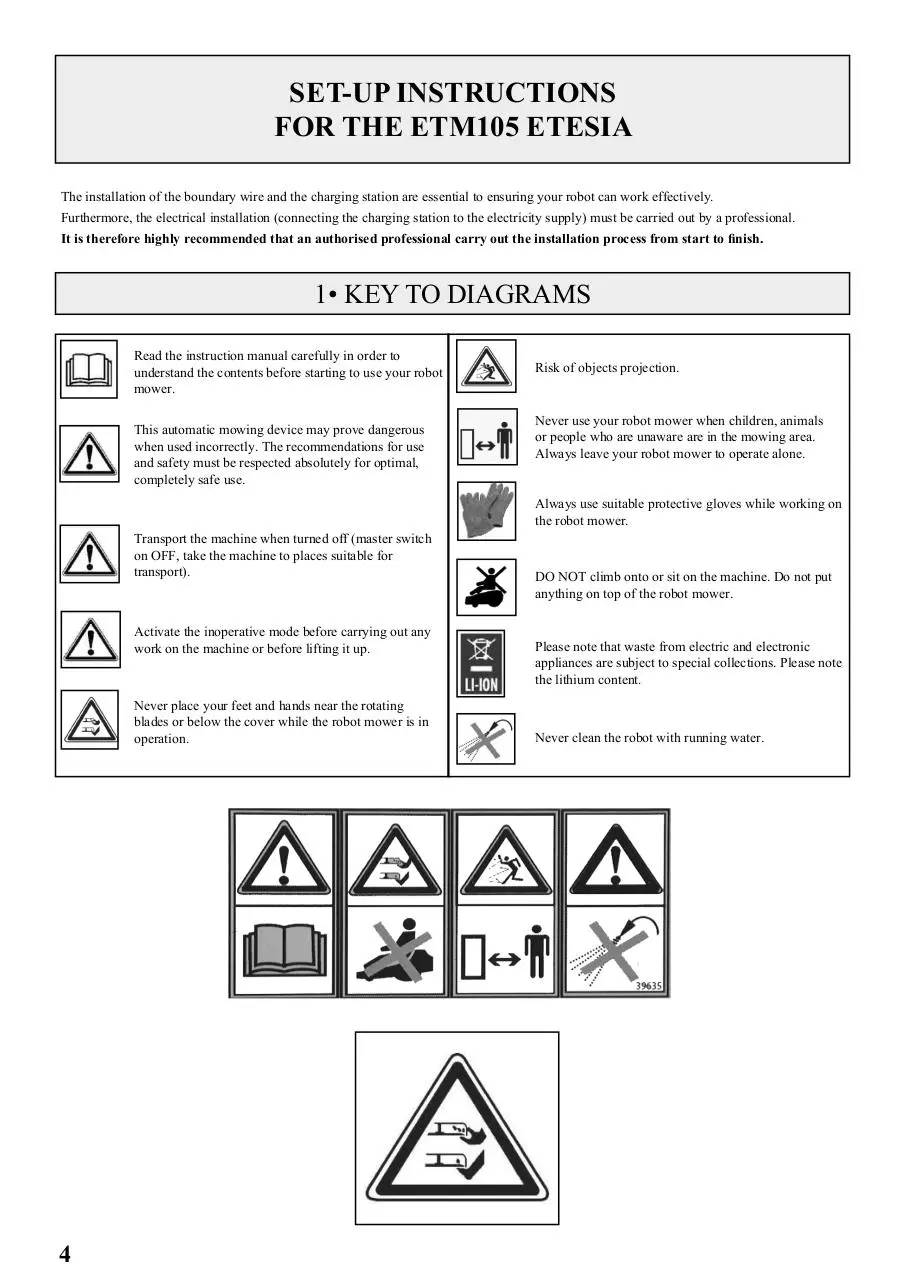
SET-UP INSTRUCTIONS
FOR THE ETM105 ETESIA
The installation of the boundary wire and the charging station are essential to ensuring your robot can work effectively.
Furthermore, the electrical installation (connecting the charging station to the electricity supply) must be carried out by a professional.
It is therefore highly recommended that an authorised professional carry out the installation process from start to finish.
1• KEY TO DIAGRAMS
Read the instruction manual carefully in order to
understand the contents before starting to use your robot
mower.
This automatic mowing device may prove dangerous
when used incorrectly. The recommendations for use
and safety must be respected absolutely for optimal,
completely safe use.
Risk of objects projection.
Never use your robot mower when children, animals
or people who are unaware are in the mowing area.
Always leave your robot mower to operate alone.
Always use suitable protective gloves while working on
the robot mower.
Transport the machine when turned off (master switch
on OFF, take the machine to places suitable for
transport).
Activate the inoperative mode before carrying out any
work on the machine or before lifting it up.
Never place your feet and hands near the rotating
blades or below the cover while the robot mower is in
operation.
4
DO NOT climb onto or sit on the machine. Do not put
anything on top of the robot mower.
Please note that waste from electric and electronic
appliances are subject to special collections. Please note
the lithium content.
Never clean the robot with running water.
1• KEY TO DIAGRAMS
5
2• USUAL DISTANCES
These distances are used in several cases. Every terrain is different and it must be kept in mind that different constraints are found in each case.
During set up, the installer must work as follows:
ETM105
Reminder:
- length of mowing: 105 cm;
- length of machine: 120 cm.
Charging station: distance of 65 cm
1. Begin setting up the wire from the charging station.
2. Position the wire in a clockwise direction.
3. Position the peripheral wire of an island in an anti-clockwise direction.
4. The cable is positioned between 2 and 5 cm deep.
Generally: 60 cm from the boundary
Terrain
boundary
Lawn
60 cm
Wire
Cross-section view
Edges, terraces, hollows: 65 cm
Lawn
Terrace
Cross-section view
65 cm
Wire
Paths, flowerbeds, at lawn level : between 30 and 50 cm
Lawn
Flowerbed
Path
30 cm
Cross-section view
50 cm
Wire
→ OBSTACLES:
2•1 LOCATED MORE THAN 1 M FROM THE EDGE OF THE TERRAIN: 2 SOLUTIONS
- Either the wire passes normally: see distances above.
- Or the wire passes in front of the obstacle (the small plot behind the obstacle will not be mowed).
2•2 LOCATED LESS THAN 1 M FROM THE EDGE OF THE TERRAIN: THE WIRE PASSES
IN FRONT
- Minimal mowing area (for demonstration): 15 m x 15 m (≈ 2 hundred metres squared).
- Passage: minimum distance of 5 m between the wires.
- It is worth ensuring a minimum distance of 15 m. between the peripheral wires when they are opposite each other (//) in front of the station.
Min 5 m
Outside area
Lawn
Min 15 m
Peripheral wire
Plan view
6
Min 200 m²
Plan view
2• USUAL DISTANCES
2•3 NARROW PATHWAYS
If the area being mown has narrow passageways or areas certain minimum dimensions must be complied with to ensure the mower operates
correctly and to ensure it can get back to the base unit.
L
l
Minimum distance between wires (l)
Length of narrow
passageway (L)
<1m
1<x<5m
5 < x < 15 m
> 15 m
ETM105
4.0 m
4.5 m
5.0 m
10.0 m
If these minimum distances are not available a second charger base unit will have to be set-up in the second mowing area.
The robot will be able to travel from one mowing area to the other during its random mowing travel but when the robot looks for the base
unit again it will stay in the area where it has finished working, i.e. at the end of allowed cutting time, its battery is discharged etc...
Minimum distance
between wires (2.5 m)
Maximum length of passageway
(5.00 m)
2•4 LENGTH OF PERIMETER WIRE
Minimum length to ensure correct robot operation: 200 m.
Maximum length beyond which the transmitted signal is too weak to enable correct operation: 1200 m.
7
2• USUAL DISTANCES
If the length of the perimeter wire exceeds the length of a spool of ETESIA ETC or ETC1 wire (500 m), a connection will have to be made
using an ETK connector according to the procedure described below.
1
3
2
≈ 30 mm
4
5
6
2
1
7
8
8
3
4
2• USUAL DISTANCES
9
=
10
=
11
12
13 a)
b)
c)
d)
> + 15°C
3 MIN
e)
f)
14
15
g)
h)
16
If the perimeter wire is modified or repaired after the robot is installed, due to the wire being cut, adding a plot, increasing the
size of the mowing area and so forth, it is imperative to use Etesia ETK connectors to connect the cables to ensure the join is
completely watertight.
9
Download Etesia ETM105 + Multizone Engels
Etesia ETM105 + Multizone Engels.pdf (PDF, 11.28 MB)
Download PDF
Share this file on social networks
Link to this page
Permanent link
Use the permanent link to the download page to share your document on Facebook, Twitter, LinkedIn, or directly with a contact by e-Mail, Messenger, Whatsapp, Line..
Short link
Use the short link to share your document on Twitter or by text message (SMS)
HTML Code
Copy the following HTML code to share your document on a Website or Blog
QR Code to this page

This file has been shared publicly by a user of PDF Archive.
Document ID: 0000502307.