Martin sprockets and gear full manual GL drawing FINAL GL (PDF)
File information
Author: USER ONE
This PDF 1.4 document has been generated by Writer / OpenOffice 4.1.3, and has been sent on pdf-archive.com on 16/11/2016 at 21:54, from IP address 99.57.x.x.
The current document download page has been viewed 281 times.
File size: 570.56 KB (45 pages).
Privacy: public file


File preview
HOW TO USE THE LATHE MACHINE
1. Turn on the machine
2. Turn on the digital board
3. Turn on the light
4. Turn on the coolant if necessary
5. Check the tightness of the Jaws
2. HOW TO TURN ON THE MACHINE (red lever)
1. Pull the lever out and up
2. Low to turn off until clicks
3. If you push the red lever too much you will start the reverse, lift
up the red lever again to turn it off.
4. THE FOOT BRAKE IS FOR EMERGENCIES
3. CUTTING JAWS
1. Choose the right jaws that grip enough and that to make the hole
not hit on the back.
2. Check if the jaws will not touch or hit when you close it into the
piece
3. Put Part to check size, make sure that your machine TIR is close
to 0, if it not go to 0, lose bolts an tight them one by one, repeat.
4. Find a suitable plate and tighten it up.
5. PUT PAINT IN THE JAWS
6. Touching face, and press Z
7. Touch inside OD, press X
8. Remove 10 press X
9. Turn on the machine, see if remove some paint and clean the
jaws
10. Remove more if needed
11. Touch the Z face, remove 3mm
12.
Cut face and look if the jaws are clean
4. SETTING THE PART OR ORDER
1. Check for order number
2. Check for number of pieces and material
3. Check for due date and priority
4. Check for sizes (OD, LTD, BORE)
5. Check for Instructions
6. Find Jaws
7. Find sword or insert and insert holder
8. Cut Jaws
9. Put plate when cutting jaws
10. Put paint
11. INDICATE PART
12. Cut Roughs
13. Measuring up to the extent indicated or leave 60 before making
the grooves, bore, HUB, or part for welding.
14. If the piece was started by someone else check the
measurements before start
(Never cuts without knowing exactly how much you are cutting)
5. T.I.R
The TIR is the maximum that you can change a piece when you
rotate it, most of the time the paper will say how TIR can vary, in
the first operation does not matter much, if you got 100 extra
material for cutting and the TIR is 30, its okay, unless the part that
has holes or cracks and may not be enough material for cleaning.
Always leave as little as possible of TIR.
1. Check the TIR of the drum or chawks to the least possible, a drum
that its not right will make you more cut in the jaws, or it will not
allow you to make your tir right on your piece, because you can only
move your drum 30thousand, if your piece is wrong 20 thousand,
your bolts will be too tight and you will not be able to move them
2. Unscrew all bolts before placing the jaws and indicates the drum,
3. Clean and turn the piece so that the see the best side, set and tight
it up as best u can, some 5 to 7 is ok.
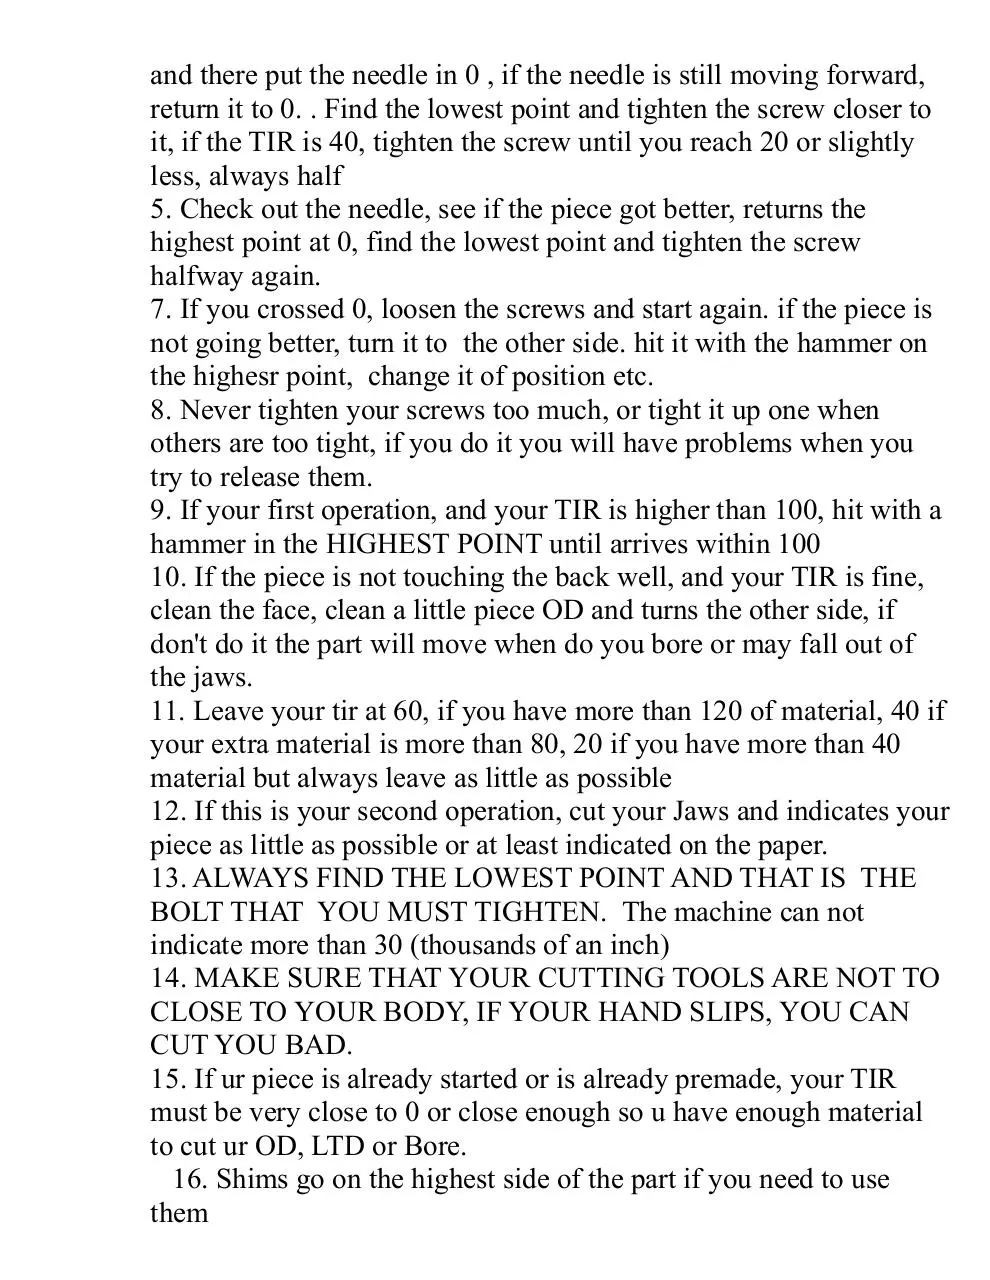
4. Put the indicator and check the needle, look for the highest point
and there put the needle in 0 , if the needle is still moving forward,
return it to 0. . Find the lowest point and tighten the screw closer to
it, if the TIR is 40, tighten the screw until you reach 20 or slightly
less, always half
5. Check out the needle, see if the piece got better, returns the
highest point at 0, find the lowest point and tighten the screw
halfway again.
7. If you crossed 0, loosen the screws and start again. if the piece is
not going better, turn it to the other side. hit it with the hammer on
the highesr point, change it of position etc.
8. Never tighten your screws too much, or tight it up one when
others are too tight, if you do it you will have problems when you
try to release them.
9. If your first operation, and your TIR is higher than 100, hit with a
hammer in the HIGHEST POINT until arrives within 100
10. If the piece is not touching the back well, and your TIR is fine,
clean the face, clean a little piece OD and turns the other side, if
don't do it the part will move when do you bore or may fall out of
the jaws.
11. Leave your tir at 60, if you have more than 120 of material, 40 if
your extra material is more than 80, 20 if you have more than 40
material but always leave as little as possible
12. If this is your second operation, cut your Jaws and indicates your
piece as little as possible or at least indicated on the paper.
13. ALWAYS FIND THE LOWEST POINT AND THAT IS THE
BOLT THAT YOU MUST TIGHTEN. The machine can not
indicate more than 30 (thousands of an inch)
14. MAKE SURE THAT YOUR CUTTING TOOLS ARE NOT TO
CLOSE TO YOUR BODY, IF YOUR HAND SLIPS, YOU CAN
CUT YOU BAD.
15. If ur piece is already started or is already premade, your TIR
must be very close to 0 or close enough so u have enough material
to cut ur OD, LTD or Bore.
16. Shims go on the highest side of the part if you need to use
them
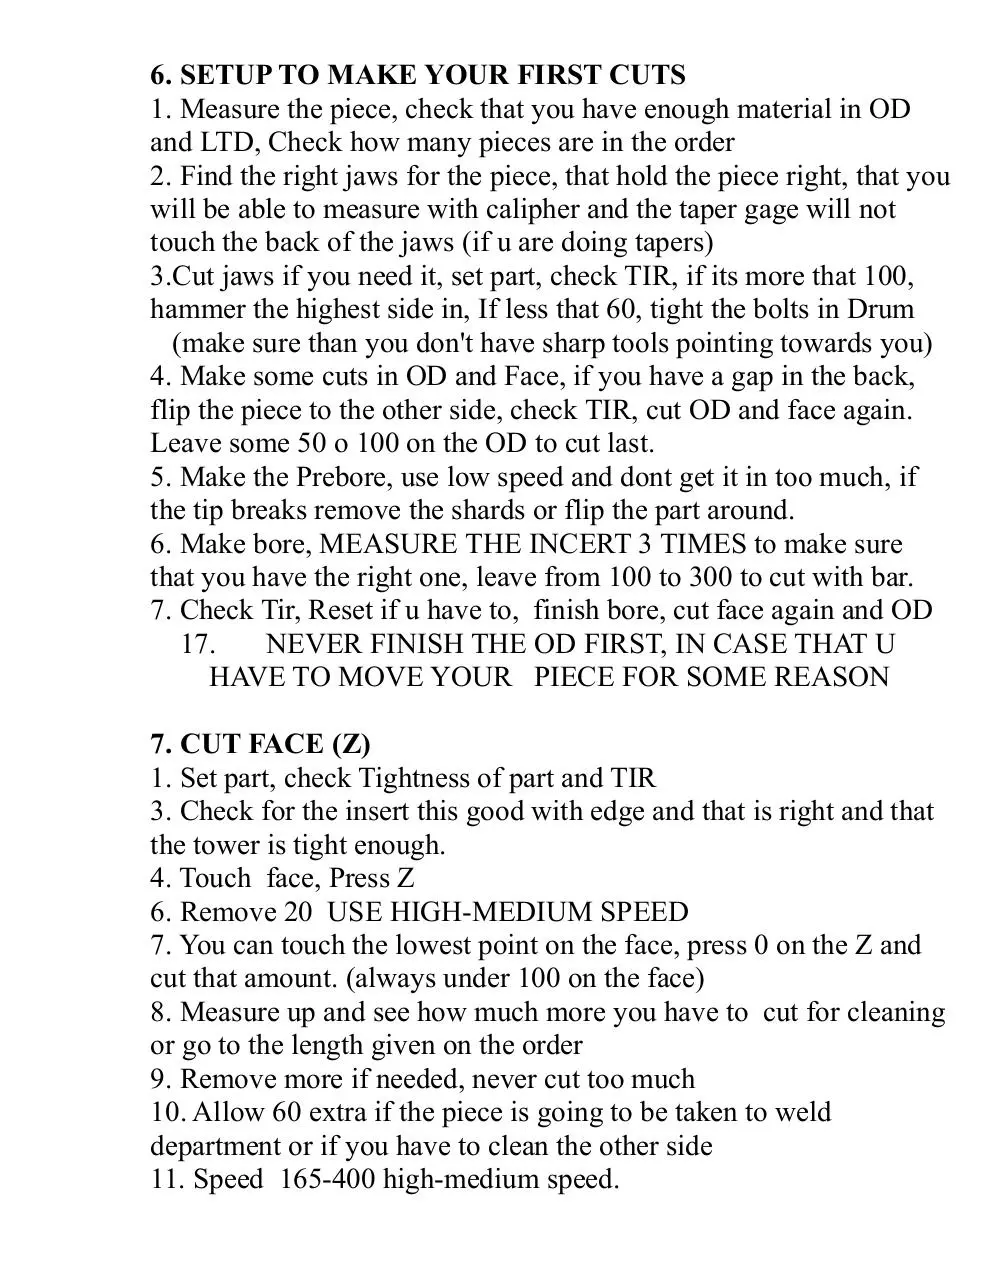
6. SETUP TO MAKE YOUR FIRST CUTS
1. Measure the piece, check that you have enough material in OD
and LTD, Check how many pieces are in the order
2. Find the right jaws for the piece, that hold the piece right, that you
will be able to measure with calipher and the taper gage will not
touch the back of the jaws (if u are doing tapers)
3.Cut jaws if you need it, set part, check TIR, if its more that 100,
hammer the highest side in, If less that 60, tight the bolts in Drum
(make sure than you don't have sharp tools pointing towards you)
4. Make some cuts in OD and Face, if you have a gap in the back,
flip the piece to the other side, check TIR, cut OD and face again.
Leave some 50 o 100 on the OD to cut last.
5. Make the Prebore, use low speed and dont get it in too much, if
the tip breaks remove the shards or flip the part around.
6. Make bore, MEASURE THE INCERT 3 TIMES to make sure
that you have the right one, leave from 100 to 300 to cut with bar.
7. Check Tir, Reset if u have to, finish bore, cut face again and OD
17.
NEVER FINISH THE OD FIRST, IN CASE THAT U
HAVE TO MOVE YOUR PIECE FOR SOME REASON
7. CUT FACE (Z)
1. Set part, check Tightness of part and TIR
3. Check for the insert this good with edge and that is right and that
the tower is tight enough.
4. Touch face, Press Z
6. Remove 20 USE HIGH-MEDIUM SPEED
7. You can touch the lowest point on the face, press 0 on the Z and
cut that amount. (always under 100 on the face)
8. Measure up and see how much more you have to cut for cleaning
or go to the length given on the order
9. Remove more if needed, never cut too much
10. Allow 60 extra if the piece is going to be taken to weld
department or if you have to clean the other side
11. Speed 165-400 high-medium speed.
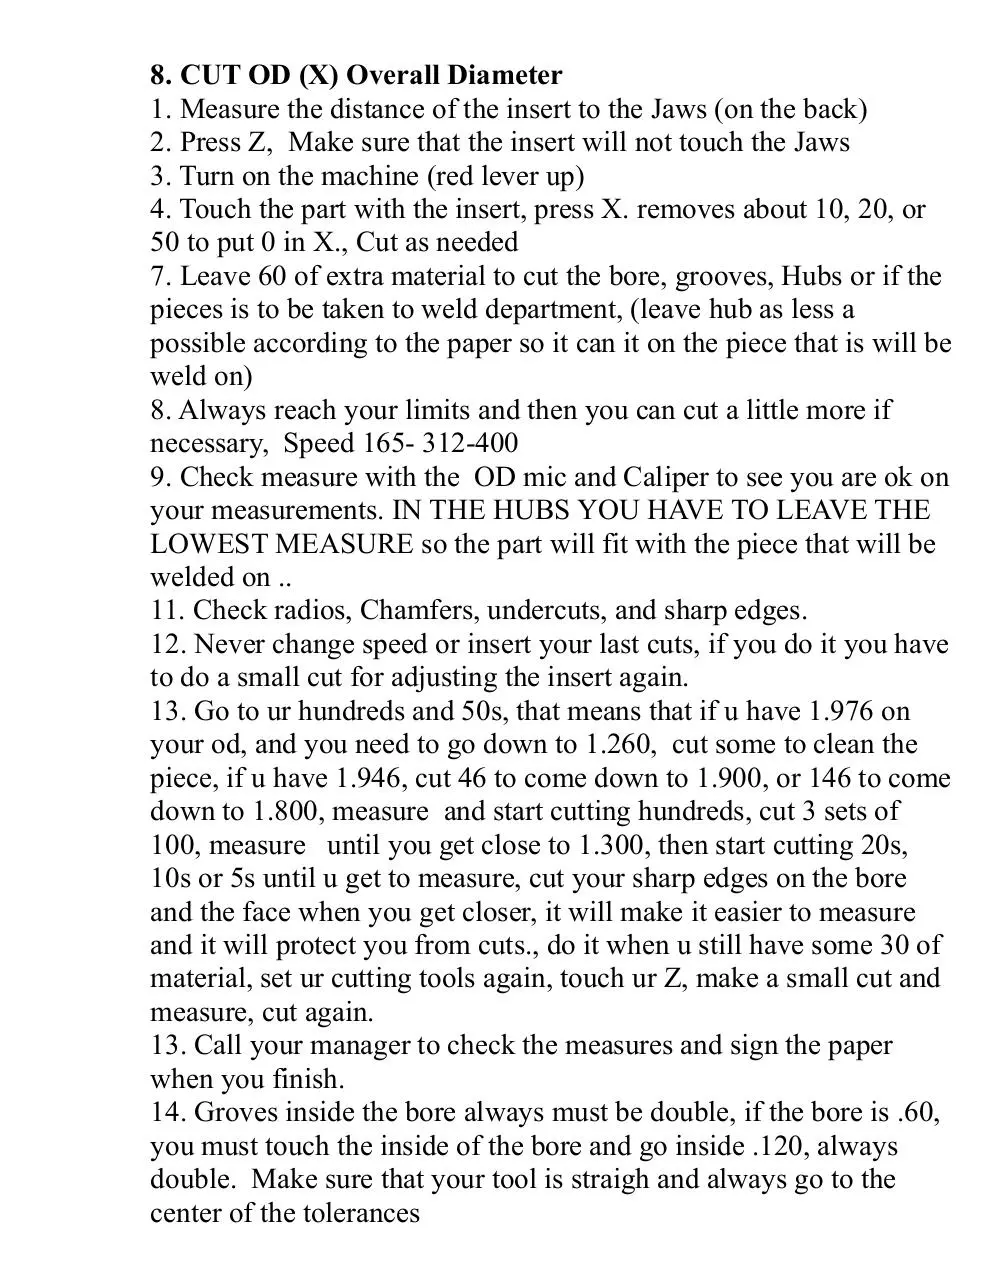
8. CUT OD (X) Overall Diameter
1. Measure the distance of the insert to the Jaws (on the back)
2. Press Z, Make sure that the insert will not touch the Jaws
3. Turn on the machine (red lever up)
4. Touch the part with the insert, press X. removes about 10, 20, or
50 to put 0 in X., Cut as needed
7. Leave 60 of extra material to cut the bore, grooves, Hubs or if the
pieces is to be taken to weld department, (leave hub as less a
possible according to the paper so it can it on the piece that is will be
weld on)
8. Always reach your limits and then you can cut a little more if
necessary, Speed 165- 312-400
9. Check measure with the OD mic and Caliper to see you are ok on
your measurements. IN THE HUBS YOU HAVE TO LEAVE THE
LOWEST MEASURE so the part will fit with the piece that will be
welded on ..
11. Check radios, Chamfers, undercuts, and sharp edges.
12. Never change speed or insert your last cuts, if you do it you have
to do a small cut for adjusting the insert again.
13. Go to ur hundreds and 50s, that means that if u have 1.976 on
your od, and you need to go down to 1.260, cut some to clean the
piece, if u have 1.946, cut 46 to come down to 1.900, or 146 to come
down to 1.800, measure and start cutting hundreds, cut 3 sets of
100, measure until you get close to 1.300, then start cutting 20s,
10s or 5s until u get to measure, cut your sharp edges on the bore
and the face when you get closer, it will make it easier to measure
and it will protect you from cuts., do it when u still have some 30 of
material, set ur cutting tools again, touch ur Z, make a small cut and
measure, cut again.
13. Call your manager to check the measures and sign the paper
when you finish.
14. Groves inside the bore always must be double, if the bore is .60,
you must touch the inside of the bore and go inside .120, always
double. Make sure that your tool is straigh and always go to the
center of the tolerances
9. HOW TO MAKE THE BORE
1. Search for the Sword,quadrill insert and insert holder
2. Place Part and indicate
3. Measure insert to have the right size, always 100 or more
undersized
4. Make Prebore
5. Put the drill and tight it up on the tower
6. Put wood and brake
7. Turn on machines on slow (65-124)
8. Check for size of the sword and measure with the caliper again
9. Turn by hand
10. Drills and swords can break if you too much pressure or over
heat if they are very big, if breaks, remove bits, turn to other side.
(Remove the trash with the air so that it does not jam inside the
hole)
11. Use lower speeds using stainless steel (65) because if it
overheats, it melts inside the hole and the metal becomes harder
with heat, using a smaller sword or turn the piece around if this
happens. If the insert or sword breaks, removes the chunks because
those chunks can break the next insert.
12. Measure, cut more and leave 60 for making the grooves, bore,
HUB, or if the piece will be taken to weld departament.
13.
CUT ur sharp edges on OD and bore when u get closer,
always leave around 100 under to cut with your boring bar last,
because if your insert breaks, it will make nicks in the bore and
you will not be able to clean it up. Use a rimmer if you can
(only for parts that will be weld.
10. HOW TO FINISH THE BORE
1. Put bar, make sure that is centered in the hole.
2. Check that the incert is not broken or blunt
3. Check that the bar will not touch the edges of the bore.
4. Put the rod into the hole until you see it on the back, press Z
5. Move Jaws to see that not touching back
6. Turn on machine, touch inside face press X
7. Remove 10 or 20 and always remove half of what you have.
8. Measure with 3d digital Mic or ID mic
9. Remove more with appropriate cuts, if you have 100, removes 60,
if you have 60 removes 30, if you have 30 removes 15 if you have
15 removes 7, if you are 7 removes 3, if you have 3, remove 1 or 0
(2 times to remove the pressure).
10. Make cuts 1 or 2 or less at the end
11. Use Sandpaper if necessary * ask supervisor for help, sandpaper
and files are very dangerous to use, sandpaper can wrap around your
arm or fingers, push them into the machine and break your fingers,
file can hit the jaws and hit you specially if it has no wood handle.
12. Remove the sharp edges
13. Never pass the limits and if the part to be heated, cut or get
milled or heated somehow, always reaches a little bit over half so
they would not return if the hole shrinks.
14. If the piece is hot, cool it before finishing the hole because it will
shrink when cools down.
15. Use plug to see if it goes thru, use sandpaper* or powertool if
needed. (*be careful using sandpaper)
16. Never change the insert or change of speed in you are almost
done because it can cut more, FOR EXAMPLE, if you have 10 to
remove, and you change your speed or insert, it will cut around 3,
you have to make a small cut of 1 or 2 to graduate the bar again.
17. BE CAREFUL WHEN FINISHING BORE
18. Speed 400, if the bore chatters, use new insert, bigger bar, raise
your bar, change speed or sharper or bolder insert.
11. CHECKING LENGTH OF THE PART (LTD)
1. Check for the piece from one side to the other
2. Face for cleaning, reach the indicated measure or leave enough to
cut on the other side
3. Take measures on 3 sides, if the difference of the measure is more
than 3 find the highest side and hit with a hammer to make it better.
Loosen it and hit it more and tight it up again, check the TIR, and
make a cut of 5. If this don't fix the piece, take it out and clean the
jaws or cut it again if needed because you may have trash behind the
piece, always do this when you have material not when you almost
done. Make sure that your calipher is not hitting the back of the
machine, find a smaller calipher or measure from the bore if needed.
This is very important for your piece otherwise it will have bad
measures all around, remove the part from the machine and clean up
the jaws until you have a good measure, clean the part with the
buffer if you can to remove trash, weld and paint ( Speed 165400)
12. SPEED OF THE TOWER
1. You have to find a suitable speed so that the piece does not
vibrate, shatter or make bad cut on the piece
2. Make sure the incert is for steel, copper, wood, plastic or iron and
that is not broken or blunt
3. Make sure of the way that the tower will go, turn it on in the air to
see which side runs You can increase or decrease the speed of the
tower using the small H and L lever
4. NEVER PUT THE INSERT NEAR THE PART BEFORE
STARTING THE MACHINE BECAUSE IT CAN HIT THE PIECE
AND PULL THE PART OUT OF THE JAWS
6. Pay attention that the insert does not hit in Jaws.
7. Make sure that the bolts in the tower are properly tighted, put
some greese and make sure that there is not trash underneat.
13.
HUBS
Hubs are parts that have a big od and a small Od and the bore.
FIRST OPERATION
1. Put part, check TIR, if the part is more that a 100 TIR, hammer
the highest side in.
2. Cut some material on face and OD, (if you have a lot of material),
if the back of the piece has a gap where is not touching theback of
the jaws, flip around, check tir again and cut the face and OD again
3. Do the pre-bore, and drill it leaving from 70 to 200 under to cut
with the bar.
4. if you have more pieces, put another piece, cut some on face and
OD and drill them also.
2. Reset the first piece, cut the face again and finish bore, OD,
chamfler and sharp edges.
SECOND OPERATION
1. Check drum TIR, cut the jaws, set piece, set TIR almost to 0,
(loosen up all bolts on the drum if you need it
2. Finish the LTD
3. Finish hub, cut sharp edges and check bore again because
sometimes shrinks with the heat.
(Do OD, bore and face on first operation, Hub on second unless
the part is too thin)
Download Martin sprockets and gear full manual GL drawing FINAL GL
Martin sprockets and gear full manual GL drawing FINAL GL.pdf (PDF, 570.56 KB)
Download PDF
Share this file on social networks
Link to this page
Permanent link
Use the permanent link to the download page to share your document on Facebook, Twitter, LinkedIn, or directly with a contact by e-Mail, Messenger, Whatsapp, Line..
Short link
Use the short link to share your document on Twitter or by text message (SMS)
HTML Code
Copy the following HTML code to share your document on a Website or Blog
QR Code to this page

This file has been shared publicly by a user of PDF Archive.
Document ID: 0000508193.