N016487 manual (PDF)
File information
Title: Caffe Mio Programming
Author: George Tsikourakis
This PDF 1.5 document has been generated by Acrobat PDFMaker 10.1 for Word / Adobe PDF Library 10.0, and has been sent on pdf-archive.com on 22/11/2016 at 14:48, from IP address 66.131.x.x.
The current document download page has been viewed 714 times.
File size: 6.36 MB (110 pages).
Privacy: public file


File preview
February 2012
Operation & Service Manual
VKI Publication #N016487
CAFFÈ MIO – OPERATION AND SERVICE
Page 2 of 110
TABLE OF CONTENTS
SECTION 1 - INTRODUCTION ........................................................................................ 3
Equipment Overview .................................................................................................. 4
Equipment Specifications ........................................................................................... 6
Using Coffee Packets .................................................................................................. 7
General Information .................................................................................................. 7
SECTION 2 - INSTALLATION ......................................................................................... 7
Unpacking .................................................................................................................. 8
Plumbing the Unit ...................................................................................................... 9
Water Filter ................................................................................................................ 9
Installing a Flo-Jet Pump ......................................................................................... 10
Installing the Scalehammer ..................................................................................... 10
Cup Holder Installation ............................................................................................ 12
Condiment Stand Installation................................................................................... 12
Adding Products ....................................................................................................... 13
Testing Equipment Operation ................................................................................... 14
Publicity Graphics Installation ................................................................................. 15
Software Menus ....................................................................................................... 16
SECTION 3 - MAINTENANCE ........................................................................................ 18
Daily Customer Maintenance .................................................................................... 19
Preventative Maintenance ........................................................................................ 20
Brewer Adjustments ................................................................................................ 25
Brew Chamber Tension Adjustment ......................................................................... 25
Brew Chamber Installation...................................................................................... 26
General Maintenance and Adjustments ..................................................................... 26
Zuma Brewer – Brew Chamber Tension Adjustment ................................................... 27
Downloading Software Updates ............................................................................... 29
SECTION 4 - TROUBLESHOOTING................................................................................ 31
Indicator Messages .................................................................................................. 32
Troubleshooting ....................................................................................................... 35
Coffee .................................................................................................................. 35
Coffee Water ......................................................................................................... 36
Chocolate ............................................................................................................. 36
Fuses ................................................................................................................... 37
Overflows ............................................................................................................. 37
Water Tank ........................................................................................................... 38
Zuma Brewer ........................................................................................................ 39
SECTION 5 – REPLACING COMPONENTS ..................................................................... 39
Replacing Major Components ................................................................................... 40
Outlet Valve(s) ...................................................................................................... 40
Brewer Screen ...................................................................................................... 45
Brewer ................................................................................................................. 47
Brewer Bracket / Brewer Motor ............................................................................... 50
Water Tank ........................................................................................................... 54
Water Tank Lid ...................................................................................................... 62
Heater Element ..................................................................................................... 66
Temperature Probe ................................................................................................ 68
Ingredient Dispenser.............................................................................................. 71
Ingredient Dispenser Motor ..................................................................................... 74
Front Circuit Board ................................................................................................ 80
Rear Circuit Board ................................................................................................. 87
Whipper Motor ...................................................................................................... 89
Inlet Valve ............................................................................................................ 97
Fuse Box Assembly ................................................................................................ 99
Overflow Cup Assembly ......................................................................................... 102
Heater Relay ........................................................................................................ 103
Thermal Cut-Off Switch ......................................................................................... 104
CAFFÈ MIO – OPERATION AND SERVICE
Page 3 of 110
SECTION
1
-
INTRODUCTION
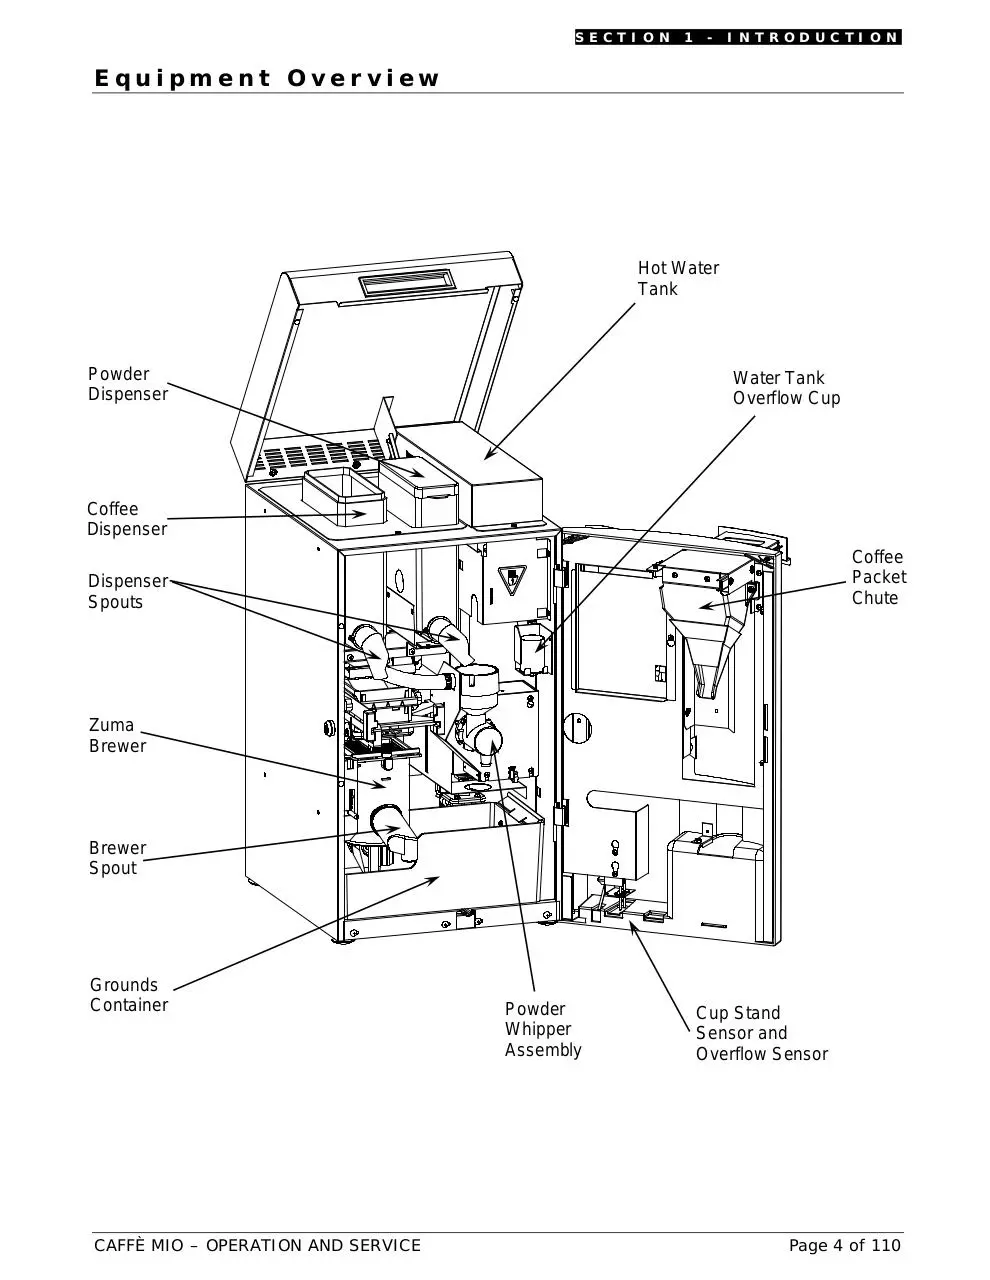
Equipment Overview
Hot Water
Tank
Powder
Dispenser
Water Tank
Overflow Cup
Coffee
Dispenser
Coffee
Packet
Chute
Dispenser
Spouts
Zuma
Brewer
Brewer
Spout
Grounds
Container
CAFFÈ MIO – OPERATION AND SERVICE
Powder
Whipper
Assembly
Cup Stand
Sensor and
Overflow Sensor
Page 4 of 110
SECTION
1
-
INTRODUCTION
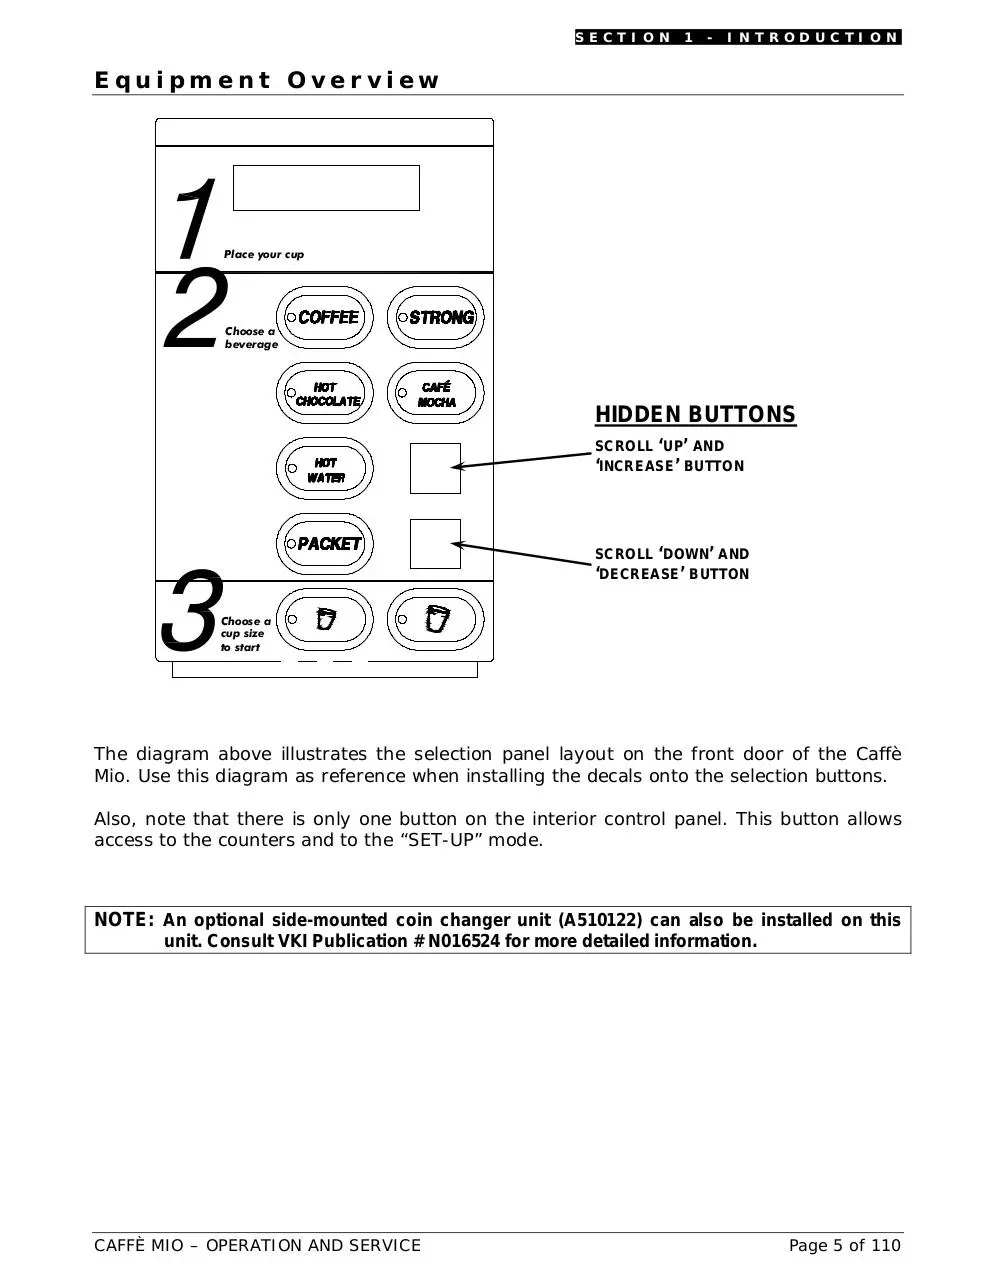
Equipment Overview
Place your cup
Choose a
beverage
HIDDEN BUTTONS
SCROLL ‘UP’ AND
‘INCREASE’ BUTTON
SCROLL ‘DOWN’ AND
‘DECREASE’ BUTTON
Choose a
cup size
to start
The diagram above illustrates the selection panel layout on the front door of the Caffè
Mio. Use this diagram as reference when installing the decals onto the selection buttons.
Also, note that there is only one button on the interior control panel. This button allows
access to the counters and to the “SET-UP” mode.
NOTE: An optional side-mounted coin changer unit (A510122) can also be installed on this
unit. Consult VKI Publication # N016524 for more detailed information.
CAFFÈ MIO – OPERATION AND SERVICE
Page 5 of 110
SECTION
1
-
INTRODUCTION
Equipment Specifications
WARNING: This equipment is designed for INDOOR USE ONLY. Placing the unit
outdoors is extremely dangerous. VKI Technologies is not responsible for any
damage or injury resulting from outdoor placements of these coffee makers.
ELECTRICAL SPECS
Power Consumption (Heater):
Maximum Current Draw:
Power Source:
1100 watts
12.5 amps
115 Volts AC @ 60Hz
OVERALL DIMENSIONS
Height:
Width:
Depth:
26.5 in
13.5 in
19.5 in
(67 cm)
(34 cm)
(49 cm)
INSTALLATION DIMENSIONS
Height:
Width:
Depth:
35.5 in
22.5 in
24 in
(90 cm)
(57 cm)
(61 cm)
85 lbs
102 lbs
(39 kg)
(46 kg)
WEIGHT
Shipping:
Operational:
CAPACITY
Coffee Hopper:
1.5 lbs
Powder Hopper: 2 lbs
Hot Water Tank: 1.9 gallons
(680 g)
(908 g)
(7.3 liters)
BREWER
12-oz Zuma Paperless
Brewing Temperature:
approximately 199°F (93°C)
FUSES
5 amp
15 amp
Protects valves, motors and electronics
Protects heater circuit only
CAFFÈ MIO – OPERATION AND SERVICE
Page 6 of 110
SECTION
1
-
INTRODUCTION
Using Coffee Packets
To brew a cup of coffee using a packet, follow these simple instructions.
1. Press the “PACKET” button on the front selection panel.
2. Open the packet door on the top front of the machine.
3. Open the coffee packet and pour the contents into the packet opening on the top of the
machine.
4. Close the packet door.
5. Press the pre-selected cup size button for the packet to start the brew cycle. The LED for
this cup size will be flashing.
NOTE: To cancel the packet option if the packet button has been pressed accidentally, press
the “COFFEE” button. If the cycle is not started in 30 seconds, the packet cycle will
automatically be canceled.
General Information
The hot water feature is “PRESS AND HOLD” only. Hot water will only be dispensed as long as
the “HOT WATER” button is pressed. It will not be dispensed “by the cup”.
There is only one button on the inner board panel. This button is used to access the set-up
mode, and to return to the main menu after a setting has been changed.
The access code to enter the SET-UP is:
“SET-UP” ACCESS CODE
COFFEE
+
PACKET + CHOCOLATE
+
COFFEE
To exit a sub-menu and get back to the main menu, press the SET-UP button.
To display the VEND TOTAL, press the "COFFEE" and "STRONG" buttons simultaneously.
To display the FREE VEND TOTAL, press the "CHOCOLATE" and "STRONG" buttons simultaneously.
To display the WATER TEMPERATURE, press the "CAFÉ MOCHA" and "STRONG" buttons
simultaneously.
To reset the counters, scroll to the “CLEAR COUNTERS” menu in the set-up and enter the
following access code:
“CLEAR COUNTERS” ACCESS CODE
COFFEE
+
PACKET + CHOCOLATE
+
COFFEE
+
SMALL CUP
The COFFEE and SMALL CUP buttons cannot be disabled. All other buttons can be disabled in the
ENABLE SWITCHES menu.
This unit works in free vend only, unless an optional, side-mounted coin changer unit is
installed (p/n – A510122).
CAFFÈ MIO – OPERATION AND SERVICE
Page 7 of 110
SECTION
2
-
INSTALLATION
Unpacking
NOTE: Prior to signing for the delivery, check the shipping carton for damage. Indicate any
damage on the delivery slip and have the driver sign acknowledging it. Damages
during shipping must be claimed with the carrier, and not with VKI Technologies.
1. Remove the coffee maker from its shipping carton.
2. Lift and place the coffee maker onto your workbench.
WARNING: DO NOT lift the coffee maker by placing your hand underneath
the front door. It is not designed to support the weight of the machine, and
serious personal injury and/or damage to the unit may occur.
3. Open the outer door (the key is in a small envelope attached to the service cord) and
open the top cover.
4. Remove all the shipping tape.
a) Shipping tape is found in the following areas: service cord, brewer spout, cup
tray.
5. Remove the cup tray shipped inside the coffee maker and install it onto the front door.
CAFFÈ MIO – OPERATION AND SERVICE
Page 8 of 110
SECTION
2
-
INSTALLATION
Plumbing the Unit
NOTE: The shut-off valve must be easily
accessible by the customer, who
must be informed of its location
during the installation.
MATERIAL REQUIREMENTS:
EQUIPMENT FITTING: Male 3/8 inch NPTF
TUBING (WATER SUPPLY TO FILTER): Reinforced PVC Beverage grade
TUBING (WATER FILTER TO EQUIPMENT): Stainless steel braided hose
Water Filter
We recommend the use of a high quality water filter (such as Everpure Filters) which will
eliminate most odors present in water, and reduce the amount of particles entering the
water tank. The following are basic instructions for installing a cartridge type filter using a
head bracket (Everpure type filter).
1. Assemble the retaining bracket to the filter head.
2. Insert the cartridge into the filter head and turn the cartridge clockwise.
3. Apply Teflon tape to the threaded portion of two 3/8" x 1/4" fittings and screw
each into the filter head.
4. Mount the water filter at an easily accessible place for servicing, such as:
(a) Under the sink against the back or side wall,
(b) On the back of a utility cabinet,
(c) On the back of the coffee maker,
(d) Any location generally within 20 feet of the machine.
NOTE: When the filter is installed or replaced, make sure to write the installation date in the
provided area on the filter cartridge. Follow the manufacturer’s recommendations for
filter replacement intervals.
CAFFÈ MIO – OPERATION AND SERVICE
Page 9 of 110
Download N016487 manual
N016487_manual.pdf (PDF, 6.36 MB)
Download PDF
Share this file on social networks
Link to this page
Permanent link
Use the permanent link to the download page to share your document on Facebook, Twitter, LinkedIn, or directly with a contact by e-Mail, Messenger, Whatsapp, Line..
Short link
Use the short link to share your document on Twitter or by text message (SMS)
HTML Code
Copy the following HTML code to share your document on a Website or Blog
QR Code to this page

This file has been shared publicly by a user of PDF Archive.
Document ID: 0000511224.