hopepoint final (PDF)
File information
Title: so the hopepoint instructions are a little unclear if you dont know…
This PDF 1.3 document has been generated by Notes / Mac OS X 10.12.1 Quartz PDFContext, and has been sent on pdf-archive.com on 15/12/2016 at 17:58, from IP address 24.56.x.x.
The current document download page has been viewed 3949 times.
File size: 1.48 MB (13 pages).
Privacy: public file


File preview
so the hopepoint instructions are a little unclear if you dont know how to navigate
xcode
iʼll add additional steps to their already established instructions, starting from step
1
step 1: after having downloaded xcode and the source file and connecting your
iphone successfully to your computer and running hopepoint.xcodeproj from the
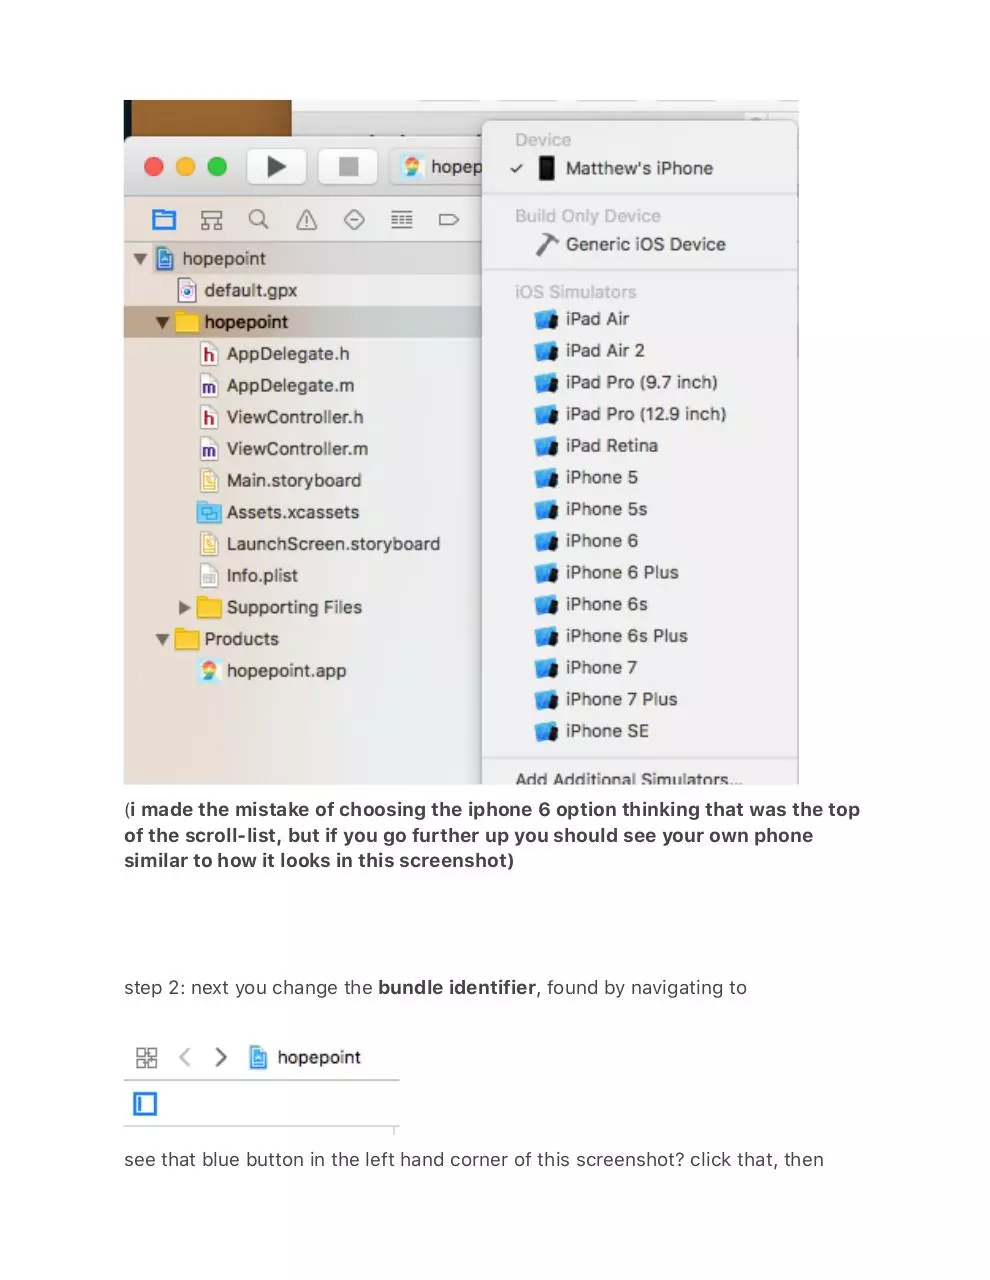
source file you downloaded, you should see this screen (roughly)
make sure that you select your device by scrolling all the way up after
connecting it to your macbook
(i made the mistake of choosing the iphone 6 option thinking that was the top
of the scroll-list, but if you go further up you should see your own phone
similar to how it looks in this screenshot)
step 2: next you change the bundle identifier, found by navigating to
see that blue button in the left hand corner of this screenshot? click that, then
click the Target submenu, then Hopepoint (it should have the colored icon)
change the field that says “cytoplasms” (mine just says that cause thats what i
changed it to, it will originally say “9magnets”)
hereʼs where things got tricky: if youʼve never set up xcode before, what youʼll
need to do is let the program sign and allow certificates to be signed by this
program. this is how youʼll do it
A. navigate to the “signing” submenu in the menu you have just navigated to
previously (should look like this)
granted, if youʼve never set up xcode before, it will have a blank signing option.
this is where you sign in with your mac credentials, the ones you use for your
icloud account (doesnʼt have to be any fancy apple developer account; mine is not
and still works like a charm)
E. once youʼve signed your stuff off, it should look like the following image above.
uncheck automatically manage signing, then navigate to the submenu of
the entire application (xcode) and click product, then clean
the function should be right under Build and right above Stop
*************once this is done, you must recheck the box that says
automatically manage signing***********
G. now that youʼve figured out the signing details, you must navigate to
this screen above, clicking the Project submenu this time and scrolling down to
the Signing portion of this submenu. change every setting in the signing
portion of this submenu to “iOS developer”
********one more thing you need to know before going into this*********
you must allow your device to be managed by your email: this can easily be done
by going to Settings->General->Device Management->Developer App (this
will say whatever apple credentials you used to sign in xcode) then tap Trust
xcode will notify you of this, but this is just a heads up as well from me
once youʼre done changing these settings, the trickiest part of this guide is
over. breathe easy, smoke a bowl, relax. rest is all smooth sailing. the
program should say something along the lines of “processing symbols” or
something in the status bar, which is dead center in the program. wait that
out. like i said, smoke a bowl.
if you refer to this guide AND the original guide posted on the github link for
hopepoint, this covers the grounds for steps 1-5in the original guide; now we move
on to using your desired location in hopepoint.
for this, i used http://gpx-poi.com/ (shoutout to the random twitter acc that replied
to the HSEarly tweet for supplying this) to get the .gpx file coordinates that
xcode will use; this is essential if you want to use a certain city (like SF) for
the simulation when on the confirmed app. this link lets you create the .gpx
file AND download it. all you have to do in xcode to input this .gpx file is
navigate to
this ^^^^^^^^^^^^^^highlighted menu in the xcode application
once you do that, you can browse whatever folder you downloaded the .gpx file
into and add it to the simulation; your added .gpx file will be placed in the first
list of preset locations, similar to this screenshot below
default (4) is the filename of the .gpx file that i added, and once youʼre running
hopepoint it should change location in real time to your desired location; there is
no need to stop hopepoint once youʼve added your own .gpx file! you can only
simulate the location while hopepoint is running
congrats, you have now successfully put in any location into your phone, and, if
everything worked out smoothly, you should be able to see that you would indeed
be in the zone that you werenʼt in prior to following both this guide and the original
github guide provided by the lovely people that produced hopepoint.
lets go through a checklist just to be sure
A. you have a connect in whatever zone is closest to you that can pick up the
shoes, with at least a valid photo ID
E. you put in the correct info for them, birth date, official government-issued
name, and your size of course
G. your phone is selected in the drop menu to the left of the status bar to run
hopepoint and your settings info looks like this
Download hopepoint final
hopepoint final.pdf (PDF, 1.48 MB)
Download PDF
Share this file on social networks
Link to this page
Permanent link
Use the permanent link to the download page to share your document on Facebook, Twitter, LinkedIn, or directly with a contact by e-Mail, Messenger, Whatsapp, Line..
Short link
Use the short link to share your document on Twitter or by text message (SMS)
HTML Code
Copy the following HTML code to share your document on a Website or Blog
QR Code to this page

This file has been shared publicly by a user of PDF Archive.
Document ID: 0000522841.