SHELF PLAN (PDF)
File information
Title: P468-5955R Coat and Mitten/JC
Author: rpanzullo
This PDF 1.4 document has been generated by QuarkXPress: pictwpstops filter 1.0 / Acrobat Distiller 7.0 for Macintosh, and has been sent on pdf-archive.com on 01/02/2017 at 21:19, from IP address 174.48.x.x.
The current document download page has been viewed 629 times.
File size: 141.24 KB (6 pages).
Privacy: public file


File preview
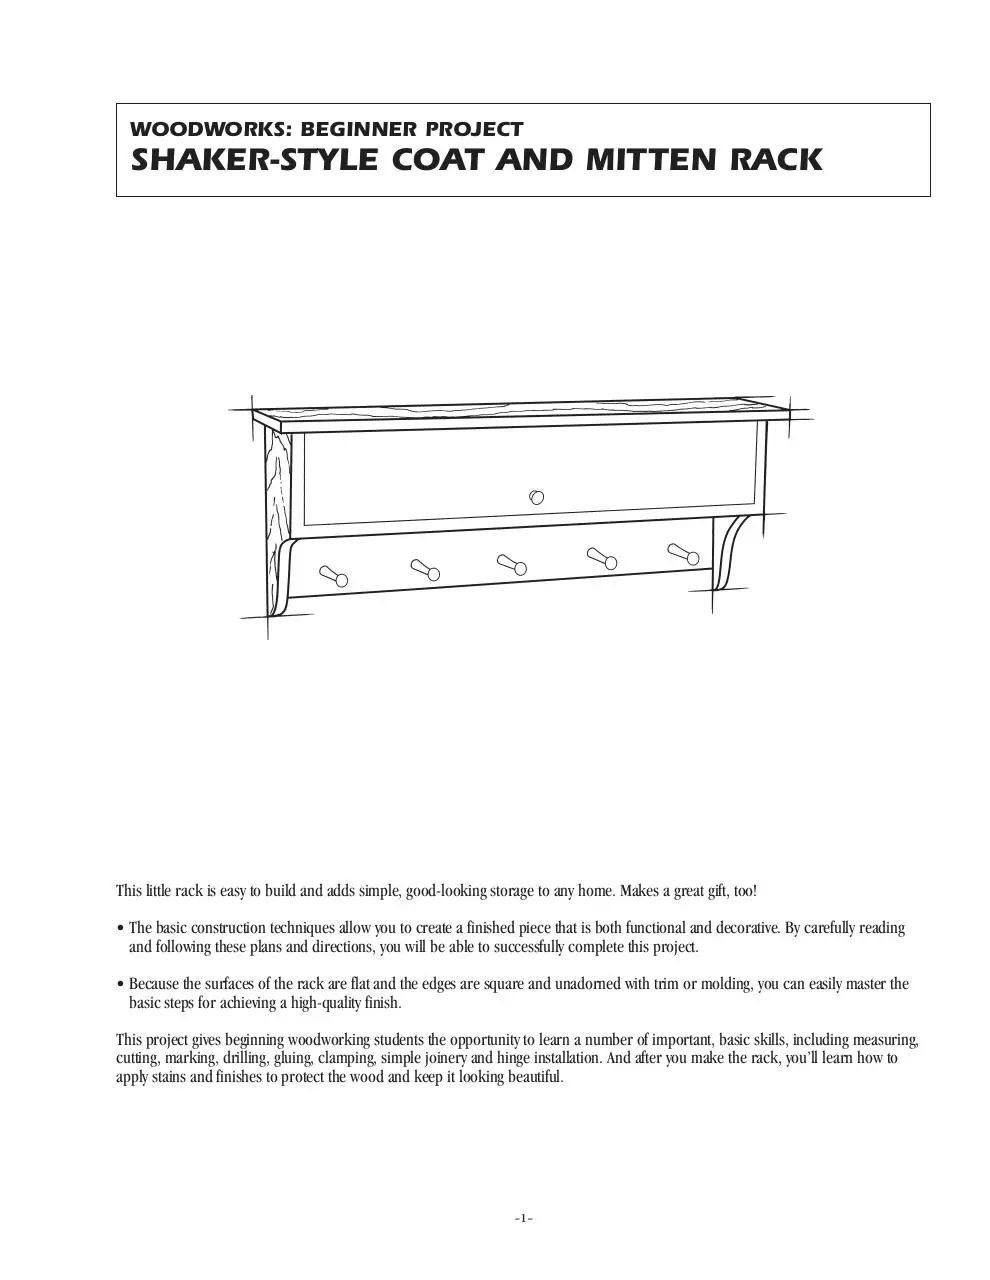
WOODWORKS: BEGINNER PROJECT
SHAKER-STYLE COAT AND MITTEN RACK
This little rack is easy to build and adds simple, good-looking storage to any home. Makes a great gift, too!
• The basic construction techniques allow you to create a finished piece that is both functional and decorative. By carefully reading
and following these plans and directions, you will be able to successfully complete this project.
• Because the surfaces of the rack are flat and the edges are square and unadorned with trim or molding, you can easily master the
basic steps for achieving a high-quality finish.
This project gives beginning woodworking students the opportunity to learn a number of important, basic skills, including measuring,
cutting, marking, drilling, gluing, clamping, simple joinery and hinge installation. And after you make the rack, you’ll learn how to
apply stains and finishes to protect the wood and keep it looking beautiful.
–1–
CONTINUED - WOODWORKS: BEGINNER PROJECT 2001-2002 SHAKER-STYLE COAT AND MITTEN RACK
TOOLS REQUIRED
Hand Tools
– Try or combination square
– Bar clamps
– Tape measure or folding ruler
– Screwdriver
Power Tools
– Scroll or saber saw
– Table or circular saw
– Electric drill, 3/8’’ spade bit, 1/2’’
spade bit, pilot hole/countersink bit
– Belt sander
Miscellaneous
– Pencil
– Compass
– Safety glasses
WOOD BUYING/CUTTING LIST
Key
A
B
C
D
E
F
G
Pcs.
2
1
1
1
1
1
2
Size
3/4’’ x 6-1/4’’ x 14’’
3/4’’ x 6-1/4’’ x 32-1/2’’
3/4’’ x 3-1/2’’ x 32-1/2’’
3/4’’ x 7-1/4’’ x 36’’
3/4’’ x 5-13/16’’ x 32-5/16’’
3/4’’ x 1-1/4’’ x 32-1/2’’
3/4’’ x 1/2’’ x 6’’
Description
pine sides
pine shelf
pine peg strip
pine top
pine hatch
pine hanging strip
pine hatch stop
OTHER MATERIALS
Item
1-1/2’’ no-mortise hinges*
1-1/4’’ beech knob*
narrow magnetic catch*
3-3/8’’ long Shaker pegs*
3/8’’ screw hole buttons*
3/8’’ plugs*
1-5/8’’ wood screws
carpenter’s glue
150- and 220-grit sandpaper
Quantity
1 pair
1
2
5
10
5
15
1 pint
*Available from home centers, hardware stores or
Rockler Woodworking and Hardware, Dept. HW, 4365
Willow Dr., Medina, MN 55340; (800) 279-4441.
WOOD FINISHING PRODUCTS
(Choose the recommended stain/finish or create your own combination.)
Recommended Finish
Prep: Minwax® Pre-Stain
Wood Conditioner
Stain: Minwax® Wood Finish™
Puritan Pine
Finish: Minwax® Fast-Drying
Polyurethane Satin
Alternate Finishes
Minwax® Water-Based Pre-Stain Wood Conditioner
Minwax® Water-Based Wood Stain Colonial Pine or
Water-Based Custom-Mixed Stain in Early Spring
(or pick from 60 color choices)
Minwax® Polycrylic® Protective Finish Satin
Or, choose this one-step finish: Minwax® WoodSheen®
Rubbing Stain and Finish, available in six colors
–2–
Miscellaneous
Gloves for finishing
Sandpaper
Clean, lint-free rags
Mineral spirits (for oil-based finishes)
Water-filled metal container with
tight-fitting lid
Minwax® Wood Finish™
Stain Brush, a Polyurethane
Brush, and/or Polycrylic® Brush
CONTINUED - WOODWORKS: BEGINNER PROJECT 2001-2002 SHAKER-STYLE COAT AND MITTEN RACK
BEFORE YOU BEGIN
STAINING AND FINISHING
Good craftsmanship begins and ends with good work habits, so make
the following steps part of your routine workshop practice. If you have
any doubts or questions about how to proceed with a project, always
discuss them with your shop instructor.
• Carefully and fully review plans and instructions before putting a tool
to the project lumber.
• Work sensibly and safely. Wear safety goggles when doing work that
creates flying chips and sawdust; wear the appropriate mask or
respirator whenever making sawdust or working with thinners or
other solvents.
• At the end of every work session, clean up your shop area and put
away all portable tools.
Woodworker’s Tip: Though you may be tempted to cut short
your sanding and wiping time, don’t do it. Both of these tasks
are very important steps in obtaining a high-quality finish.
Remember, it is the finish, just as much as the fit and smoothness
of the parts, that will have great bearing on how people judge your
craftsmanship. To ensure an excellent result, follow the steps
listed below and also the instructions that the finish manufacturer puts on its products.
FINISHING TIPS
• Use scraps of wood to test the stains and finishes you are planning to
use. On the back of the scrap, mark the stain/finish combination and
the type of wood. Allow all samples to dry thoroughly before making
your final finish selection. Save your samples for quick reference on
future projects.
• All stains and finishes must be allowed to dry thoroughly between
coats. Remember that drying times can vary due to humidity and
other climate conditions.
• If you have some leftover stain or finish, wipe the can rim so that
stain or finish in the rim won’t dry out and prevent the lid from
forming a tight seal.
• Brushes used for oil-based finishes must be cleaned with mineral
spirits; for water-based products such as Minwax® Polycrylic®
Protective Finish, clean brushes with warm water and soap.
CUT TING AND ASSEMBLY
PROCEDURE
Refer to the project illustration shown on page 6.
1. Using a compass and a straightedge, transfer the pattern measurements for Part A to the pine stock. Then cut the sides (A) with a jigsaw.
Sand the curved edges smooth either by hand or with a drum sander.
2. Cut and rip the shelf (B) to the length and width given in the
Cutting List.
3. Cut and rip the top (D) to its length and width.
4. Cut and rip the hatch (E) to its length and width.
5. Cut the hanging strip (F) and the peg strip (C) to the same length as
the shelf (B) and rip each of those pieces to their respective widths.
6. Cut and rip the hatch stop (G) to its length and width.
7. Drill the 3/8” counterbore holes for the screw-hole buttons into the
outside faces of parts A with your 3/8” spade bit. Make each hole
3/16” deep.
8. Drill the 3/8” counterbore holes in the top (D). These holes must
be 3/8” deep.
9. Mark the center points for the 1/2” holes to be used for mounting
the Shaker pegs into the peg strip (C). Use your 1/2” spade bit and
drill the holes perfectly perpendicular to the peg strip to ensure that
the pegs will project evenly when they’re glued in place.
10. Lay the pieces on your workbench and, using no glue, preassemble
the hanging strip (F), the shelf (B), the peg strip (C) and the sides (A),
clamping them together with a bar clamp.
11. Drill the holes for the wood screws with the combination pilot
hole/countersink bit, using the center of the counterbore holes as
a guide.
12. With the pieces still clamped together, screw the sides (A) to parts
B, C and F. Fasten the top (D) to the sides in the same manner.
13. Glue and clamp the hatch stops to the inside of parts A.
14. Install the hinges to the underside of the top (D) and to the top of
the hatch (E).
15. Install the magnetic catches to the face of each hatch stop (G).
16. Install the wood knob to the face of the hatch (E).
17. Glue the buttons, plugs and pegs into their corresponding holes.
Use only a small drop of glue for the buttons but be sure to apply a thin
coat of glue completely around the plugs and the base of the pegs. This
will swell the wood and ensure a tight fit. After the glue is dry, trim or
belt-sand the four plugs flush with the top.
1. Sand the entire piece with 150-grit paper, then move up to 220-grit
to complete the pre-finish smoothing. Sand using with-the-grain
strokes to remove any marks or scratches that may have occurred
during assembly. Dust off the piece and wipe it carefully with a clean,
lint-free rag dampened with mineral spirits.
2. Soft, porous woods like pine have a tendency to absorb stain
unevenly. To prevent streaking and blotching apply Minwax® Pre-Stain
Wood Conditioner following the directions on the label. After 15 minutes, wipe off all excess Conditioner using a clean, lint-free rag.
Proceed to the staining within 2 hours.
3. Do the staining in two steps, starting on the interior surfaces and
then moving to the exterior surfaces. Apply the Minwax® Wood Finish™
Puritan Pine (or the stain color of your choice) to the interior surfaces
using either a rag or a brush. Allow the stain to set for about 10 to15
minutes then wipe off any remaining excess. Repeat for the exterior
surfaces. Allow the stain to dry for 24 hours before applying the finish.
Woodworker’s Tip: When wiping off stain, make certain that
your last wipe with the cloth goes with the grain of the wood. This
way, any stain you might miss during wipe-off will be visually
minimized by the wood grain.
4. Apply Minwax® Fast-Drying Polyurethane following the directions on
the can. To obtain the look of hand rubbing, use Satin finish. If a high
shine is desired, use Gloss. In either case, use a brush intended for use
with Polyurethane. Allow the first coat to dry overnight.
5. The next day, sand all surfaces lightly with 220-grit paper using
with-the-grain strokes. Dust off and wipe all surfaces with a clean,
lint-free rag dampened with mineral spirits. Apply a second coat of
Polyurethane and set the piece aside to cure overnight.
–3–
CONTINUED - WOODWORKS: BEGINNER PROJECT 2001-2002 SHAKER-STYLE COAT AND MITTEN RACK
6. The next day, sand all surfaces lightly with 220-grit paper. Dust off
and wipe the piece with a clean, lint-free rag dampened with mineral
spirits and apply the third and final coat of Polyurethane. Allow the
piece to cure for several days before installing and using the rack.
4. Allow 5 to 15 minutes for penetration, then remove excess by
wiping lightly with a clean, soft cloth.
5. Two coats are best: Wait a minimum of 2 hours and apply the
second coat in the same manner as the first coat. Extra coats may be
applied if increased sheen and deeper color are desired.
6. For additional surface protection, wait 2 hours after second stain
application and wipe on a couple of coats of Minwax® WoodSheen
Natural, allowing 2 hours between coats.
7. Immediately after each use, tightly close the bottle.
8. Cleanup is with mineral spirits.
If you opt for a water-based finish:
All the basic finishing steps, such as sanding, dusting and wiping off,
apply when working with water-based finishes. Following are the basic
steps to a water-based finish:
1. When using a water-based stain, first apply a coat of Minwax®
Water-Based Pre-Stain Wood Conditioner, which will help to ensure
uniform penetration of the stain. Apply the Conditioner with a nylonpolyester brush and allow it to penetrate for about 5 minutes. Then
wipe any excess off the surface with a clean, lint-free cloth.
2. Wait about 15 minutes, then use 150-grit sandpaper to remove any
“whiskers” raised by the Conditioner.
3. Apply the stain you selected with either a nylon/polyester brush or
clean rags. Allow the stain to penetrate no longer than 3 minutes. While
the stain is still wet, wipe off all excess with a clean cloth that has been
lightly dampened with stain. Allow the piece to dry for 2 hours before
applying a second coat, if desired. Allow the piece to dry overnight
before applying the clear finish.
Woodworker’s Tip: Minwax® Water-Based Wood Stain is
available in six factory (wood-tone) colors, a White Wash Pickling
Stain and 60 custom colors. This means that you aren’t limited to
just wood colors (pine, oak, walnut, etc.). Instead, you can actually pick and apply a color to complement the décor of the room
in which the rack will be displayed. For this reason, make sure
you look over all of the Minwax® color charts before making your
final selection.
4. Applying Minwax® Polycrylic® Protective Finish is the final step. Stir
the contents of the can thoroughly before starting and periodically
repeat the stirring during your work session.
5. Working a small area at a time to maintain a wet edge, apply the first
coat. Work quickly and make the final strokes in each newly finished
section using with-the-grain brushstrokes.
6. Allow the finish to dry a minimum of 2 hours and then sand lightly
with 220-grit sandpaper wrapped around a soft backup block.
Thoroughly dust off and wipe all surfaces with a water-dampened rag.
7. Repeat steps 4, 5 and 6 to apply the second and third coats.
8. Allow the piece to rest for about a week before installing and using
the rack.
If you opt for a one-step finish:
This finishing technique, a combined gel stain and protective finish, is
an easy one to use. Yet, it permits you to achieve a handsome handrubbed look in just a couple of hours. Use it only on raw wood or over
previous coats of Minwax® WoodSheen®.
1. Sand surface smooth, to the 150-grit stage. Dust thoroughly and
remove all dust with a clean, lint-free rag dampened with mineral
spirits. Within 2 hours of this pre-treatment, proceed with steps 2
through 4.
2. Shake the bottle of WoodSheen vigorously for about 15 seconds.
3. Liberally apply WoodSheen using a clean, soft cloth or foam brush.
–4–
CONTINUED - WOODWORKS: BEGINNER PROJECT 2001-2002 SHAKER-STYLE COAT AND MITTEN RACK
PRODUCT SAFETY
For your safety and the safety of those you work with, always read the
safety warnings, which manufacturers print on their labels, and follow
them to the letter. Typical safety advice and instructions will contain
information such as the following:
DELAYED EFFECTS FROM LONG-TERM
OCCUPATIONAL OVEREXPOSURE.
Contains solvents that can cause permanent brain and nervous system
damage. Intentional misuse by deliberately concentrating and inhaling
the contents may be harmful or fatal.
DANGER! MINERAL-BASED PRODUCTS ARE HARMFUL OR FATAL
IF SWALLOWED. SKIN IRRITANT. COMBUSTIBLE. KEEP OUT OF
REACH OF CHILDREN. DANGER: Contains mineral spirits. Harmful
or fatal if swallowed. Do not take internally. Skin irritant. Avoid contact
with skin and eyes. Wear rubber gloves and safety glasses when handling. Combustible. Do not use or store near heat, sparks, flame or
other source of ignition. Close container after each use. Avoid inhalation
and use only with adequate ventilation. If using indoors, open all windows and doors to make sure there is fresh air movement. If you experience light-headedness, dizziness or headaches, increase fresh air
movement or leave the area. Reports have associated repeated and
prolonged occupational overexposure to solvents with permanent
brain and nervous system damage. Intentional misuse by deliberately
concentrating and inhaling the contents may be harmful or fatal.
FIRST AID: If swallowed: Do not induce vomiting. Call physician
immediately.
FOR SKIN CONTACT: Wash thoroughly with soap and water. If
irritation persists, get medical attention.
FOR EYE CONTACT: IMMEDIATELY flush eyes thoroughly with water,
then remove any contact lenses. Continue to flush eyes with water for
at least 15 minutes. If irritation persists, get medical attention.
IF AFFECTED BY INHALATION: Immediately remove to fresh air.
If symptoms persist, call physician.
SAFE DISPOSAL OF RAGS AND WASTE.
Please be mindful of the safe way to dispose of rags and other waste.
Rags, steel wool and other waste products soaked with oil finishes or
solvents may spontaneously catch fire if improperly discarded. Place
rags, steel wool and other waste immediately after use in a water-filled
metal container. Tightly seal and dispose of the waste materials in
accordance with local trash removal regulations. Be sure to keep the
waste out of reach of children.
When using Minwax Polycrylic Protective Finish:
VAPOR HARMFUL. Use only with adequate ventilation. To avoid overexposure, open windows and doors or use other means to ensure fresh air
entry during application and drying. If you experience eye watering,
headaches or dizziness, increase fresh air supply or wear NIOSHapproved respiratory protection or leave the area. Avoid contact with
eyes and skin. Wash hands after using. Keep container closed when not
in use. Do not transfer contents to other containers for storage.
DO NOT TAKE INTERNALLY.
FIRST AID. In case of eye contact, flush thoroughly with large amounts
of water for 15 minutes and get medical attention. For skin contact,
wash thoroughly with soap and water. In case of respiratory difficulty,
provide fresh air and call physician. If swallowed, get medical attention
immediately.
–5–
CONTINUED - WOODWORKS: BEGINNER PROJECT 2001-2002 SHAKER-STYLE COAT AND MITTEN RACK
SHAKER-STYLE COAT AND MITTEN RACK
1"
1"
D
HINGE
1" FRONT
AND SIDES
G
E
5/8"
F
GLUE STOP
TO SIDE
6-3/4"
A
KNOB
1/8"
CLEARANCE
CATCH
1"
3/4"
B
6-1/4"
1
D
4"
4" RAD.
14"
3/4"
E
C
CL
SHAKER PEG
1-1/4"
F
2-1/4" RAD.
2"
1-1/2"
NO-MORTISE
HINGE
1-1/4" DIA.
WOOD KNOB
G
1"
A
SIDE A—PATTERN
1"
MAGNETIC
CATCH
B
G
3/4"
SHAKER PEG
A
6-1/2"
6-1/2"
1/2"
DIA.
HOLE
1
3-1/4"
C
CL
3/8" DIA. x 3/16" DEEP
COUNTERBORE
3/8" SCREW-HOLE
BUTTONS (SIDES);
3/8" FLAT-TOP
PLUGS (TOP)
1-5/8" SCREW
DETAIL 1
–6–
Download SHELF PLAN
SHELF_PLAN.pdf (PDF, 141.24 KB)
Download PDF
Share this file on social networks
Link to this page
Permanent link
Use the permanent link to the download page to share your document on Facebook, Twitter, LinkedIn, or directly with a contact by e-Mail, Messenger, Whatsapp, Line..
Short link
Use the short link to share your document on Twitter or by text message (SMS)
HTML Code
Copy the following HTML code to share your document on a Website or Blog
QR Code to this page

This file has been shared publicly by a user of PDF Archive.
Document ID: 0000547517.