SWING PLAN (PDF)
File information
Title: untitled
This PDF 1.4 document has been generated by / Acrobat Distiller 7.0 for Macintosh, and has been sent on pdf-archive.com on 01/02/2017 at 21:19, from IP address 174.48.x.x.
The current document download page has been viewed 839 times.
File size: 414.09 KB (8 pages).
Privacy: public file


File preview
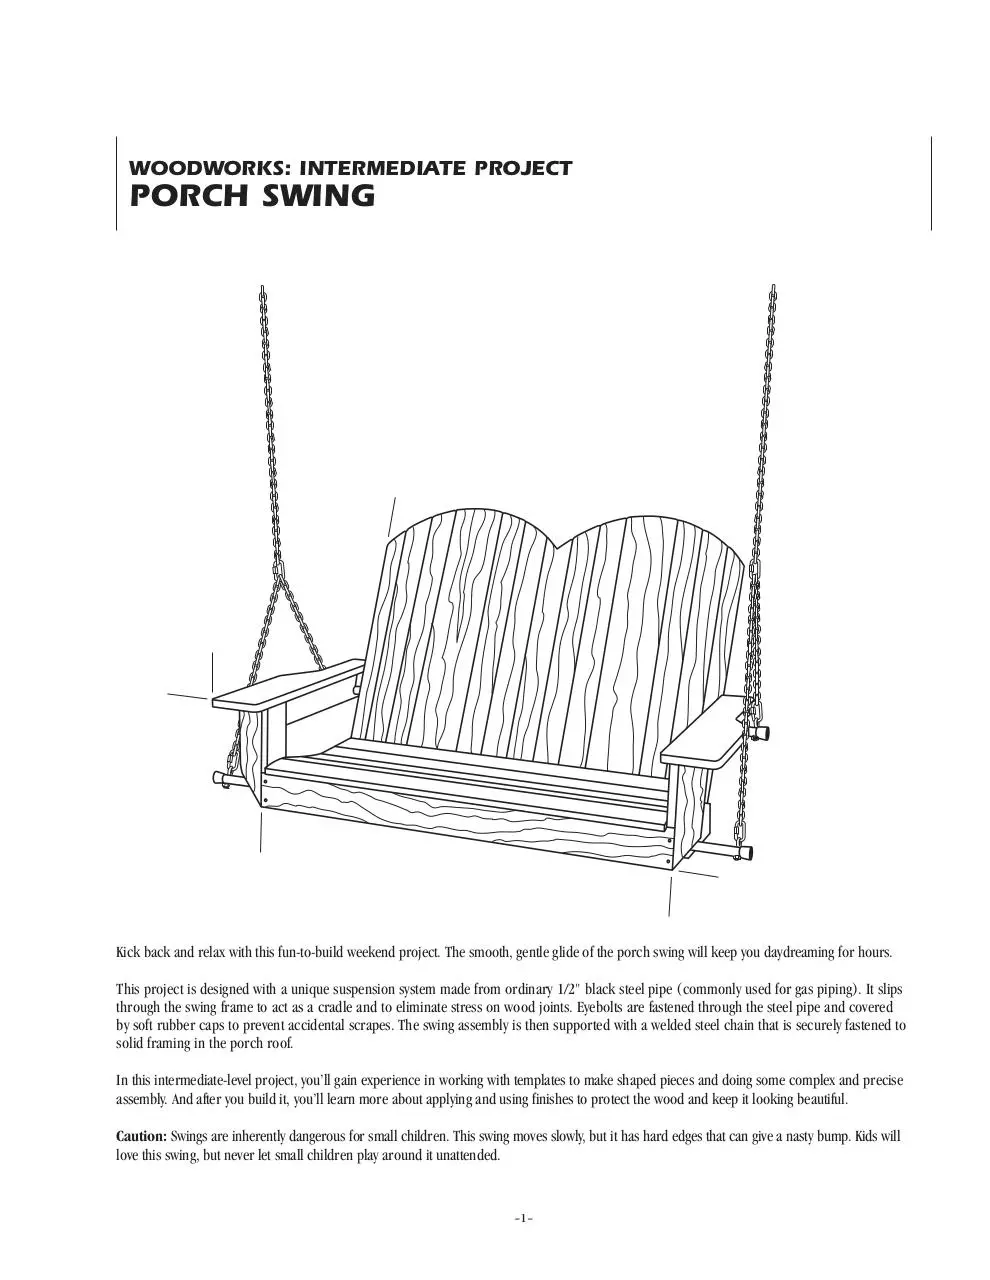
WOODWORKS: INTERMEDIATE PROJECT
PORCH SWING
Kick back and relax with this fun-to-build weekend project. The smooth, gentle glide of the porch swing will keep you daydreaming for hours.
This project is designed with a unique suspension system made from ordinary 1/2" black steel pipe (commonly used for gas piping). It slips
through the swing frame to act as a cradle and to eliminate stress on wood joints. Eyebolts are fastened through the steel pipe and covered
by soft rubber caps to prevent accidental scrapes. The swing assembly is then supported with a welded steel chain that is securely fastened to
solid framing in the porch roof.
In this intermediate-level project, you’ll gain experience in working with templates to make shaped pieces and doing some complex and precise
assembly. And after you build it, you’ll learn more about applying and using finishes to protect the wood and keep it looking beautiful.
Caution: Swings are inherently dangerous for small children. This swing moves slowly, but it has hard edges that can give a nasty bump. Kids will
love this swing, but never let small children play around it unattended.
–1–
CONTINUED - WOODWORKS: INTERMEDIATE PROJECT 2004-2005 PORCH SWING
TOOLS REQUIRED
Hand Tools
– Hacksaw
– Adjustable wrench
– Block plane
– Bar clamps
Power Tools
– Miter saw or circular saw
– Drill with bits and screwdriver attachment
– Jigsaw
– Table saw
– Orbital sander
Miscellaneous
– Tape measure
– Safety glasses
– 120-, 150- and 220-grit
sandpaper
– Clean, lint-free cloths
– Respirator
– 4" roller
– Gloves for finishing
– Mineral spirits (for oilbased finishes)
– Water-filled metal container
with tight-fitting lid
SHOPPING LIST
CUTTING LIST
NOTE: The wood for this project is cedar, a naturally rot
resistant species. White oak, cypress, and poplar are also
good alternative dense woods that won’t mar easily and stain
beautifully.
Key
A1
Pcs.
2
A2
1
B
2
C
D
E
F
G
H
J
K
1
1
1
1
1
2
9
2
L
2
Wo o d w o r k e r ’s Ti p : Knots can weaken a board and spell
disaster, especially on furniture, so be sure to select knotfree boards.
M
2
N
P
Q
6
2
1
WOOD FINISHING PRODUCTS
R
1
Item
1"x 6" x 8' boards
1"x 4" x 8' boards
1-1/4" galvanized deck screws
1-5/8" galvanized deck screws
1/2" unthreaded black pipe 56" long
1/2" unthreaded black pipe 51" long
Pilot hole/countersink drill bit
3/16" welded, zinc-plated chain
1/4" threaded eyebolts
2-1/4" quick-link eyes
3/4" rubber caps
– Minwax® Wood Finish™
Stain Brush or other good
quality, natural bristle brush
(for oil-based stains and
finishes)
– Minwax® Stainable
Wood Filler
– Construction adhesive
– Thread-locking compound
– Exterior spray primer
– Black or brown spray paint
Quantity
7
3
2 lbs.
2 lbs.
1
1
1
17'
4
8
4
Recommended Finish
Thompson’s® WaterSeal® Waterproofer PLUS
Tinted Wood Protector Honey Gold (or your choice
of Natural Cedar, Nutmeg Brown, Rustic Red, or
Coastal Gray).
Alternate Finish
Thompson’s® WaterSeal™ Deck & House SemiTransparent Latex Stain – Cedartone (for a cedar
appearance), Briarwood (for a brownish tone),
Woodland (for a reddish tone), or Superwhite
(for a white appearance).
–2–
Size & Description
3/4" x 5-1/2" x 17-1/2"
(side seat braces)
3/4" x 5-1/2" x 14-1/2"
(center seat brace)
3/4" x 3-1/2" x 10-1/2"
(front arm braces)
3/4" x 3-1/2" x 43" (front stringer)
3/4" x 3-1/2" x 40" (rear stringer)
3/4" x 3-1/2" x 40" (lower back brace)
3/4" x 2-5/16" x 43" (center back brace)
3/4" x 1-1/2" x 40-1/2" (top back brace)
3/4" x 5-1/2" x 35" (center back slats)
3/4" x 2-11/16" x 35" (back slats)
3/4" x 1-13/16" x 35"
(tapered back slats)
3/4" x 2-1/2" x 10-1/2"
(arm supports, waste from parts P)
3/4" x 3" x 22-1/4"
(horizontal arm supports)
3/4" x 2-11/16" x 41-1/2" (seat slats)
3/4" x 5-1/2" x 27" (arms)
1/2" (13/16" outside diameter) x 56"
black steel pipe
1/2" (13/16" outside diameter) x 51"
black steel pipe
CONTINUED - WOODWORKS: INTERMEDIATE PROJECT 2004-2005 PORCH SWING
BEFORE YOU BEGIN
7. Use a table saw to cut the center and top horizontal back braces
(F and G) from 1x4s. Set the blade at 27-1/2 degrees for the bevel cuts.
Good craftsmanship begins and ends with good work habits, so make
the following steps part of your routine workshop practice. If you have
any doubts or questions about how to proceed with a project, always
discuss them with your shop instructor.
• Carefully and fully review plans and instructions before putting a
tool to the project lumber.
• Work sensibly and safely. Wear safety goggles when doing work that
creates flying chips and sawdust; wear the appropriate respirator
whenever making sawdust or working with thinners or other
solvents.
• At the end of every work session, clean up your shop area and put
away all portable tools.
8. Mark a diagonal taper onto a 1x3 as shown in Fig. 1 to make the
two outer slats (K) from this single piece. Cut along the line with your
jigsaw, then use a block plane to smooth the cut edge.
9. Assemble the back as shown in Figs. 1 and 4. Lay all the back slats
(H, J, K) face down on a flat surface and slip temporary 1/4" spacers
between them to help maintain consistent spacing. Fasten the bottom
brace (E) to the middle slat, using a framing square to make sure
they’re joined at 90 degrees. Start at the center and work out to the
sides. When you get to the fourth slat on each side, check your spacing;
you may need to adjust it so the outer edge of the tapered slat (K) is
flush with the end of the lower back brace.
CUTTING AND ASSEMBLY
PROCEDURE
10. Cut the curves on the back assembly. Make a simple beam
compass from a scrap of wood as shown in Fig. 5. Flip the backrest
assembly over and nail one end of the compass 14 inches from the top
and in the center of the 1x6 back slat. Insert your pencil into the 1/4"
hole drilled in the other end of the compass and draw the curve. Cut
along the mark with your jigsaw. With the backrest assembly in this
position, measure and mark a 2-1/2" line parallel to the bottom edge.
1. Cut all the parts to the dimensions shown in the CUTTING LIST.
Using a table saw, make 1x3s from the 1x6s.
2. Notch the front arm braces (B) with a jigsaw to accept the front
stringer (C) as shown in Fig.1. Fasten C to both parts B with 1-5/8"
deck screws. Drill pilot and countersink holes and apply a dab of
construction adhesive at each joint.
11. Hang the lower part of the back assembly over the edge of the
work surface and slide the seat assembly onto it. Place the seat frame
assembly you built earlier onto the backrest assembly. It’s crucial to
align the rear seat frame stringer (D) to the 2-1/2" line on the backrest
so the remainder of the assembly will fit together. Glue the joint, then
clamp and screw the assemblies together.
Wo o d w o r k e r ’s Ti p : Why use construction adhesive instead of
carpenter’s glue? We used Liquid Nails brand LN-600 because it’s
waterproof and resilient. Construction adhesive will help your
porch swing stand up to both weather and stress. Apply a small
bead at every joint. If the glue oozes slightly, let the excess harden
and then cut it off with a sharp putty knife or wood chisel.
12. Drill 7/8" holes in the horizontal arm supports (M) to the exact
dimensions shown in Fig. 1. Then glue and screw these pieces to the
front arm braces (B) and the center back brace (F).
3. Draw the curved shapes for parts A1, A2 and P onto hardboard
templates, shown in Fig.1, cut them out and trace them onto boards.
To cut them out with a jigsaw, clamp them to the workbench to keep
them from wandering while you cut the curves. Sand the curves smooth
with 100-grit sandpaper. Drill 7/8"-dia. holes with a sharp spade bit
into parts A1 and A2 as shown in Fig. 2 for the front pipe hanger.
13. Glue and screw the seat slats to the seat braces. Start in the back
and leave approximately a 3/16" space between each piece. Trim the
last slat to overhang the front stringer by 1/2". Plane the transition
piece on the curve of the seat and at the leading edge of the front seat
slat for maximum comfort. Also shave off any high spots in the seat slats
with a block plane.
4. Trace the angle of the center seat brace (A2) onto each side brace
(A1) to locate the holes for attaching the rear stringer (D). Again,
drill pilot holes and glue and screw the seat braces to the front stringer
and the front arm braces. Next, glue and screw the rear stringer to the
seat braces.
14. Test-fit the pipe, chain and connecting links in the wooden assembly. This is a good time to discover any glitches and correct them before
you do any finishing. Slide the pipes through the holes in the seat frame
and along the back, leaving an equal amount exposed on each side.
Wo o d w o r k e r ’s Ti p : You’ll need to pre-drill holes for every screw
so you won’t split the wood or break off the screw head. To make
this process easier, buy a special combination bit that can drill
and countersink in one operation.
15. Drill a 3/16" hole in the center of the rear support pipe, then screw
a 2" No. 8 sheet metal screw (use a 1/8" pilot hole) up into the center
back support. This connection will keep the pipe from sliding to one
side while the swing is in motion.
5. Drill through the front arm braces (B) with a 7/8" spade bit after
you’ve glued and screwed the side seat braces to them. These two holes
will complete the pathway for the front pipe support (Q).
16. Drill 9/32"-dia. holes for the eyebolts. Angle the eyebolts slightly
toward the center of the swing to minimize the torque on the pipe and
prevent the lock-screw from breaking.
6. After you assemble the arm braces, stringers and seat braces, glue
and screw the curved front arm supports (L) to the sides of B as shown
in Fig. 1.
–3–
CONTINUED - WOODWORKS: INTERMEDIATE PROJECT 2004-2005 PORCH SWING
Recommended Finish
21. Before applying Thompson’s® WaterSeal® Waterproofer PLUS
Clear or Tinted Wood Protector, read and follow the directions found
on the back of the can. Be sure that both surface and air temperature
are above 50° F during application and for 48 hours after application,
and if you’re working outside, do not apply product if rain is forecasted
within 24 hours of application.
17. Hang the swing using the quick-link eyes to join the lengths of
chain. This swing could be holding 400 pounds or more, so you must
anchor the swing’s chain with 1/2" screw eyes screwed at least 2" into
solid framing as shown in Fig. 6. Also, distribute the weight to more
than one joist or rafter by screwing a pair of 2x4s 54" apart and then
inserting the screw eyes into the 2x4s. The swing should tip back
slightly at the arms (about 1" from back to front) when it is at rest.
During the final assembly after finishing, squirt thread-locking compound on the eyebolt threads. Be sure to cut the ends of the eyebolts
flush with the nuts for safety. When the installation is complete and
secure, remove the swing for finishing.
22. The surfaces must be free of all mildew, dust, dirt, oil, soot, grease,
and other contaminants. If the surface is damp or wet from cleaning or
weather, allow the surface to dry thoroughly (a minimum of 48 hours)
before application.
18. Before applying the finish, remove the chains and pipes. Sand the
pipes with 100-grit sandpaper, then wipe them down thoroughly
with a rag dampened with mineral spirits. Let the mineral spirits
evaporate off the surface, then spray-paint the pipes with exterior
primer followed by a brown or black exterior enamel.
23. Cover plants and shrubs and move all objects that could come in
contact with Wood Protector.
24. When you apply Clear or Tinted Wood Protector, do not mix it
with other waterproofing products because variations in the final
appearance of the surface being treated may result.
19. Sand the wood parts with 100-grit sandpaper, paying particular
attention to the arms and the edges of the seat and back. Softer edges
will be safer and more comfortable and hold the finish better.
25. Before applying Wood Protector over the entire surface, a small
trial patch is recommended to verify color.
20. Wipe off the dust and vacuum the swing. You’ll make better time if
you apply the finish with a small 4" roller and follow it up with a brush
to even the coat. Use the brush to get between the slats and then look
for runs and drips coming through the other side.
26. In most applications, only one light coat is necessary. Apply with a
brush, roller, applicator pad, or by dipping the piece into the product.
Regardless of which application method is used, remove excess within
15 minutes by redistributing it to drier areas or wiping it off.
PROTECTING YOUR PROJECT
27. Use only with adequate ventilation. Oiliness and tackiness will
result if over-applied or applied to wet or damp surface or if overnight
temperature falls below 50° F within 48 hours of application. Excessive
oiliness caused by over-application may be removed by scrubbing wood
with a concentrated degreaser.
Any type of wood that’s used outdoors needs protection from water
damage. We’ve chosen Thompson’s® WaterSeal® Waterproofer PLUS
Tinted Wood Protector to provide complete protection for your project.
It not only prevents water damage, but the coating also resists mildew
and U.V. (ultraviolet radiation in sunlight) damage, and it exceeds
industry standards for waterproofing on wood. In addition, Tinted
Wood Protector adds color without hiding natural wood grain.
28. Allow at least 48 hours to dry before you hang the swing. Drying
time will vary depending on the substrate, temperature and humidity.
Wo o d w o r k e r ’s Ti p : Always be sure to choose a waterproofer that
claims to exceed industry standards for waterproofing on wood.
29. Clean brushes and equipment with mineral spirits, then rinse with
clean water.
FINISHING TIPS
• When you apply Thompson’s® WaterSeal® Waterproofer PLUS Clear
or Tinted Wood Protector, do not mix it with other waterproofing
products because variations in the final appearance of the surface
being treated may result. Also, do not thin these products.
• Coverage: The approximate coverage of Clear Wood Protector on
cedar is 300 to 400 square feet per gallon. A gallon of Tinted Wood
Protector will cover about 250 to 300 square feet. The approximate
coverage of oil or latex stain on smooth wood is 250 to 300 square
feet per gallon.
NOTE: The length of protection will vary depending on environment.
Perform the following splash test once a year to see whether reapplication is necessary. Sprinkle water on various sections of surface to be
sealed. If water absorbs and darkens color of substrate within 5 seconds, the surface is porous and considered ready to be treated. If water
beads up or otherwise sits on top of surface, then surface doesn’t need
protection at this time. For maximum protection from color change
and other damage caused by the sun, reapplication is recommended
every year. Vertical and horizontal surfaces will experience color
changes at different rates.
–4–
CONTINUED - WOODWORKS: INTERMEDIATE PROJECT 2004-2005 PORCH SWING
WARNING! Removal of old paint by sanding, scraping or other means
may generate dust or fumes that contain lead. Exposure to lead dust
or fumes may cause brain damage or other adverse health effects,
especially in children or pregnant women. Controlling exposure to lead
or other hazardous substances requires the use of proper protective
equipment, such as properly fitted respirator (NIOSH approved) and
proper containment and cleanup. For more information, call the
National Lead Informations Center at 1-800-424-LEAD (in US) or
contact your local health authority.
Alternate Finish
If you want more color along with excellent protection, use
Thompson’s® WaterSeal™ Deck & House Latex or Oil Stain, both of
which come in Solid and Semi-transparent formulations and are available in 117 ready- and custom-mixed colors.
30. Before applying any of these stains, read and follow the directions
found on the back of the can. To ensure good penetration, do not apply
in direct sunlight or on hot days. Be sure that both surface and air temperature are above 50° F and below 95° F during application and for
48 hours after application. If you’re working outside do not apply
product if rain is forecasted within 24 hours of application.
Contents are COMBUSTIBLE. Keep away from heat and open flame.
Contains ALIPHATIC HYDROCARBONS.
31. The surfaces must be free of all mildew, dust, dirt, oil, soot, grease,
and other contaminants. If the surface is damp or wet from cleaning or
weather, allow the surface to dry thoroughly (a minimum of 48 hours)
before application. Shake or mix thoroughly before application
(mechanical shaking is recommended).
VAPOR HARMFUL. Use only with adequate ventilation. To avoid overexposure, open windows and doors or use other means to ensure fresh
air entry during application and drying. If you experience eye watering,
headaches, or dizziness, increase fresh air supply, or wear respiratory
protection (NIOSH/ MSHATC23C or equivalent), or leave the area. Avoid
contact with eyes and skin. Wash hands after using. Keep container
closed when not in use. Do not transfer contents to other containers
for storage.
32. Since in-store color samples may vary slightly when actually
applied to wood (based on color, texture, grain, porosity, and type of
wood), apply the stain to a small test area and let it dry to determine
final color before proceeding with the entire project.
FIRST AID: In case of eye contact, flush thoroughly with large amounts
of water for 15 minutes and get medical attention. For skin contact,
wash thoroughly with soap and water. In case of respiratory difficulty,
provide fresh air and call physician. If swallowed, get medical attention
immediately.
DELAYED EFFECTS FROM LONG-TERM
OCCUPATIONAL EXPOSURE.
Contains solvents that can cause permanent brain and nervous system
damage. Intentional misuse by deliberately concentrating and inhaling
the contents can be harmful or fatal.
33. Apply stain with an exterior paint pad, brush, roller, or compression-driven sprayer set for low pressure. Do not use product in a
pump-up garden sprayer. When rolling be sure to go back and brush-in
stain to ensure even coverage. When using a pad or brush, keep the
leading edge wet and distribute stain evenly. This will help avoid lap
marks and keep color uniform.
34. Work from top to bottom or side to side in areas small enough to
allow the leading edge to remain wet at all times during application.
Use natural breaks as boundaries to divide large areas into more manageable work areas.
WARNING: This product contains chemicals known to the
State of California to cause cancer and birth defects or other
reproductive harm.
35. One coat of stain is recommended, but a second coat can be
added if desired. Allow the first coat to dry thoroughly (approximately
4 hours for latex, 24 hours for oil) before second application. Drying
time will vary depending on the substrate, temperature and humidity.
DO NOT TAKE INTERNALLY. KEEP OUT OF THE REACH
OF CHILDREN.
36. For oil-base stain, clean brushes and equipment with mineral
spirits, then rinse with clean water. For latex stain, clean brushes
and equipment with soap and water.
SAFE DISPOSAL OF RAGS AND WASTE.
Rags, steel wool or waste soaked in Thompson’s® WaterSeal®
Waterproofer PLUS Tinted Wood Protector may spontaneously catch
fire if improperly discarded. Immediately after use, place rags, steel
wool or waste in sealed, water-filled metal container. Dispose of in
accordance with local fire regulations.
IMPORTANT: Place rags, steel wool and waste immediately after use
in a sealed, water-filled metal container.
PRODUCT SAFETY
For your safety and the safety of those you work with, always read the
safety warnings, which manufacturers print on their labels, and follow
them to the letter. Typical safety advice and instructions will contain
information such as the following:
®
–5–
CONTINUED - WOODWORKS: INTERMEDIATE PROJECT 2004-2005 PORCH SWING
FIG 1. PORCH SWING DETAILS
3/16"
WELDED STEEL CHAIN
161/2" (ADJUST FOR FIT)
25" (ADJUST FOR FIT)
J
K
QUICK-LINK EYES
G
11/4" SCREWS
FOR BACK SLATS
F
H
H
B
P
B
M
N
1/4" EYEBOLT
(TRIM FLUSH WITH NUT)
P
L
M
NOTCH FOR C
7/8 "
A2
- DIA. HOLE
D
L
C
A1
1/2" - I.D.
BLACK PIPE
11/8" TO
CENTER
Q
CUT HERE
FOR A2
13/4" TO
CENTER
R
NOTCH FOR C
15/8" DECK
SCREWS
3/4" - I.D.
RUBBER CAP
621/2"
DEGREES
A1 AND A2
K
K
EACH SQUARE EQUALS 1 SQ. INCH
7/8" - DIA.
HOLE
L
M
P
3/4" TO
CENTER
11/2" TO
CENTER
®
–6–
CONTINUED - WOODWORKS: INTERMEDIATE PROJECT 2004-2005 PORCH SWING
FIG 3. SEAT FRAME ASSEMBLY
FIG 2. PORCH SWING END VIEW
P
B
L
REAR
STRINGER
(D)
G
A1
A1
A2
M
A1
SEAT
SUPPORTS
P
B
B
D
C
"-DIA. HOLE
7/8
B
FIG 4. ASSEMBLING THE BACK
FIG 5. CUTTING THE BACK ASSEMBLY
F
G
E
1 /2"
"
1 /4 ER
AC
SP
12
NO. 4 FINISH NAIL
"
28
S
1/4"
HOLE DRILLED
AT 14" FROM NAIL
CENTER OF BOARD
®
–7–
CONTINUED - WOODWORKS: INTERMEDIATE PROJECT 2004-2005 PORCH SWING
FIG 6. HANGING THE PORCH SWING
2" x 4" MUST
SPAN 3 JOISTS
3/8"
CLOSED
SCREW EYE
(3" LONG)
1/4" LAG SCREWS
(31/2" LONG)
®
–8–
Download SWING PLAN
SWING_PLAN.pdf (PDF, 414.09 KB)
Download PDF
Share this file on social networks
Link to this page
Permanent link
Use the permanent link to the download page to share your document on Facebook, Twitter, LinkedIn, or directly with a contact by e-Mail, Messenger, Whatsapp, Line..
Short link
Use the short link to share your document on Twitter or by text message (SMS)
HTML Code
Copy the following HTML code to share your document on a Website or Blog
QR Code to this page

This file has been shared publicly by a user of PDF Archive.
Document ID: 0000547518.