WVO Final Report B (PDF)
File information
This PDF 1.5 document has been generated by / Skia/PDF m53, and has been sent on pdf-archive.com on 16/03/2017 at 19:29, from IP address 129.65.x.x.
The current document download page has been viewed 386 times.
File size: 738.35 KB (9 pages).
Privacy: public file


File preview
CALIFORNIA POLYTECHNIC STATE UNIVERSITY
Alternative Fuels Laboratory
BRAE 434
Spring Quarter 2016
Instructor: Art MacCarley
Solar Waste Vegetable Oil Processor
June 03, 2016
Andrew Hostler
Steven Schwartz
Chris Chavez
Nathanael DeBruno
Abstract
Every year, countless gallons of vegetable oil are used in the foodservice industry to
make many different kinds of food. This vegetable oil can find a second life in the form of
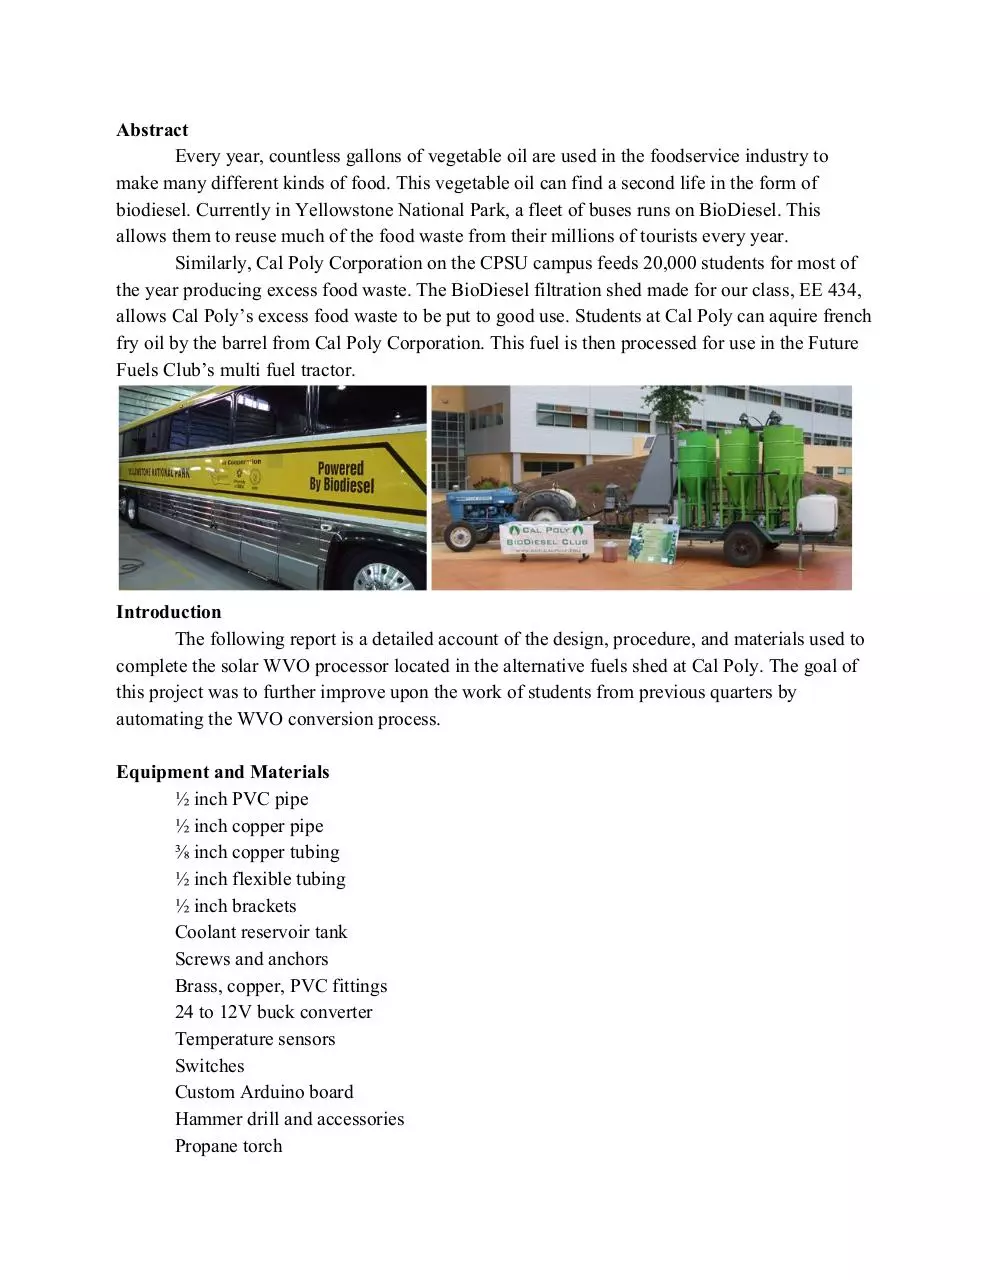
biodiesel. Currently in Yellowstone National Park, a fleet of buses runs on BioDiesel. This
allows them to reuse much of the food waste from their millions of tourists every year.
Similarly, Cal Poly Corporation on the CPSU campus feeds 20,000 students for most of
the year producing excess food waste. The BioDiesel filtration shed made for our class, EE 434,
allows Cal Poly’s excess food waste to be put to good use. Students at Cal Poly can aquire french
fry oil by the barrel from Cal Poly Corporation. This fuel is then processed for use in the Future
Fuels Club’s multi fuel tractor.
Introduction
The following report is a detailed account of the design, procedure, and materials used to
complete the solar WVO processor located in the alternative fuels shed at Cal Poly. The goal of
this project was to further improve upon the work of students from previous quarters by
automating the WVO conversion process.
Equipment and Materials
½ inch PVC pipe
½ inch copper pipe
⅜ inch copper tubing
½ inch flexible tubing
½ inch brackets
Coolant reservoir tank
Screws and anchors
Brass, copper, PVC fittings
24 to 12V buck converter
Temperature sensors
Switches
Custom Arduino board
Hammer drill and accessories
Propane torch
Design Requirements
The main requirement of the project was to implement an easy to use control system for
the processor. First, the control system needed to control the filtering system with the flip of a
switch. This means this one switch would turn on the 12 volt pump, controlling the coolant loop,
and the 24 volt scooter motor, controlling the WVO loop. The control system also needed to
decide when to run the WVO loop which was dependent on the temperature of the coolant
entering the coil of the WVO barrel. Finally the control system needed to shut the system off
when the process was complete.
Along with the control system, the project hardware needed to be brought up to code.
Therefore, all the existing piping needed to be ripped out. The ¾ inch PVC, used for the coolant
loop, that ran from the solar thermal array to the shed was to be replaced by ½ inch PVC. The
flex cable used in the WVO loop that was placed outside of the shed was to replaced with ½ inch
hard copper pipe. Then, the ½ inch PVC and copper piping was to enter through the window of
the shed. Once the piping was inside the shed, flexible pipes could be implemented.
Finally, the system was to be controlled using four batteries wired up to be a 24 volt
supply.
Procedure
First, we ripped out all the existing piping. Then, we connected ½ pvc to the solar thermal
array using two brass fittings and two PVC connectors. Making only 90 degree angles we
connected all the PVC, using primer and glue for all
connections, for the up and down coolant loop on the roof.
We proceeded to feed the PVC through the window at a
90 degree angle, this was only possible with ½ inch
piping, anything larger would not have fit through the
window. Then, we
connected the pushing
coolant loop directly to the
12 volt pump with all ½
inch PVC pipe, no flex
tubing. On the bottom end
of the pump, we connected flex tubing which was placed in the
coolant reservoir. The falling coolant loop was hard piped to near
the 12 volt pump. From there we switched to the coolant flex pipe
which was connected the copper coil inside of the barrel. At the
bottom of the copper coil, flex tubing was fed into the coolant reservoir. This completed the
coolant loop.
Next, we worked on the copper pipe for the WVO loop. For reference, all connections
were cleaned on the inside and outside of the copper pipe with the designated brush, then flux
was applied on the outside of the pipes before soldering the
copper connections. The copper pipe ran from the 24 volt
pump out of the box, was ran to be flush with the wall, the
two copper lines ran sidebyside up to and through the
window. Then the copper pipe ran down to the wall inside
the shed. From there, we connected the copper tubing. For
testing purposes we left the copper tubing unconnected from
the barrel so we could visually see the WVO loop worked
properly without having to use the barrel for testing. This
completed the WVO loop.
After the piping was completed, we used the hammer
drill to drill holes on the roof and on the walls of the shed,
both inside and outside. The holes were filled with all
purpose anchors, and ½ inch brackets were screwed into the
anchors. Brackets were used on the roof to secure the PVC, on the outside wall to secure the
copper piping,and inside to secure both the PVC and copper piping. Then, the 12 volt pump was
screwed into anchors. Finally, the coolant reservoir was screwed into the anchors in the walls
directly under the 12 volt pump.
Finally, we built in an automated sensing and control system for the shed. This was built
using an Arduino opensource software base, integrating the sensors to an AtMega328 processor.
First, the custom printed circuit board was designed in CadSoft Eagle. This application is
used by many businesses and hobbyists alike to create their own robust microcontroller systems.
The board was then exported to a manufacturing set of files, and sent to Bay Area Circuits for
fabrication.
Next, the board was assembled and
programmed. This board was
modeled after the Arduino
Duemilanove (2009), an early
prototype of the Arduino Uno. As
such, you could program the
processor in an Arduino Uno for
testing, the “pop” the chip into the
board once fully programmed. This
board controlled four lowside switches
in parallel with the manual pump
switches.
Finally, the processor with the Arduino code was tested
with the switches and various sensor readings on the
two temperature sensors. If the Arduino code needs to
be edited in the future, the arduino code is in Appendix
A. Any student wishing to reprogram needs only to swap the processor chip with an Arduino
Uno, program it with modified code from the appendix, then swap the chips back.
Testing
The WVO loop consisting of copper pipe, copper tubing, and the 24 volt scooter motor
was ran for five minutes, using water, with no problems detected. The coolant loop was tested
using the buck converter for the 12 volt pump. Multiple problems arose, the coolant reservoir
used was not large enough to supply the whole loop with enough water to pump through the
whole system. We ran the system until the coolant reservoir was depleted and shut the pump off.
While waiting for the water to return to the reservoir, the water returning to the reservoir was
steaming. As we watched this process, the PVC pipe inside the shed was beginning to droop. The
PVC pipe made its own 90 degree angle because the water that made it to the solar thermal array
became too hot for the PVC to handle. We waited for the PVC to cool down and we tested it
again. This time we used a larger bucket so there was enough water to fill the coolant loop. We
ran this loop for ten minutes and by the end of it the PVC inside the shed on the return loop had
drooped down about an inch. Therefore, the WVO loop and coolant loop work as
planned;however, the PVC pipe just can’t handle the heat of the system.
Conclusion
While the system runs currently, further improvements still need to be made. Firstly, the
PVC pipe used is not adequate for the near boiling water coming out of the solar array.
Additionally, there needs to be a better way to transport oil to and from the processing barrel.
Being required to completely remove all the existing plumbing and replace it with new piping
was a huge setback for our team and as a result we did not have time to adequately test the
control system.
Fortunately, many substantial upgrades were made to the shed. The new copper piping
works well and looks much cleaner than the previous rats nest of flex line. The batteries were
switched to 24V and are now successfully charging at 24V after a year of neglect. A buck
converter was installed to allow both pumps to run off the same battery bank and all of the
switches were cleanly mounted onto the rear panel with the control board. The control board
features a reprogrammable AtMega 328 which will allow students in the future to adjust the
control settings as they see fit. Overall, this project allowed our team to develop skills and
experience outside the Electrical Engineering world and it was rewarding to know our work will
have a lasting impression on the Cal Poly campus for years to come.
Appendix A: Control Board Arduino Code
// WVO.ino
// A program for a waste vegetable oil filtration system
// Declarations for temp readings
#include <OneWire.h>
#include "DallasTemperature.h"
// Data wire is plugged into pin 2 on the Arduino
#define ONE_WIRE_BUS 2
// Setup a oneWire instance to communicate with any OneWire devices (not
just Maxim/Dallas temperature ICs)
OneWire oneWire(ONE_WIRE_BUS);
// Pass our oneWire reference to Dallas Temperature.
DallasTemperature sensors(&oneWire);
#define LED 13
#define COIL 4
#define CENTRIFUGE 5
#define ENTRY_PUMP_A 6
#define ENTRY_PUMP_B 7
#define THRESHOLD_RAIL_VOLTAGE 13
#define BATTERY_PIN A0
#define COOLANT_SENSOR_INDEX 0
float batteryVoltage();
float barrelTemp();
void setup() {
Serial.begin(115200);
Serial.println("test");
sensors.begin(); // IC Default 9 bit. If you have troubles consider
upping it 12. Ups the delay giving the IC more time to process the temperature
measurement
// put your setup code here, to run once:
pinMode(LED,OUTPUT);
pinMode(COIL,OUTPUT);
pinMode(CENTRIFUGE,OUTPUT);
pinMode(A0,INPUT);
pinMode(3,INPUT);
digitalWrite(LED,LOW);
digitalWrite(COIL,LOW);
digitalWrite(CENTRIFUGE,LOW);
}
void loop() {
if(analogRead(BATTERY_PIN)<13)
//batteryVoltage()<THRESHOLD_RAIL_VOLTAGE) //if battery is too low, standby
with "pulse" LED
{
digitalWrite(COIL,LOW); //12 is generic GPIO for coil pump
digitalWrite(CENTRIFUGE,LOW); //11 is generic GPIO for centrifuge pump
digitalWrite(LED,HIGH); //standby with "pulse" LED
delay(1000);
digitalWrite(LED,LOW);
delay(1000);
}
else if(analogRead(BATTERY_PIN)>420)
{
digitalWrite(LED,HIGH);
sensors.requestTemperatures();
if(coilTemp()>24)
{
digitalWrite(COIL,HIGH); //12 is generic GPIO for coil pump
}
else
{
digitalWrite(COIL,LOW); //12 is generic GPIO for coil pump
}
if(0==(digitalRead(3))) //Pin 8 is an input pin hooked up to a switch
that is low when the temp is high enough
{
digitalWrite(CENTRIFUGE,HIGH); //11 is generic GPIO for centrifuge
pump
}
else
{
digitalWrite(CENTRIFUGE,LOW); //11 is generic GPIO for centrifuge
pump
}
}
}
float batteryVoltage()
{
float voltageBatt = 0;
voltageBatt = analogRead(BATTERY_PIN)*5/1024*14*.125;
Serial.println(voltageBatt);
return (voltageBatt);
}
float coilTemp()
{
sensors.requestTemperatures(); // Send the command to get temperatures
int fast = sensors.getTempCByIndex(COOLANT_SENSOR_INDEX);
Serial.println(fast);
return (fast);
}
Download WVO Final Report B
WVO_Final_Report B.pdf (PDF, 738.35 KB)
Download PDF
Share this file on social networks
Link to this page
Permanent link
Use the permanent link to the download page to share your document on Facebook, Twitter, LinkedIn, or directly with a contact by e-Mail, Messenger, Whatsapp, Line..
Short link
Use the short link to share your document on Twitter or by text message (SMS)
HTML Code
Copy the following HTML code to share your document on a Website or Blog
QR Code to this page

This file has been shared publicly by a user of PDF Archive.
Document ID: 0000569919.