Avaya Physical VoIP Phone Setup (PDF)
File information
Author: GSI
This PDF 1.5 document has been generated by Microsoft® Word 2016, and has been sent on pdf-archive.com on 23/03/2017 at 16:09, from IP address 216.143.x.x.
The current document download page has been viewed 607 times.
File size: 550.19 KB (7 pages).
Privacy: public file


File preview
Avaya Physical VoIP Phone Setup
Your telephone comes equipped with a special power supply to provide the phone with the required
power to operate as a VOIP Phone. Therefore, please pay close attention to the power supply
connection instructions below:
1. The power supply adapter should show labels indicating what cables connect to each port,
please see pictures below:
a. Connect the phone cord to the power supply port labeled “Phone” ---- other end plugs
into top port (“A”) on back of phone (see PICTURE 3).
b. Connect the Ethernet cord to port labeled “LAN” on the power supply ---- other end to
your Home Internet Router (Use the same cable that is/was plugged into your thin
client/computer).
Looks like this:
Page 1 of 7
2. Please connect the power supply power to your home electrical outlet. The phone should start
its power on process.
Continued on Next Page
Page 2 of 7
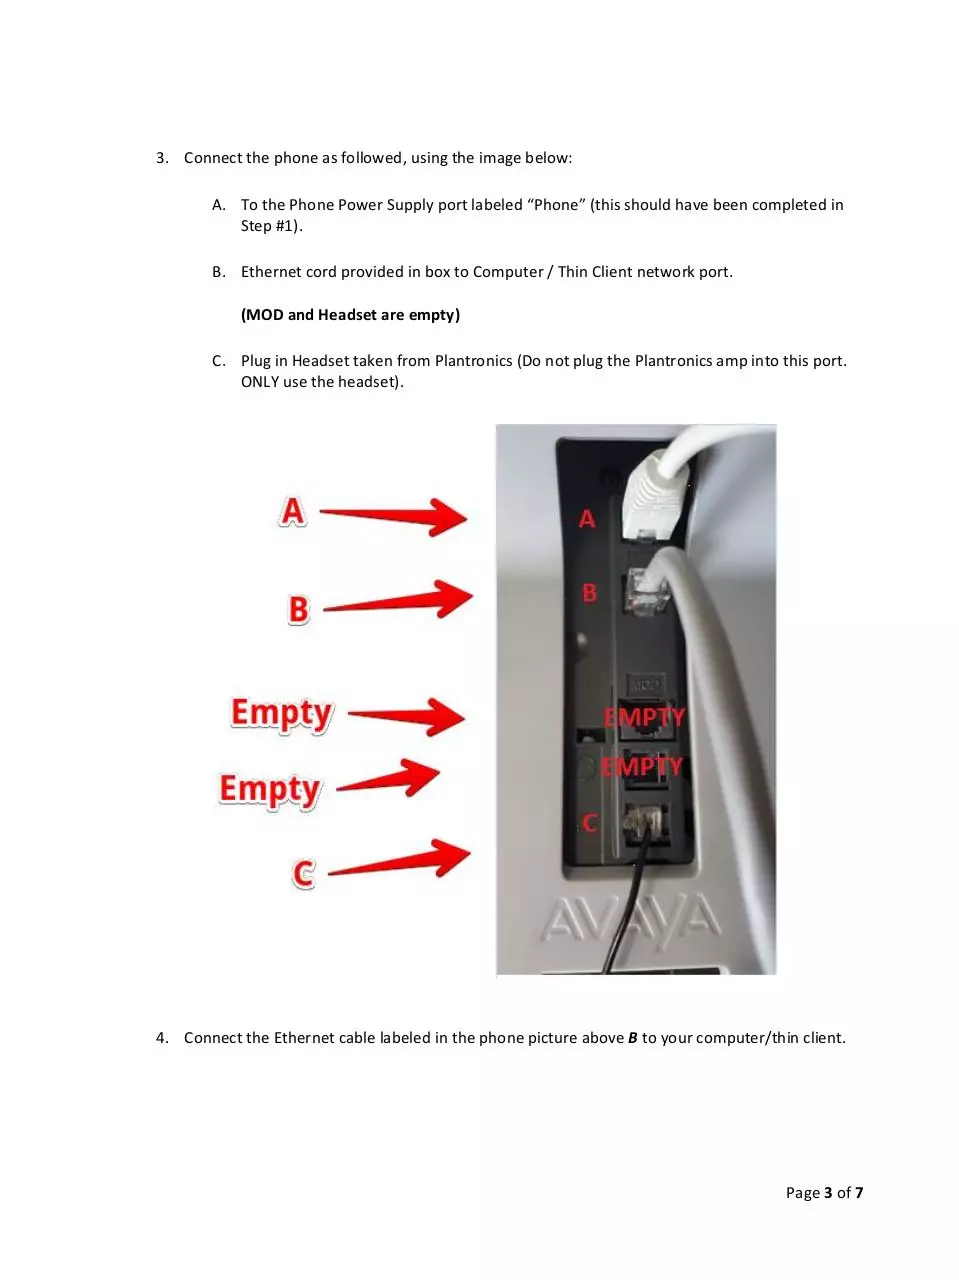
3. Connect the phone as followed, using the image below:
A. To the Phone Power Supply port labeled “Phone” (this should have been completed in
Step #1).
B. Ethernet cord provided in box to Computer / Thin Client network port.
(MOD and Headset are empty)
C. Plug in Headset taken from Plantronics (Do not plug the Plantronics amp into this port.
ONLY use the headset).
4. Connect the Ethernet cable labeled in the phone picture above B to your computer/thin client.
Page 3 of 7
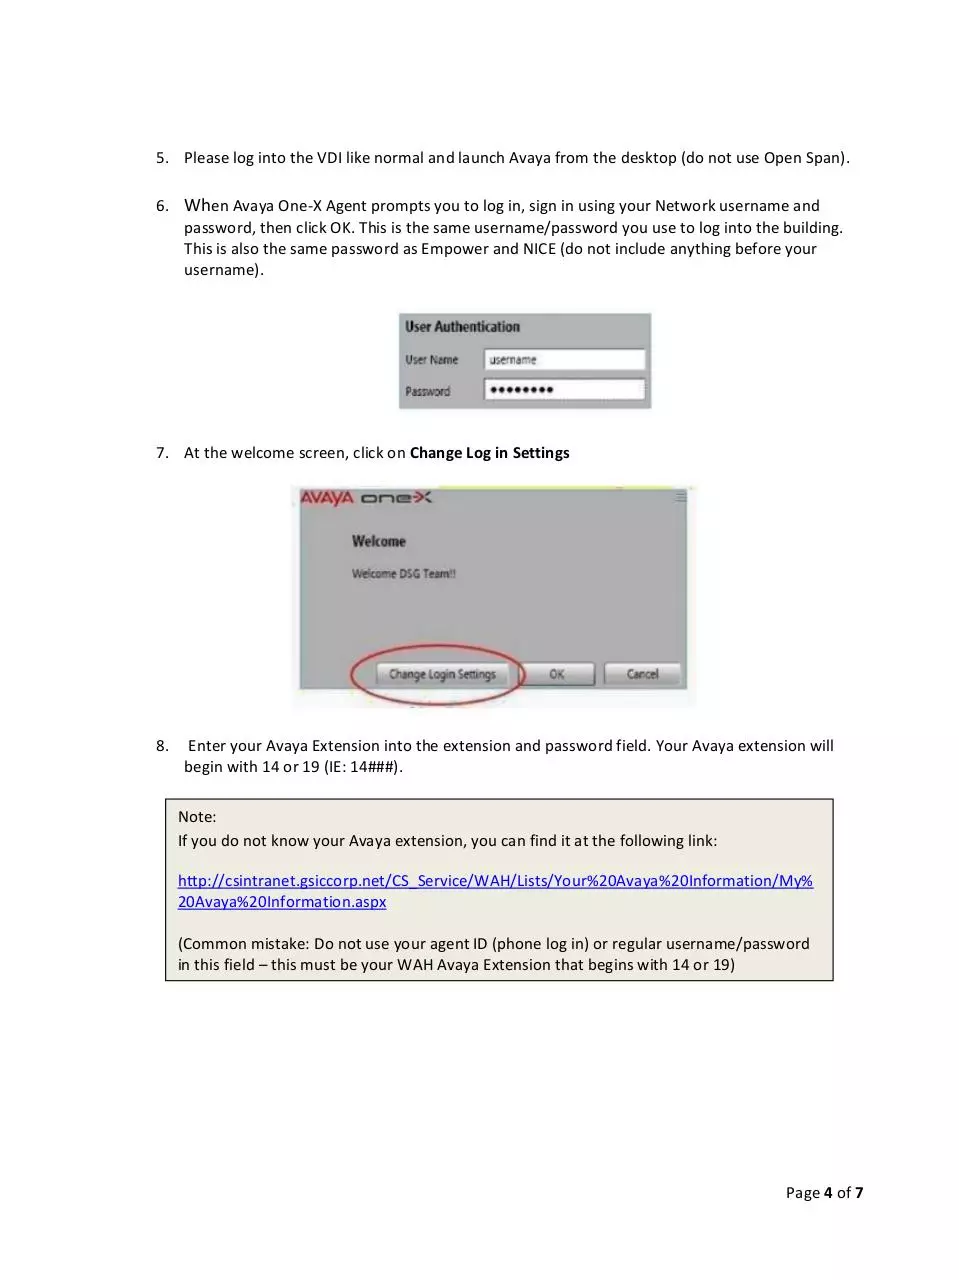
5. Please log into the VDI like normal and launch Avaya from the desktop (do not use Open Span).
6. When Avaya One-X Agent prompts you to log in, sign in using your Network username and
password, then click OK. This is the same username/password you use to log into the building.
This is also the same password as Empower and NICE (do not include anything before your
username).
7. At the welcome screen, click on Change Log in Settings
8.
Enter your Avaya Extension into the extension and password field. Your Avaya extension will
begin with 14 or 19 (IE: 14###).
Note:
If you do not know your Avaya extension, you can find it at the following link:
http://csintranet.gsiccorp.net/CS_Service/WAH/Lists/Your%20Avaya%20Information/My%
20Avaya%20Information.aspx
(Common mistake: Do not use your agent ID (phone log in) or regular username/password
in this field – this must be your WAH Avaya Extension that begins with 14 or 19)
Page 4 of 7
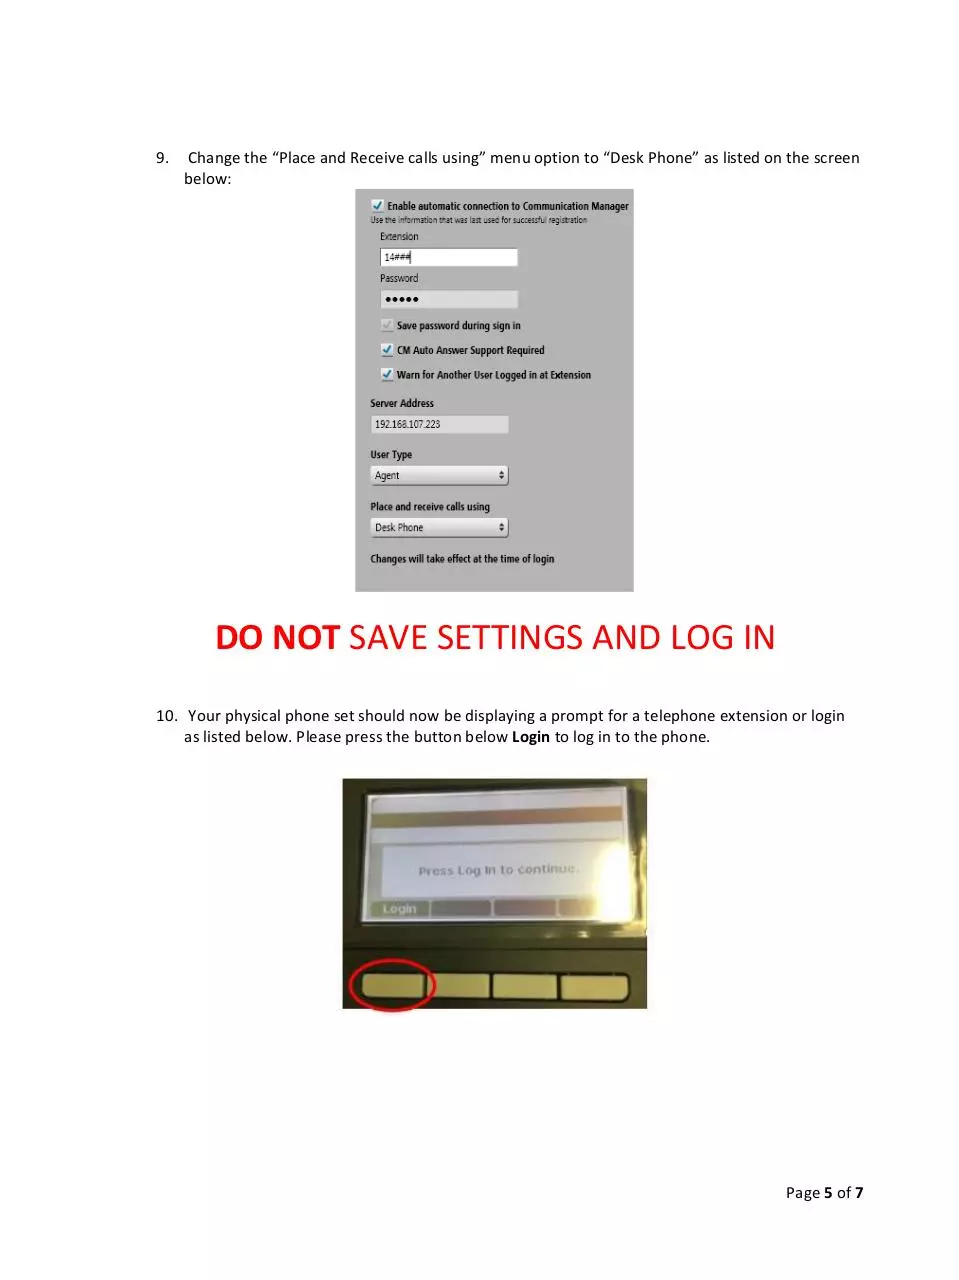
9.
Change the “Place and Receive calls using” menu option to “Desk Phone” as listed on the screen
below:
DO NOT SAVE SETTINGS AND LOG IN
10. Your physical phone set should now be displaying a prompt for a telephone extension or login
as listed below. Please press the button below Login to log in to the phone.
Page 5 of 7
11. The phone will prompt you for an extension – using your dial pad, enter your Avaya extension
that begins with 14 or 19 and press the button below Enter.
12. The phone will prompt you for a password – using your dial pad, enter your Avaya extension that
begins with 14 or 19 and press the button below Enter.
13. If you receive the below listed prompt; “Extension in use: with your extension number listed”.
Please confirm the extension number is the one that belongs to you and please hit the
“Continue” Button. If the extension was entered incorrectly, then please hit the “Login” button
to restart the entering extension and password process again:
Page 6 of 7
14. Upon successful login to your physical phone, you should see a screen similar to the one below,
showing your telephone extension similar to the screen below:
15. In Avaya One-X (on your computer), press Save Settings and Log In. Your phone will beep a few
times; remove the handset from the phone and set it to the side like normal. You should be
logged in and ready to take calls.
Page 7 of 7
Download Avaya Physical VoIP Phone Setup
Avaya Physical VoIP Phone Setup.pdf (PDF, 550.19 KB)
Download PDF
Share this file on social networks
Link to this page
Permanent link
Use the permanent link to the download page to share your document on Facebook, Twitter, LinkedIn, or directly with a contact by e-Mail, Messenger, Whatsapp, Line..
Short link
Use the short link to share your document on Twitter or by text message (SMS)
HTML Code
Copy the following HTML code to share your document on a Website or Blog
QR Code to this page

This file has been shared publicly by a user of PDF Archive.
Document ID: 0000573520.