5EAT HD 2 Transgo Instructions (PDF)
File information
Author: David Hardin
This PDF 1.7 document has been generated by Microsoft® Publisher 2010, and has been sent on pdf-archive.com on 02/06/2017 at 16:58, from IP address 162.231.x.x.
The current document download page has been viewed 3467 times.
File size: 417.65 KB (6 pages).
Privacy: public file


File preview
5EAT-HD2
REPROGRAMMING
KIT
Short, Firm Shifts with Performance, Durability and “CLASS”
™
This Kit Fits:
Subaru
Outback 2.5XT / 3.0R 2005-2007 5 Speed AWD
Legacy GT 2005-2007 5 Speed AWD
B9 Tribeca 2006-2007 5 Speed AWD
HOLD IT! READ THIS BEFORE STARTING!
The Installation of this product REQUIRES A PROFESSIONAL AUTOMATIC TRANSMISSION TECHNICIAN.
DO NOT ATTEMPT to do this installation on your own! We DO NOT furnish technical help to general mechanics, do-ityourselfer’s or anyone else NOT FULLY EXPERIENCED and EQUIPPED to handle the diagnosis, overhaul and drive-ability for
the 5EAT Transmission.
To the Technician: Perform a thorough road-test and scan the system for codes before starting. It is important to address any
engine or transmission performance problems BEFORE attempting the installation of this product. If the car has been driven hard
for very long with added horse power the friction materials may already be damaged, overhauling will be required. This product
REQUIRES a good working transmission before installation. Use extreme care in handling this valve-body assembly as the solenoids are FRAGILE and at this time can NOT be ordered separately. Avoid applying pressure to the valve body with the solenoids CONTACTING the bench! If you accidentally damage a solenoid the only current solution is to purchase a new valve-body
assembly from the dealer. DO NOT DIP OR SOAK THE MEMORY BOX (attached to the Valve-body) IN SOLVENT!
Before beginning READ THE INSTRUCTIONS THOROUGHLY! There is additional information included to help you identify bolt
locations for removal and disassembly purposes in the Removal Guide. Call us with ANY installation questions you may have.
®
Mr Shift
You'll just Love it.
Product support [626] 443-7451
2621 Merced Ave, El Monte, CA 91733-1997
© TransGo 2010
READ THIS BEFORE STARTING VALVEBODY!
The Installation of the Valve body parts and tech starts on the next
page. Always do Step 1 on this page first before proceeding with
the Valve Body parts and tech installation. If you need help removing and disassembling the VB, read below. Otherwise do Step 1
on this page and proceed with the installation on the following
pages. DO NOT SOAK or wash the memory box in solvent. It
is attached to your Valve-body! (See VB Removal Booklet)
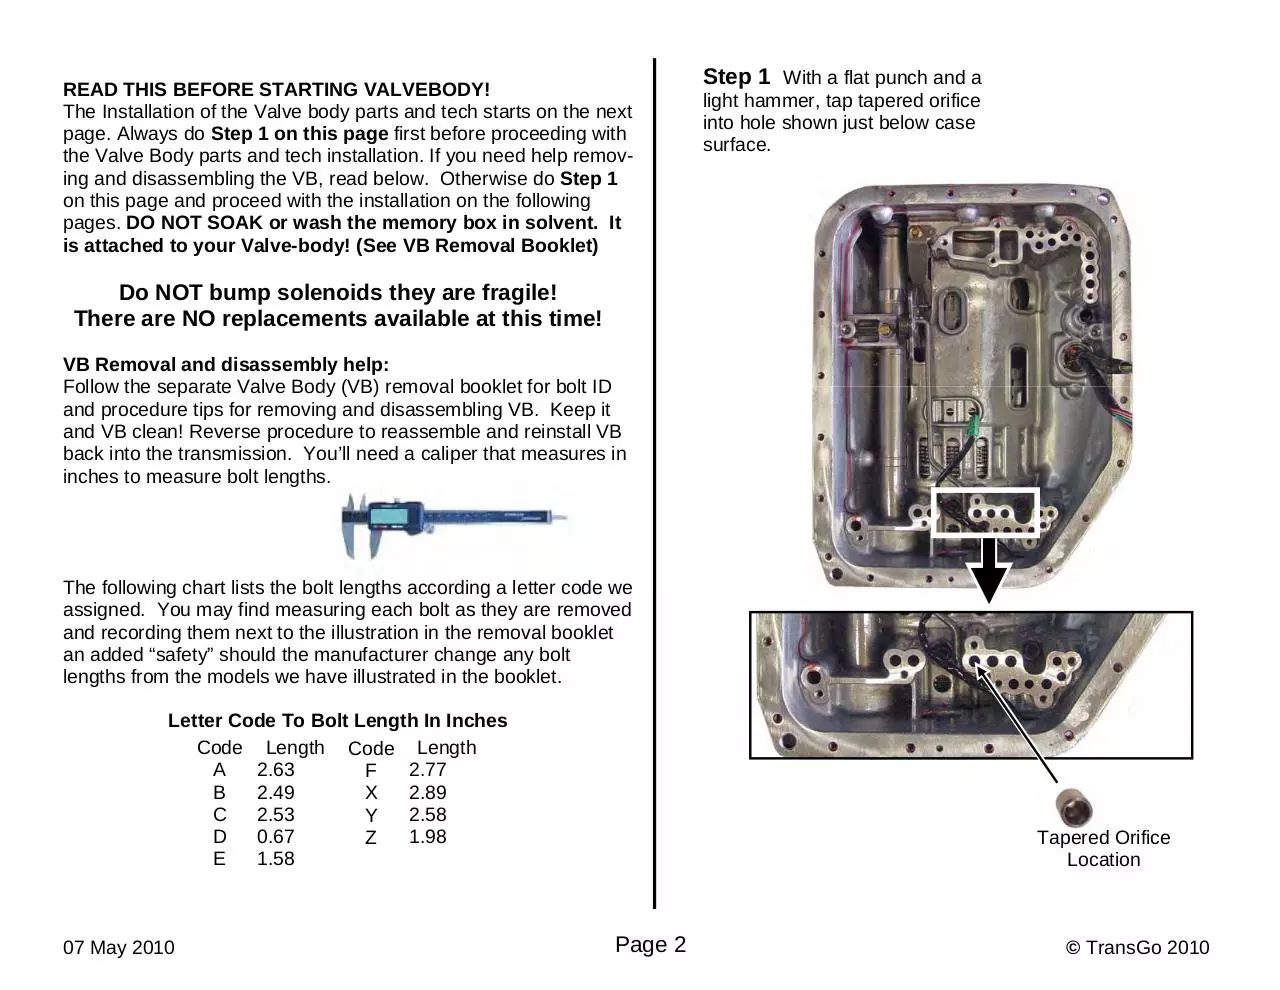
Step 1 With a flat punch and a
light hammer, tap tapered orifice
into hole shown just below case
surface.
Do NOT bump solenoids they are fragile!
There are NO replacements available at this time!
VB Removal and disassembly help:
Follow the separate Valve Body (VB) removal booklet for bolt ID
and procedure tips for removing and disassembling VB. Keep it
and VB clean! Reverse procedure to reassemble and reinstall VB
back into the transmission. You’ll need a caliper that measures in
inches to measure bolt lengths.
The following chart lists the bolt lengths according a letter code we
assigned. You may find measuring each bolt as they are removed
and recording them next to the illustration in the removal booklet
an added “safety” should the manufacturer change any bolt
lengths from the models we have illustrated in the booklet.
Letter Code To Bolt Length In Inches
Code Length Code Length
A
2.63
2.77
F
B
2.49
2.89
X
C
2.53
2.58
Y
D
0.67
1.98
Z
E
1.58
07 May 2010
Tapered Orifice
Location
Page 2
© TransGo 2010
Middle Valve Body (Top View)
Step 2 Working with one valve at a time, remove original
valve and match it for size to one of the new valves provided.
Install new valves, springs and check balls exactly as shown.
Always insert ball first into hollow end of new valve then spring.
Make sure small end of new inner spring faces ball! Insert the
new valve, ball and spring as an assembly into VB, then install
outer springs, plugs and retainers as required. See below and
next page for each specific valve assembly requirements.
Experience Tip: Be safe! Save all old parts and discard them only
after road test and your sure everything is ok.
Always keep the instructions.
Complete details of small parts
locations for entire valve body
are in the Removal Guide.
Install New Orange
Inside Original
Pressure
Regulator
Pressure Regulator:
Check Boost Valve type and
use the springs that match.
White Springs
Install NEW Large diameter
Valve, ball and spring.
Ball
Re-Use
Pressure Regulator
Boost Valves
Plain Springs
Retainer removes
from other side of
valve body.
Small end of
new Spring.
Discard Spring
on small Valve
only.
Install NEW Small diameter
Valve, ball and spring.
07 May 2010
© TransGo 2010
Page 3
Lower Valve Body (Top View)
Step 2 Continued
Re-Use
Open end of filter
pokes up thru plate.
Replace
Springs
With
= F
Pilot A BLUE
Re-Use
Install NEW Large diameter
Valve, ball and spring.
Ball
Pilot B Yellow
F
Re-Use
F
Small end of
new Spring.
F
Re-Use
F
Re-Use
Complete details of small parts
locations for entire valve body
are in the Removal Guide.
07 May 2010
Page 4
© TransGo 2010
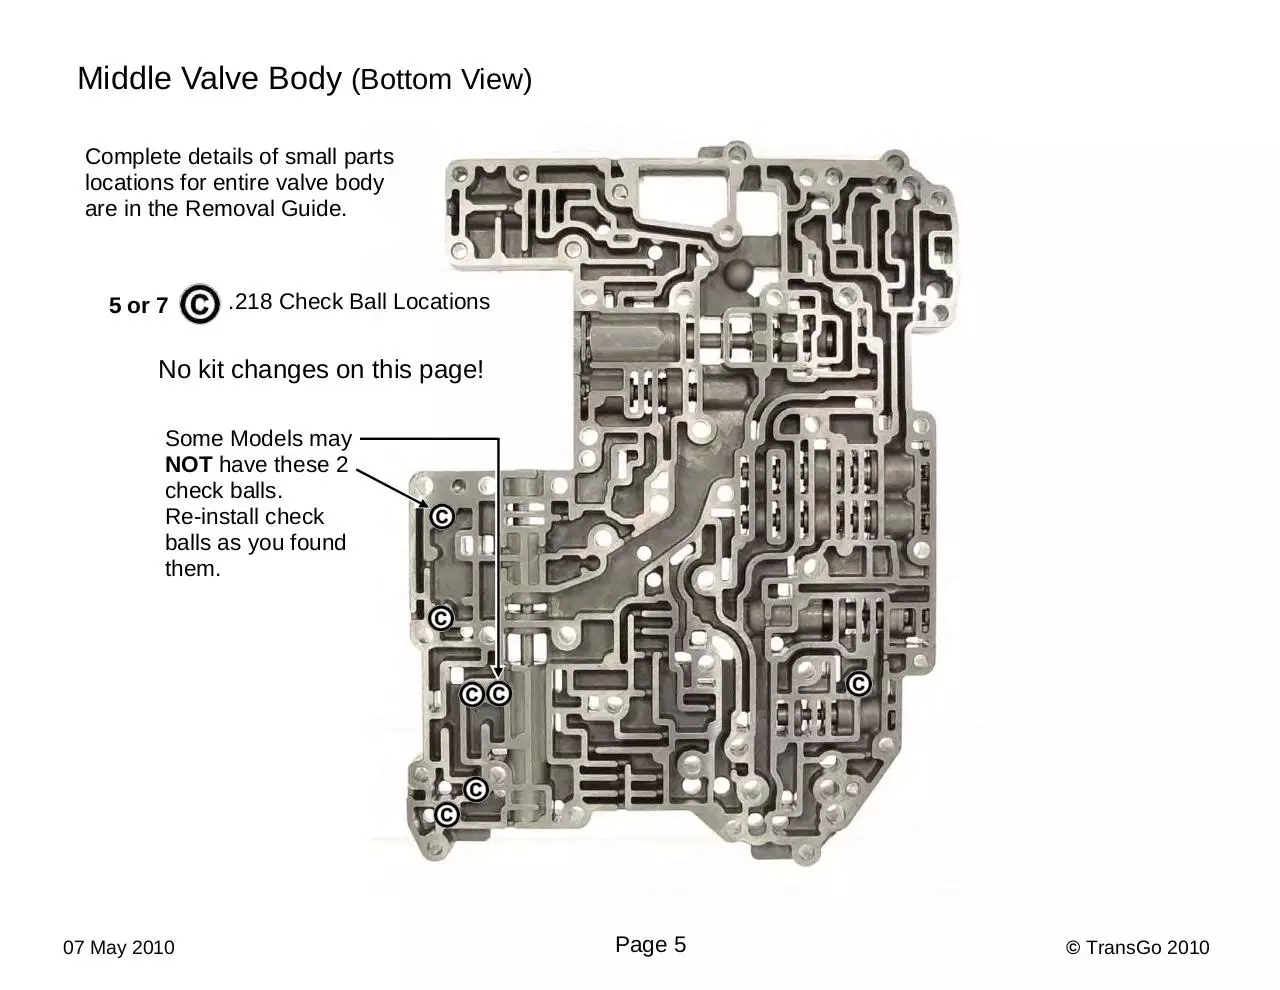
Middle Valve Body (Bottom View)
Complete details of small parts
locations for entire valve body
are in the Removal Guide.
5 or 7
.218 Check Ball Locations
No kit changes on this page!
Some Models may
NOT have these 2
check balls.
Re-install check
balls as you found
them.
07 May 2010
Page 5
© TransGo 2010
Separator Plates
Complete this page, then re-check your work in this
booklet. Refer back to the Removal Guide to finish
assembling and installing the valve body.
REMEMBER be gentle handling this valve body!
Step 3 Drill plate holes according to chart below.
Hole sizes:
A-.125
B&C-.103
D-.136
Upper Body to Middle
Body Separator Plate
Lower Body to Middle
Body Separator Plate
Remember!
Open end of filters
poke up thru plate.
D
A
= F
C
Re-Use
B
07 May 2010
Page 6
© TransGo 2010
Download 5EAT HD-2 Transgo Instructions
5EAT HD-2 Transgo Instructions.pdf (PDF, 417.65 KB)
Download PDF
Share this file on social networks
Link to this page
Permanent link
Use the permanent link to the download page to share your document on Facebook, Twitter, LinkedIn, or directly with a contact by e-Mail, Messenger, Whatsapp, Line..
Short link
Use the short link to share your document on Twitter or by text message (SMS)
HTML Code
Copy the following HTML code to share your document on a Website or Blog
QR Code to this page

This file has been shared publicly by a user of PDF Archive.
Document ID: 0000606662.