pi hole[1] (PDF)
File information
Title: Block Ads Network-wide with A Raspberry Pi-hole
Author: Jpgpi250@gmail.com
This PDF 1.5 document has been generated by Microsoft® Word 2013, and has been sent on pdf-archive.com on 20/06/2017 at 21:34, from IP address 84.193.x.x.
The current document download page has been viewed 531 times.
File size: 490.18 KB (17 pages).
Privacy: public file


File preview
2017
Block Ads Network-wide with A Raspberry Pi-hole
Jpgpi250@gmail.com
© 2015, 2016, 2017 Jacob Salmela
12-5-2017
1.
Reading the manual......................................................................................................................... 2
2.
Buy. .................................................................................................................................................. 2
3.
Download. ....................................................................................................................................... 2
4.
Raspberry pi Installation.................................................................................................................. 3
1.
Preparing the SD card. ................................................................................................................. 3
2.
Preparing your DHCP server. ....................................................................................................... 3
3.
Power on the Raspberry pi. ......................................................................................................... 3
4.
Use Putty on your (Windows) workstation to connect to the Raspberry pi. .............................. 3
5.
Configure the static IP address. ................................................................................................... 3
6.
Reboot the Raspberry pi.............................................................................................................. 4
7.
Update the Raspberry pi ............................................................................................................. 4
8.
Install mail (assumes valid gmail account) .................................................................................. 4
9.
Setup Key authentication ............................................................................................................ 5
10.
Install Webmin ........................................................................................................................ 6
11.
Additional system configuration (webmin) ............................................................................. 6
12.
Modify your ntp server configuration ..................................................................................... 7
13.
Install DNS utils ........................................................................................................................ 8
5.
Pi-hole installation (version v3.0.1) ................................................................................................. 8
1.
Installation ................................................................................................................................... 8
2.
Upgrading .................................................................................................................................... 9
6.
Change your DNS settings ............................................................................................................... 9
7.
Change the default UNIX password .............................................................................................. 10
8.
Change / Recover the admin page password ................................................................................ 10
9.
Windows Whitelist ........................................................................................................................ 10
10.
Modify Whitelist and Blacklist ................................................................................................... 10
11.
Adding Wildcard sites to the blacklist ....................................................................................... 11
12.
Adding host lists ........................................................................................................................ 11
13.
Suppress pi-hole’s daily cron mail ............................................................................................. 13
14.
Raspberry pi Error Messages ..................................................................................................... 13
15.
Windows DNS cache .................................................................................................................. 14
16.
Protect your Raspberry Pi.......................................................................................................... 14
17.
Disable unused hardware (Raspberry Pi® 3 Model B only) ....................................................... 15
18.
Helping the RANDOM number generator. ................................................................................ 16
19.
Backup your Pi-hole................................................................................................................... 16
1. Reading the manual.
If you are reading this document, using Adobe Reader, you may click on a hyperlink to
content in this document. Use the combination <Alt> <left arrow> to return to the previous
location.
"Back" and "Forward" buttons can also be added to the toolbar. If you right-click on the tool
bar, under "Page Navigation", they are referred to as "Previous View" and "Next View".
Copying and pasting from this manual into Putty doesn’t seem to work all the time. If you get
an error, try typing the command…
2. Buy.
You can buy this anywhere, I bought them at Conrad (included links). If you buy them at
Conrad, ensure you use the country specific links (conrad.de, conrad.be, conrad.nl …), this to
get the proper payment and delivery options!
- Raspberry pi:
o Raspberry Pi® 3 Model B 1 GB w/o OS (item no.: 1419716)
o Banana Pi® B+ enclosure Black RB-Case (item no.: 1274195)
- SD card: Ensure you buy a class 10 card. You’ll need an SD adapter to format and write the
SD card.
o microSDHC card 32 GB Transcend 32GB CL10 MICRO SDHC CARD Class 10 (item no.:
416521)
o Transcend MicroSD™ Adapter auf SD (itm no.: 1413689)
- Power Supply: If you don’t have a spare one.
o VOLTCRAFT DO-10 MicroUSB (item no.: 518334)
o USB charger Mains socket HN Power HNP15-USB-C (item no.: 406329)
3. Download.
- Putty, ensure you download a version including PuTTYgen.
- WinSCP
- Win32DiskImager
- SDFormatter
- Raspbian Jessie Lite (the Raspberry pi operating system). This document was written,
using Version April 2017, Release date 2017-04-10, Kernel version 4.4
4. Raspberry pi Installation
1. Preparing the SD card.
- Format the SD card, using SDFormatter.
- Extract 2017-04-10-raspbian-jessie-lite.zip, this zip contains a single img file.
- Write the extracted img file to the SD card, using Win32DiskImager.
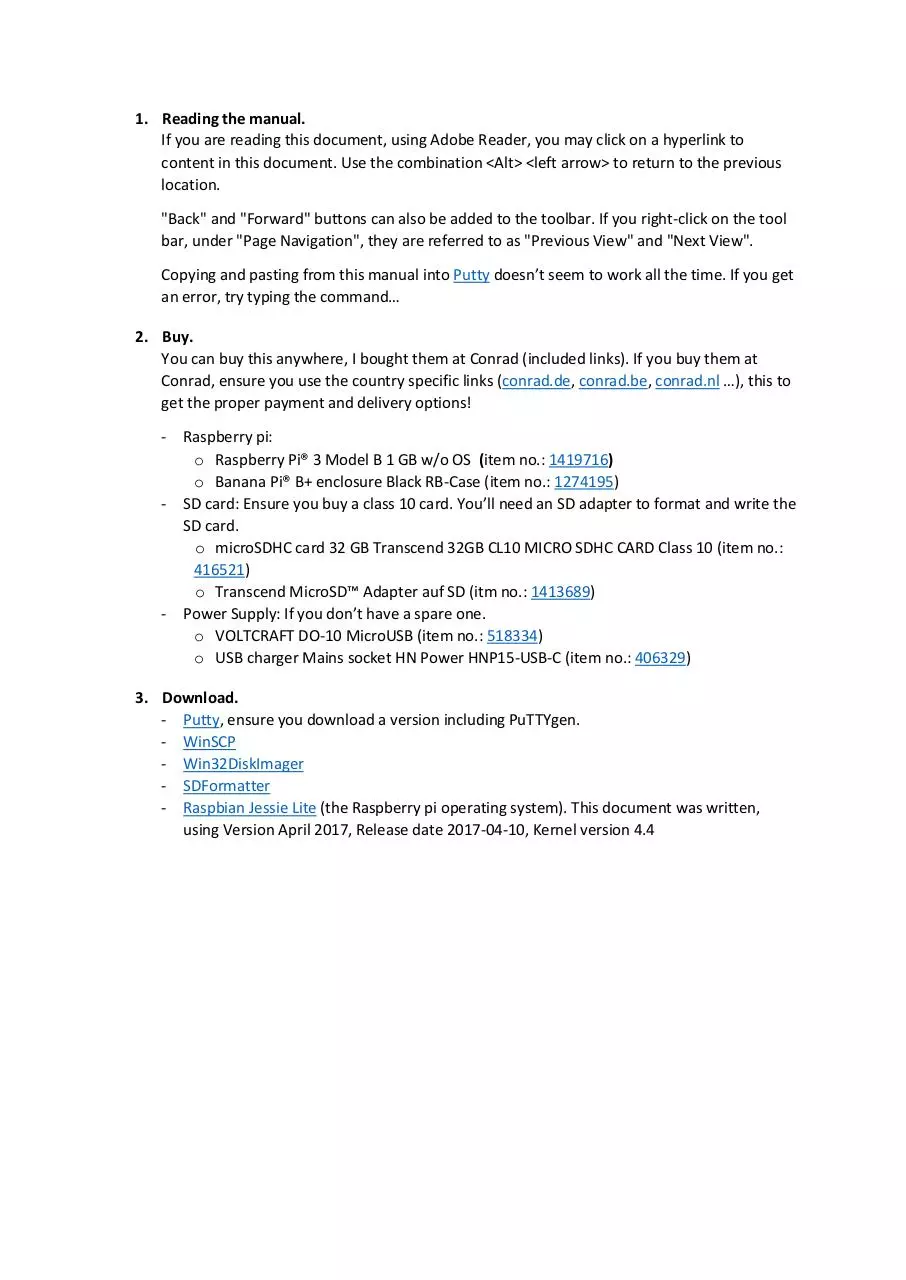
- You need to create a file called “ssh” (no extension) in the boot partition to enable
SSH (read the release notes).
- Insert the SD card in the Raspberry pi (power disconnected).
2.
Preparing your DHCP server.
You probably have an existing DHCP configuration. It is advised you make a static entry
for the Raspberry pi (IP address – MAC address). This will ensure the Putty and winSCP
configurations will still be functional, if you decide to reinstall from scratch. The static IP
configuration will overwrite the values from the DHCP server.
3.
Power on the Raspberry pi.
You only need to connect the power and an Ethernet cable. There is no need for a
keyboard, mouse or HDMI monitor.
4.
Use Putty on your (Windows) workstation to connect to the Raspberry pi.
- Session / Host Name (or IP address): enter the IP address
- Connection / Data / Auto-login username: pi
- Session /Saved Sessions: Enter a name for the device and click ‘Save’
- Click ‘Open’
- The default password is ‘raspberry’
5.
Configure the static IP address.
Reference: http://www.suntimebox.com/raspberry-pi-tutorial-course/week-3/day-5/,
read the comment from BK near the end of the page.
sudo nano /etc/dhcpcd.conf
Enter your Raspberry pi’s static IP address and your network’s gateway, we are using the
OpenDNS servers.
interface eth0
static ip_address=<your Raspberry pi’s static address>
static routers=<your networks gateway>
static domain_name_servers=208.67.222.222 208.67.220.220
Now is the time, if you haven’t already done so, to configure the static DHCP entry. To
find the MAC address:
ifconfig
Copy the HWaddr (that is the MAC address) from eth0
6.
Reboot the Raspberry pi
Your Putty session will disconnect, wait a few seconds, right click the Putty frame and
select ‘restart session’.
sudo reboot
7.
Update the Raspberry pi
sudo apt-get update && sudo apt-get -y upgrade
Wait for the updates to install…
8.
Install mail (assumes valid gmail account)
Reference: http://www.sbprojects.com/projects/raspberrypi/exim4.php
Reference: https://wiki.archlinux.org/index.php/SSMTP
We will be installing SSMTP, you will need to upgrade the system, if you haven’t already
done so, before this works!
sudo apt-get -y install ssmtp mailutils mpack
Wait for the installation to complete…
Edit the SSMTP configuration.
sudo nano /etc/ssmtp/ssmtp.conf
Enter your gmail’s account details. The root, mailhub and hostname entries already
exist, these entries need to be updated.
root=<your account name>@gmail.com
mailhub=smtp.gmail.com:587
hostname=<Your Raspberry pi’s name should already be here>
AuthUser=<your account name>@gmail.com
AuthPass=<your password>
useSTARTTLS=YES
Edit the SSMTP aliases configuration.
sudo nano /etc/ssmtp/revaliases
Add the following (replace the account information)
root:<your account name>@gmail.com:smtp.gmail.com:587
pi:<your account name>@gmail.com:smtp.gmail.com:587
9.
Setup Key authentication
Generate the authentication keys on your Raspberry pi
ssh-keygen -t rsa -C "raspberrypi"
Accept the defaults
If you didn’t already setup WinSCP on your (Windows) workstation:
-
Open WinSCP, select ‘New Site”
File protocol: SCP
User name: pi
Password: raspberry
Click ‘Advanced’
Environment / SCP/shell /Shell: sudo su –
Click “OK”
Click “Save”
Login, using WinSCP
-
Select the saved session
Click “Login”
Select Options / Preferences from the WinSCP menu
Select Environment / Interface
Check Commander
Select Panels
Check Show hidden files
Browse to the pi .ssh directory (/home/pi/.ssh)
Copy id_rsa and id_rsa.pub to your (Windows) workstation (It’s recommended you
create a sources/installation/key folder for your Raspberry Pi, containing all the
necessary files)
Rename id_rsa.pub to authorized_keys (no extension) and copy it back to the .ssh
folder. If you want to restrict SSH logins to particular IP addresses, check out this
reference.
Start PuTTYgen on your (Windows) workstation.
- Select “Load”
- Select the “All files” type
-
Browse to your sources/installation/key folder and select id_rsa
Click “Open”, Confirm the import
Click “Save private key”
Confirm you want to save the key without a passphrase
Type an appropriate key name and save the private key file (.ppk)
Configure Putty to use the key
-
Open Putty, select the saved session, click “Load”
Connection / Data / Auto-login username: pi
Connection / SSH / Auth
Click “Browse”, select the private key file you created (.ppk)
Session
Click “Save”
Test your configuration, open a new Putty session, you should be logged on
automatically.
Configure WinSCP to use the key
-
Open WinSCP, select the saved session, click “Edit”
Click “Advanced”
SSH / Authentication
Private key file
Click “…” (Browse), select the private key file you created (.ppk)
Click “OK” (closes advanced)
Empty the password field
Click “Save”
Test your configuration, open a new WinSCP session, you should connect, using the
private key.
10. Install Webmin
Reference: http://www.webmin.com/deb.html
Install the depencies
sudo apt-get -y install perl libnet-ssleay-perl openssl libauthen-pam-perl libpam-runtime libio-p
ty-perl apt-show-versions python
Download the package
sudo wget http://prdownloads.sourceforge.net/webadmin/webmin_1.840_all.deb
Install the package, this may take a while…
sudo dpkg --install webmin_1.840_all.deb
11. Additional system configuration (webmin)
The Webmin URL: https://<Your Raspberry pi’s IP address>:10000/
The username is pi, the password is raspberry, unless you’ve already changed that.
- Webmin / Webmin configuration / Logging:
o Requires mail setup!
o Send logged actions via email to: enter a valid (g)mail address.
- System / Software Package Updates:
o Requires mail setup!
o Check for updates on schedule: Yes, every day.
o Email updates report to: enter a valid (g)mail address.
o Action when update needed: Install any updates.
- Hardware / system time / change timezone:
o Select the correct time zone
If you know the name of your time zone, you can also change it on the command
line. Example for “Europe/Brussels”:
sudo timedatectl set-timezone Europe/Brussels
- Webmin / Webmin Configuration / IP Access Control:
o Select only allow from listed addresses
o Enter allowed IP addresses (at least the static IP address of your workstation)
- Servers / SSH Server / Authentication:
o Requires working Key authentication!
o Allow authentication by password? no
12. Modify your ntp server configuration
Goto http://support.ntp.org/bin/view/Servers/NTPPoolServers
Select the region you are in, there will be a list of NTP servers for your region.
sudo nano /etc/ntp.conf
Find the line (<ctrl-W>) # pool: <http://www.pool.ntp.org/join.html>
There are four (4) lines below this line. Replace the DNS names with the DNS names
from the list Example: Europe.
server 0.europe.pool.ntp.org iburst
server 1.europe.pool.ntp.org iburst
server 2.europe.pool.ntp.org iburst
server 3.europe.pool.ntp.org iburst
Restart the NTP service
sudo /etc/init.d/ntp restart
Check ntp servers synchronization status.
ntpq
At the ntpq prompt, enter pe.
ntpq> pe
You’ll get a list of servers, the primary server is marked with an asterisk (*). It may take a
while for the synchronization to become active, repeat the command
To quit the ntpq prompt, enter quit
ntpq> quit
13. Install DNS utils
It is recommended to check your system’s DNS capability before installing pi-hole.
sudo apt-get -y install dnsutils
Check if name resolution is functional, remember we configured the OpenDNS servers.
dig google.com
5. Pi-hole installation (version v3.0.1)
1.
Installation
Reference: https://pi-hole.net/
-
Automated install
I’ve had issues with this (DNS error) see below for an alternative
curl -L https://install.pi-hole.net | bash
-
Alternative Semi-Automated install
wget -O basic-install.sh https://install.pi-hole.net
chmod +x basic-install.sh
sudo ./basic-install.sh
-
Read the informational dialogs.
Select DNS servers (I’ve been using the OpenDNS servers).
Both IPv4 and IPv6 are selected, uncheck IPv6 if you don’t use it…
Confirm your network settings
Read the IP conflict dialog (this should never be an issue if you prepared your DHCP
server.
Select “On (Recommended)” to install the web admin interface. Your choice will be
recorded, using the INSTALL_WEB setting in /etc/pihole/setupVars.conf.
Select “On (Recommended)” to log queries. Your choice will be recorded, using the
QUERY_LOGGING setting in /etc/pihole/setupVars.conf.
Download pi-hole[1]
pi-hole[1].pdf (PDF, 490.18 KB)
Download PDF
Share this file on social networks
Link to this page
Permanent link
Use the permanent link to the download page to share your document on Facebook, Twitter, LinkedIn, or directly with a contact by e-Mail, Messenger, Whatsapp, Line..
Short link
Use the short link to share your document on Twitter or by text message (SMS)
HTML Code
Copy the following HTML code to share your document on a Website or Blog
QR Code to this page
![QR Code link to PDF file pi-hole[1].pdf](/qr/4/4c/4cW6Y9o4.png)
This file has been shared publicly by a user of PDF Archive.
Document ID: 0000615242.