VID instructions (1) (PDF)
File information
Title: BK5R16LT
Author: w3p Scripts
This PDF 1.4 document has been generated by Adobe InDesign CC 2017 (Macintosh) / Adobe PDF Library 15.0, and has been sent on pdf-archive.com on 21/12/2017 at 18:27, from IP address 2.219.x.x.
The current document download page has been viewed 285 times.
File size: 9.29 MB (20 pages).
Privacy: public file


File preview
F
19
10
H
12
6
5
4
21
G
A
22
18
B
G
H
11
7
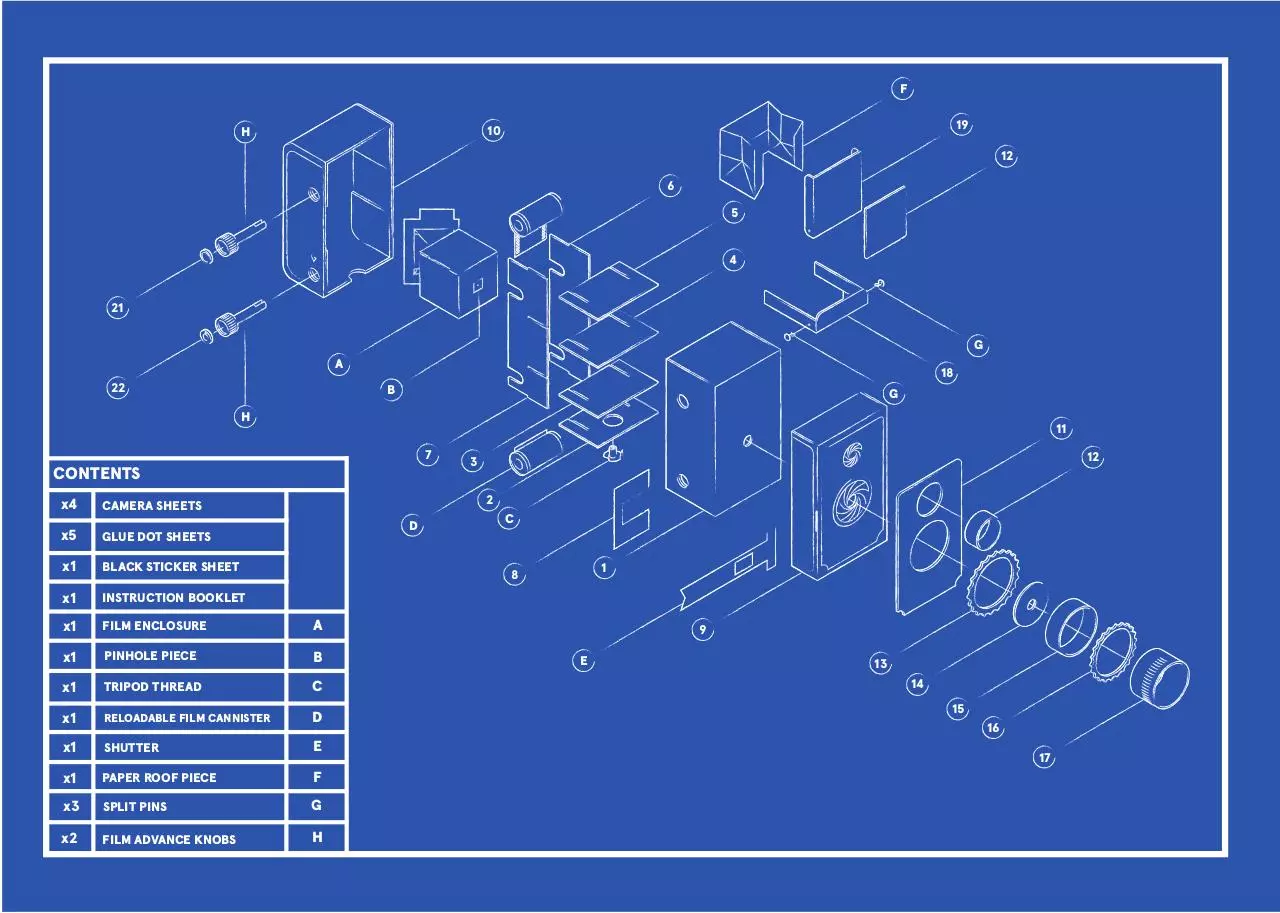
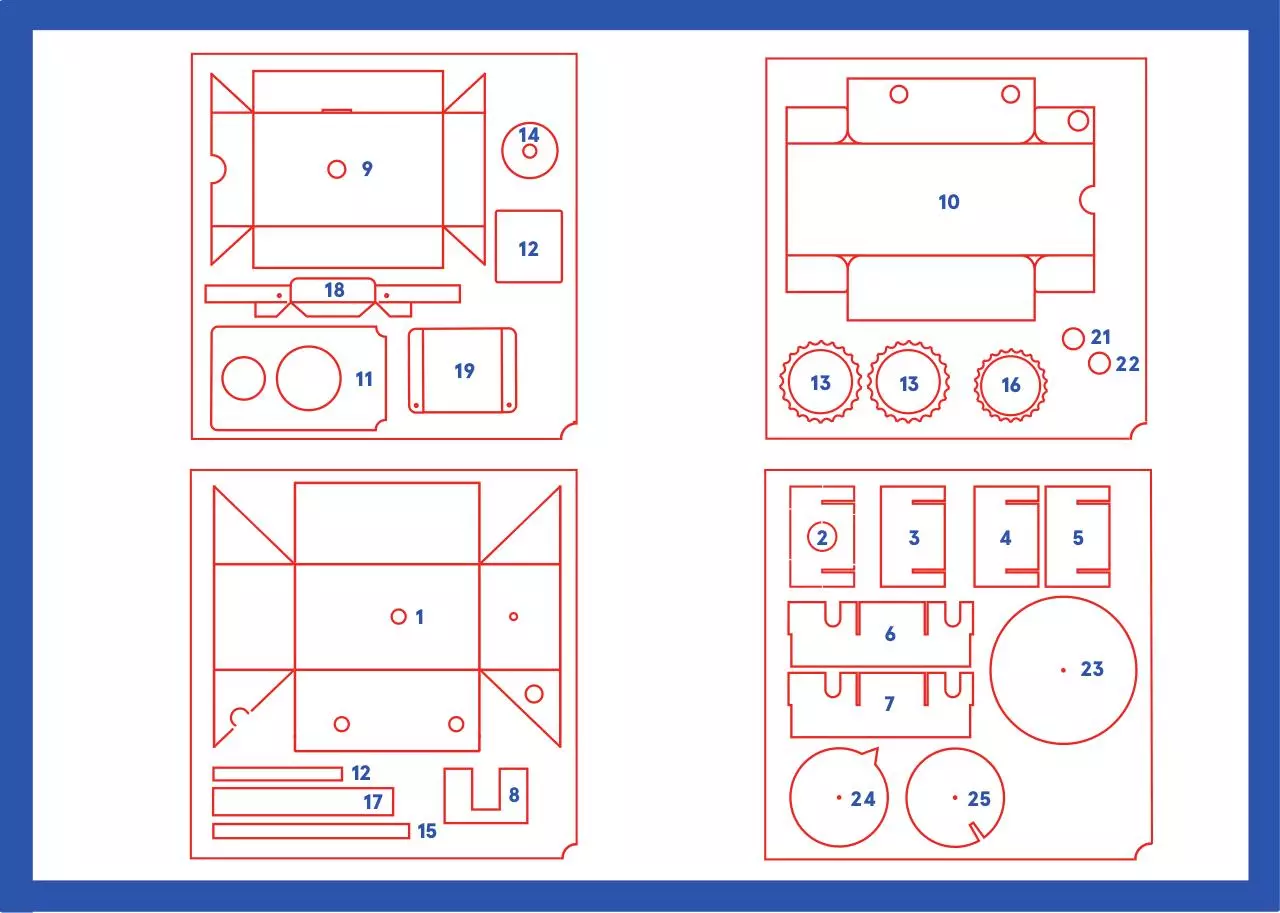
CONTENTS
x4
x5
12
3
2
CAMERA SHEETS
D
GLUE DOT SHEETS
x1
BLACK STICKER SHEET
x1
INSTRUCTION BOOKLET
x1
FILM ENCLOSURE
x1
PINHOLE PIECE
B
x1
TRIPOD THREAD
C
x1
RELOADABLE FILM CANNISTER
D
x1
SHUTTER
E
x1
PAPER ROOF PIECE
F
x3
SPLIT PINS
G
x2
FILM ADVANCE KNOBS
H
C
1
8
A
9
E
13
14
15
16
17
14
9
10
12
18
21
19
11
13
13
16
2
3
4
1
22
5
6
23
7
12
17
8
15
24
25
What is a pinhole camera?
Lens
A pinhole camera is the very simplest form
of camera in the world. Instead of a lens
like you might have used on other cameras
it instead uses a tiny hole to create images.
Photography as we know it
today was only invented in 1826
yet the idea of the pinhole has
been known for a very long
time.
Pinhole
PHOTOGRAPHS
Captures movement which can
sometimes look like a ghost. This
is because the exposure times are
longer than a normal camera.
?
Some images may have
a distorted or warped
appearance.
The exposure time is the amount of time light is let into
the camera. On a lens camera this can be a fraction of
a second, but anywhere from 1 second to several hours
on a pinhole camera.
The first humans may have
even seen a form of pinhole
technology thousands of
years ago as light from the sun
projected through tree leafs,
leaving shadows on the floor.
When light passes through a pinhole, it will keep
traveling in a straight line until it hits the back of the
camera, forming an inverted (upside-down) image.
The image appears upside-down because light always
travels in a straight line, so the top of the candle
becomes the bottom and the bottom becomes the top.
THE IMAGE
More ‘fuzzy’ than a photograph
taken with a lens.
Pinhole photography allows you to create
images that conventional cameras can’t.
Images are usually a little more soft focus.
?
Did you know that ‘camera
obscura’ means ‘dark
chamber’ in Latin?
The pinhole technique is based on the principle of the
camera obscura which is centuries old. Basically nothing
more than a light-proof box with, in the middle of one
side, a tiny hole instead of a lens.
REAL CANDLE
The camera you are going to make has a
pinhole that is 0.2mm in diameter. That’s
about the same size as a grain of sand.
PINHOLE
How does it work?
PINHOLE
?
Trace the line from the bottom of the real
candle to the top of the image of the candle
with your finger to help understand this
principle.
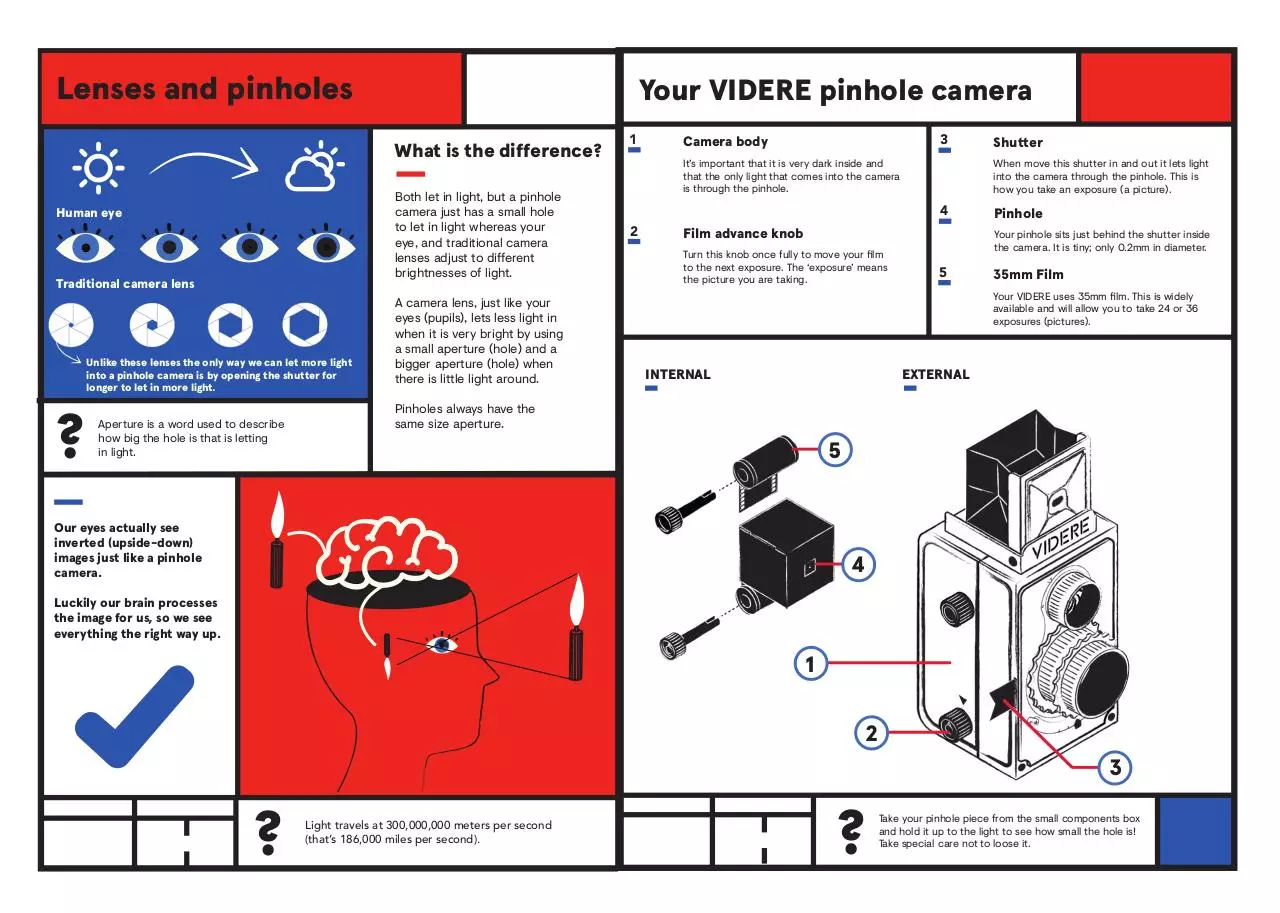
Lenses and pinholes
Your VIDERE pinhole camera
What is the difference?
Both let in light, but a pinhole
camera just has a small hole
to let in light whereas your
eye, and traditional camera
lenses adjust to different
brightnesses of light.
Human eye
Traditional camera lens
Unlike these lenses the only way we can let more light
into a pinhole camera is by opening the shutter for
longer to let in more light.
?
Aperture is a word used to describe
how big the hole is that is letting
in light.
A camera lens, just like your
eyes (pupils), lets less light in
when it is very bright by using
a small aperture (hole) and a
bigger aperture (hole) when
there is little light around.
1
3
Camera body
It’s important that it is very dark inside and
that the only light that comes into the camera
is through the pinhole.
2
When move this shutter in and out it lets light
into the camera through the pinhole. This is
how you take an exposure (a picture).
4
Film advance knob
Turn this knob once fully to move your film
to the next exposure. The ‘exposure’ means
the picture you are taking.
Shutter
Pinhole
Your pinhole sits just behind the shutter inside
the camera. It is tiny; only 0.2mm in diameter.
5
35mm Film
Your VIDERE uses 35mm film. This is widely
available and will allow you to take 24 or 36
exposures (pictures).
INTERNAL
EXTERNAL
Pinholes always have the
same size aperture.
5
Our eyes actually see
inverted (upside-down)
images just like a pinhole
camera.
4
Luckily our brain processes
the image for us, so we see
everything the right way up.
1
2
3
?
Light travels at 300,000,000 meters per second
(that’s 186,000 miles per second).
?
Take your pinhole piece from the small components box
and hold it up to the light to see how small the hole is!
Take special care not to loose it.
HOW TO USE THE GLUE DOTS
White dots on a striped background indicate where a glue dot
should be placed.
Your VIDERE 35mm kit comes with glue dots to help construct your camera.
If you prefer, you can use craft glue to build your camera, just use it where you would
usually place the glue dots.
1
3
Take your glue dot sheets from the box.
Each glue dot sheet is perforated.
Place the glue dot down firmly into place, pressing down hard to
create a strong bond.
2
4
Take one glue dot and remove the white backing paper.
When in place pull away the remaining backing swiftly.
The glue dot should remain in place on the cardboard,
making your piece ready to construct.
BUILDING THE CAMERA BODY
1
Pop out part 1.
Ensure any small, perforated circles are removed and
discarded.
Apply the glue dots to the triangular flaps and construct into
a box shape as shown.
2
Pop out part 8. Apply glue dots to front two rectangles
of part 1. Next, take the shutter (piece E) and sandwich it
between part 1 and part 8, ensuring it can move freely from
left to right.
This movement is essential as it what allows light into your
camera to expose your film.
3
Pop out parts 2 - 7. Place the shorter pieces into the grooves
of the longer parts as shown, ensuring part 2 (the one with
the hole) is at the bottom.
When constructed, push the grid into the constructed part 1.
This grid is what eventually holds the film enclosure in place.
You should expect a tight fit!
4
Take the tripod thread (part C) from the small components box.
Insert it into the hole on the bottom of part 1 as shown.
Press firmly until the pronged edges have pierced through the
layer of card, being cautious of your fingers in the process.
Download VID instructions (1)
VID instructions (1).pdf (PDF, 9.29 MB)
Download PDF
Share this file on social networks
Link to this page
Permanent link
Use the permanent link to the download page to share your document on Facebook, Twitter, LinkedIn, or directly with a contact by e-Mail, Messenger, Whatsapp, Line..
Short link
Use the short link to share your document on Twitter or by text message (SMS)
HTML Code
Copy the following HTML code to share your document on a Website or Blog
QR Code to this page

This file has been shared publicly by a user of PDF Archive.
Document ID: 0000711746.