Anni Scaeva Patch 5 (PDF)
File information
This PDF 1.4 document has been generated by TextMaker, and has been sent on pdf-archive.com on 27/04/2019 at 11:19, from IP address 79.248.x.x.
The current document download page has been viewed 629 times.
File size: 331.08 KB (3 pages).
Privacy: public file


File preview
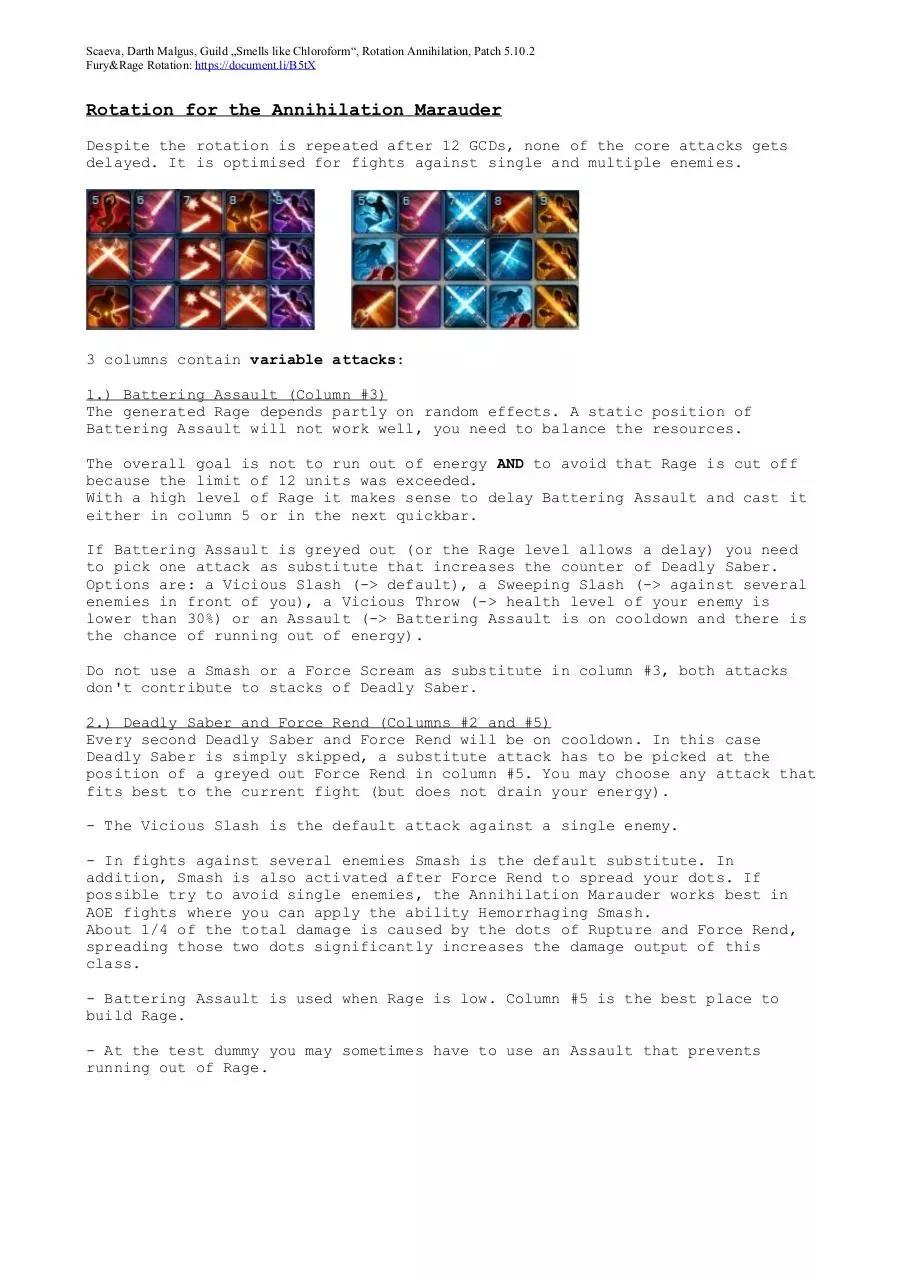
Scaeva, Darth Malgus, Guild „Smells like Chloroform“, Rotation Annihilation, Patch 5.10.2
Fury&Rage Rotation: https://document.li/B5tX
Rotation for the Annihilation Marauder
Despite the rotation is repeated after 12 GCDs, none of the core attacks gets
delayed. It is optimised for fights against single and multiple enemies.
3 columns contain variable attacks:
1.) Battering Assault (Column #3)
The generated Rage depends partly on random effects. A static position of
Battering Assault will not work well, you need to balance the resources.
The overall goal is not to run out of energy AND to avoid that Rage is cut off
because the limit of 12 units was exceeded.
With a high level of Rage it makes sense to delay Battering Assault and cast it
either in column 5 or in the next quickbar.
If Battering Assault is greyed out (or the Rage level allows a delay) you need
to pick one attack as substitute that increases the counter of Deadly Saber.
Options are: a Vicious Slash (-> default), a Sweeping Slash (-> against several
enemies in front of you), a Vicious Throw (-> health level of your enemy is
lower than 30%) or an Assault (-> Battering Assault is on cooldown and there is
the chance of running out of energy).
Do not use a Smash or a Force Scream as substitute in column #3, both attacks
don't contribute to stacks of Deadly Saber.
2.) Deadly Saber and Force Rend (Columns #2 and #5)
Every second Deadly Saber and Force Rend will be on cooldown. In this case
Deadly Saber is simply skipped, a substitute attack has to be picked at the
position of a greyed out Force Rend in column #5. You may choose any attack that
fits best to the current fight (but does not drain your energy).
- The Vicious Slash is the default attack against a single enemy.
- In fights against several enemies Smash is the default substitute. In
addition, Smash is also activated after Force Rend to spread your dots. If
possible try to avoid single enemies, the Annihilation Marauder works best in
AOE fights where you can apply the ability Hemorrhaging Smash.
About 1/4 of the total damage is caused by the dots of Rupture and Force Rend,
spreading those two dots significantly increases the damage output of this
class.
- Battering Assault is used when Rage is low. Column #5 is the best place to
build Rage.
- At the test dummy you may sometimes have to use an Assault that prevents
running out of Rage.
Scaeva, Darth Malgus, Guild „Smells like Chloroform“, Rotation Annihilation, Patch 5.10.2
Fury&Rage Rotation: https://document.li/B5tX
- Force Scream deals more damage than a Vicious Slash, but consumes 2 more units
of energy. Avoid this attack if you run out of resources a couple of GCDs later
on, that would reduce the DPS. Compared to the test dummy there are some game
mechanics in raids and PVP matches that provide additional Rage (-> Cloak of
Rage, Brazen reduces the cooldown of Berserk, Hemorrhage can affect several
enemies, more than 1 Force Leap). Force Scream can sometimes be used in raids
and PVP matches. The cooldown is the same as of Force Rend, it fits nicely into
column #5.
- Crippling Slash with the perk "Maiming Reach" will root the enemy for 3
seconds. In addition the enemy gets slowed down for 10 seconds. This can be
quite useful in PVP matches.
Picking "Maiming Reach" is optional.
The two attacks after Deadly Saber set the counter for that dot to 2. Force Rend
does not add a stack, but delays the 3rd stack.
There is a chance for an additional tick with 2 Deadly Saber stacks before the
next attack in column #1 increases the counter to 3.
It is important to cast Deadly Saber and Force Rend in the same quickbar.
Starting Points and Synchronisation
A short opening sequence is used in fights against a single enemy before the
rotation is started in quickbar #1: [Frenzy -> Force Charge -> Battering Assault
-> Annihilate -> + one additional attack, e.g. Force Choke or Vicious Throw in
combination with the perk Ruthless Aggressor]
The cooldown of the next Annihilate will now end at the position of a greyed out
Force Rend in quickbar #2, column #5. Use a Slash or an Assault at positions
where Annihilate is greyed out.
If you don’t like that additional opening sequence there is an alternative with
a different synchronisation: Begin the rotation (after a Force Charge) with
Deadly Saber in quickbar #3.
In fights against groups of enemies Deadly Saber in quickbar #1 is used as entry
point, the Smash after Force Rend will spread the dots. The following Annihilate
will trigger a 3% damage bonus on all bleeding effects. (-> passive ability
Devious Wounds)
Berserk and Deadly Saber
Berserk will have the greatest impact on Deadly Saber if activated directly
after Force Rend, dots with 3 stacks will autocrit.
The 30th stack for Berserk can be reached at any point of the rotation. Some
attacks directly build 4 stacks, the perk Brazen indirectly generates 2 units
when the Marauder suffers damage. The distance between reaching the 30th stack
and activating Berserk matters:
If Berserk was built directly at Force Rend no stacks are lost. This is the best
case.
The situation looks different if Berserk becomes available 1 GCD after Force
Rend. Delaying the activation of that buff until the next Force Rend will lead
to a large number of unused Fury stacks, all over 30 are lost. The next position
of maximum impact is 7 GCDs away, depending on the attacks that are used you can
lose up to 4x7=28 stacks of Fury. While getting attacked the perk Brazen would
generate up to 2x7=14 stacks and Deadly Saber instantly builds 4 stacks.
This example describes the worst case, there are situations where delaying
Berserk does not make any sense at all.
Scaeva, Darth Malgus, Guild „Smells like Chloroform“, Rotation Annihilation, Patch 5.10.2
Fury&Rage Rotation: https://document.li/B5tX
Parse
At the test dummy my rotation for the Annihilation Marauder parses a bit lower
than the one for the Fury Marauder. Fury/Rage are single-target specs that have
no energy issues at the testdummy, while Annihilation shines in AOE fights.
During raids and PVP matches you usually have a mix of fights against one and
several enemies, in my opinion neither of those 2 classes is superior over the
other.
Conditions for this parse were the same as for Fury Marauder: 4.000.000 HP ship
dummy with armor debuff. Fully augmented 258 armor with set bonus. No relics
that have to be activated manually. No guild buff.
Scaeva
(Dipl.-Ing.)
TRE -> Darth Malgus
Download Anni Scaeva Patch 5
Anni_Scaeva_Patch_5.pdf (PDF, 331.08 KB)
Download PDF
Share this file on social networks
Link to this page
Permanent link
Use the permanent link to the download page to share your document on Facebook, Twitter, LinkedIn, or directly with a contact by e-Mail, Messenger, Whatsapp, Line..
Short link
Use the short link to share your document on Twitter or by text message (SMS)
HTML Code
Copy the following HTML code to share your document on a Website or Blog
QR Code to this page

This file has been shared publicly by a user of PDF Archive.
Document ID: 0001929257.