How to check your car (PDF)
File information
Title: How to check your car
This PDF 1.3 document has been generated by Pages / iOS Version 13.1 (Build 17A5821e) Quartz PDFContext, and has been sent on pdf-archive.com on 05/09/2019 at 11:53, from IP address 58.171.x.x.
The current document download page has been viewed 280 times.
File size: 7.74 MB (15 pages).
Privacy: public file


File preview
How To Do A Routine Check
Up On Your Car (DIY)
Joe Bose
Table Of Contents
Understanding the main components of an engine
1
Checking the battery and topping it up
2
Checking Coolant and Topping up
3
Checking your Tyres
4
Checking your Oil
5
Replacing your Oil
6
Checking your Brake Fluid
7
Filling your Wiper Fluid
7
Checklist
8-9
i
Introduction
Cars, one of the best inventions to our world. It is now
commonly used for transport. Most of us probably own one
and use one. Some modify them to their liking, some enjoy the
satisfaction of driving and some simply use it just to get from
point A to B.
However when you use your car it is vital to do basic check
ups. Cars require care just like we humans do. If you don’t
maintain your car properly it may cause damage and may not
function properly. This is why every now and then, we should
give our car a good checkup. This booklet will help you to do
so.
Where said refer to manual, you can look in the Self Maintenance section of your vehicles
manual. It is highly recommended you read your manual. You will find most this
information in your manual
*Disclaimer* We are not responsible for any damage caused to your car. Use this book as a guide. Check
your instruction manual that comes with your car, the company produced the car and know what is best
for it.
ii
Understanding the Main
Components of an Engine
Shown above is a diagram pointing out the main parts of the engine. Then not
shown are the other parts but equally important, such as the battery, wiper fluid
reservoir, brake fluid reservoir and etc.
Camshaft: A rod with many egg shaped parts. These egg shaped parts push down valves
which let the air, fuel, and exhaust gases in and out of the combustion chamber. In this
particular engine there are 8 cams.
Piston: Rod with a cylindrical disk on the top. The piston moves up and down in the cylinder
to suck in fuel and air and compresses it. When the air fuel mixture is compressed is gets
ignited by the spark plug which causes the piston to go back down. All the pistons are
connected by the crankshaft to create a linear movement.
Cylinder: The cylinder is a chamber in which the piston is located. This chamber is where the
fuel gets burned
Fuel Injector: Injects the fuel in-to the cylinder ready for combustion
Spark Plug: Produces a spark to ignite the air-fuel mixture
Alternator: Driven by the timing belt, it produces power to charge the battery
Exhaust: The pipe in which the burned fuel is sent out and where the sound & emission is
reduced
Crankshaft: The pipe which the pistons rotate. It is a shaft that transfers the power of the
engine to the wheels and to rotate the timing belt
1
Checking the Battery and Topping
it Up
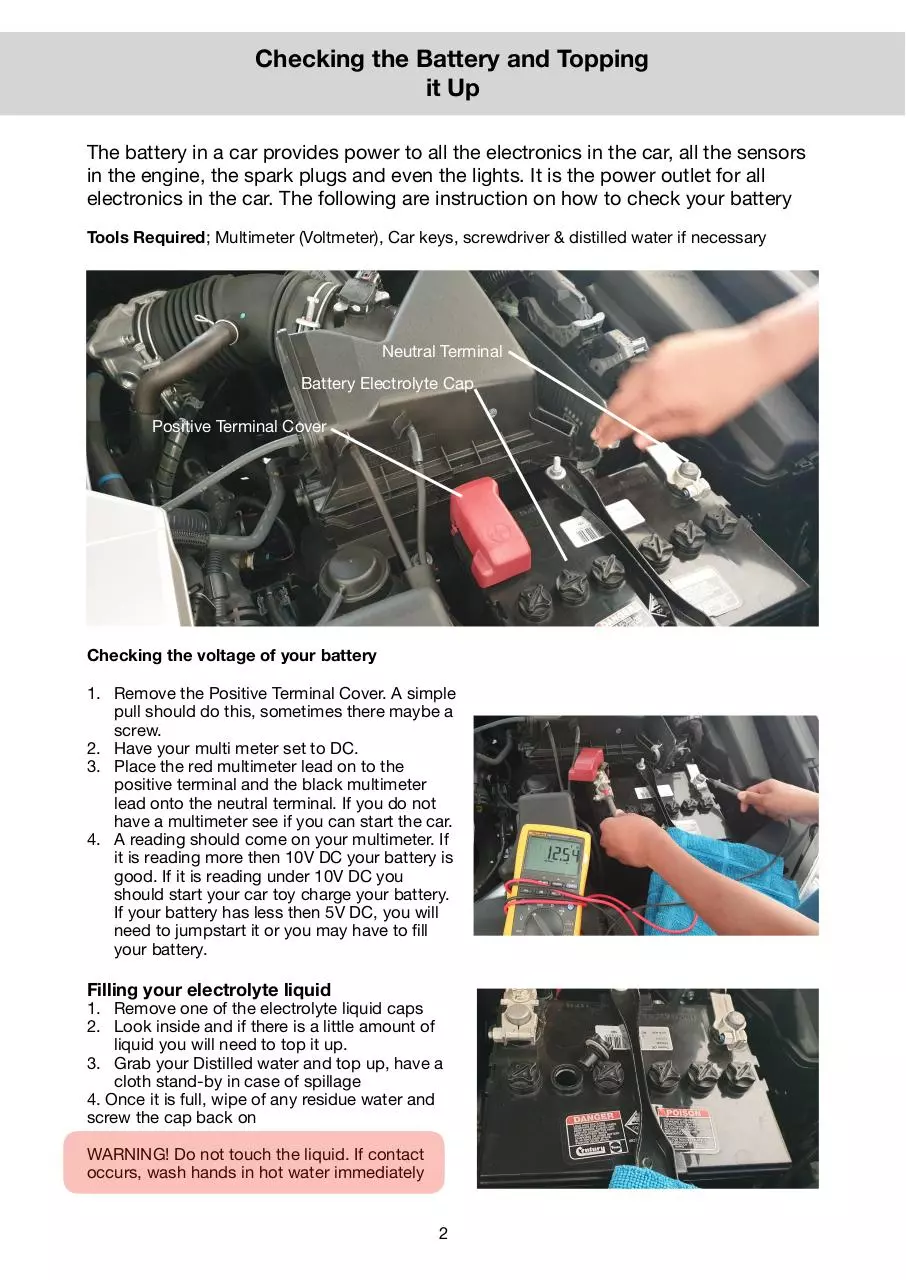
The battery in a car provides power to all the electronics in the car, all the sensors
in the engine, the spark plugs and even the lights. It is the power outlet for all
electronics in the car. The following are instruction on how to check your battery
Tools Required; Multimeter (Voltmeter), Car keys, screwdriver & distilled water if necessary
Neutral Terminal
Battery Electrolyte Cap
Positive Terminal Cover
Checking the voltage of your battery
1. Remove the Positive Terminal Cover. A simple
pull should do this, sometimes there maybe a
screw.
2. Have your multi meter set to DC.
3. Place the red multimeter lead on to the
positive terminal and the black multimeter
lead onto the neutral terminal. If you do not
have a multimeter see if you can start the car.
4. A reading should come on your multimeter. If
it is reading more then 10V DC your battery is
good. If it is reading under 10V DC you
should start your car toy charge your battery.
If your battery has less then 5V DC, you will
need to jumpstart it or you may have to fill
your battery.
Filling your electrolyte liquid
1. Remove one of the electrolyte liquid caps
2. Look inside and if there is a little amount of
liquid you will need to top it up.
3. Grab your Distilled water and top up, have a
cloth stand-by in case of spillage
4. Once it is full, wipe of any residue water and
screw the cap back on
WARNING! Do not touch the liquid. If contact
occurs, wash hands in hot water immediately
2
Checking the Coolant/Antifreeze
and Topping it Up
Car engine can get very hot from all the moving objects and heat from burning fuel. If the engine
gets too hot, the parts may expand a lot, components like wire can melt, and possibly can get
into flames. To prevent all of this cars have Antifreeze. It circulates most through most the
components of the engine to keep it cool. It is a requirement to change it and check it every now
an then.
Tools Required: Torch. If topping up fluid; screwdriver, drain pan, funnel
Reservoir Cap
Antifreeze Reservoir
Maximum Indicator
Minimum Indicator
Checking the Antifreeze level
1. Locate the Antifreeze reservoir in the engine bay. To
distinguish it, the liquid will be a bright colour, such
as pink or green. The cap for the tank should also be
labelled with COOLANT
2. If your level is showing in between the Maximum
Indicator and the Minimum Indicator your level is OK.
If it is any higher, you should consider getting it
drained or empty and pouring in exactly what you
need. If it is lower you will need to top up.
3. If your coolant looks burnt or has metal pieces in it
you should replace it and get a qualified mechanic to
do a full check up of the internals.
Topping Up Your Antifreeze
1. Checking your instruction manual, find out the type of antifreeze required.
2. Open up the coolant reservoir, you may need to use a screw driver. Only open it after 20 mins
of the car being switched of as the coolant will be pressurised.
3. Place the funnel through the whole and start slowly pouring in the antifreeze always checking
the level. With some coolants you may have to add some water. You can check how much on
the back of the bottle.
4. Once your done, close the cap and your done
*If you only need to top up a little bit, you can use water but too much will weaken the
characteristics of antifreeze*
WARNING! Don’t touch the fluid or radiator after the engine was running, give it 10 minutes
3
Checking your Tyres
Tyres are a very vital part for motor vehicles. They provide good contact from the car to the road,
and prevent the car from sliding. If you have worn tires, you may loose control. It is important you
check you tires every 3 months. You can receive a fine if your tires are worn out too much.
Tools Required: Torch, Pressure Gauge (You can go to your local fuel pump)
TWI/Cubes
Checking the Tread
1. On the sidewall of the tire, locate the TWI (Tread Wear
Indicator) marking as shown above.
2. Once you have located, at that same spot look into
the tyre to see the tread and the little cubes. You
may need to use a torch
3. If the tire tread is levelled with the cubes you need to
to replace. If there is gap between the cubes and
tread there is no need to replace them just yet. On the
side is a good tyre
Checking the Air and Filling it up
1.
On the Driver side door pillar, locate the sticker on
the river side door pillar (as shown on image below)
indicating what pressure your tyres need to be at.
2. Once you know what pressure you need, grab your
pressure gauge and check whether they are inflated
properly.
3. If you don’t have have a pressure gauge, or one that
is not suited with high pressures, you can go to your
local fuel pump, and just use the prompts there to fill
air or empty.
If you have a pressure gauge, you can use it to find out the
pressure.
*If there are any bulges on your tyre you need to replace them.
4
Checking your Oil
Motor oil lubricates the rapid moving parts of the engine. The oil help parts to move smoother by
reducing the friction. Without oil, the moving the parts of the engine will hesitate a lot. The
temperature overall will increase.
Tool Required: Paper Towel
Oil Reservoir Cap
Oil Dipstick
Checking you Oil Condition and Level:
1. Locate the dipstick in your engine bay. It normally has a yellow
circle at the top.
2. Once you have located it, have your cloth on standby incase of
dripping oil
3. Take out the dipstick and wipe off the oil. Then reinsert the dipstick
back in the hole.
4. Then again take out the dipstick. At the end of the
stick, there will be to small holes or a criss cross
pattern. The oil should be in between this.
5. If your oil reading is below the pattern or bottom
most circle you need to top it up. If it is way above
pattern or up most circle, you need to empty some
out. If your oil looks burnt or has particles in it, you
will need to replace it. You can also check your
instruction manual, for the required time to change
your oil. The oil on the right needs to be replaced
soon.
*Some cars have a computer which reads the oil level for you. If so, you will not need to
take out. your dipstick*
If you cant access the dipstick, or the computer reading the oil, you will have to go to a
certified mechanic
5
Emptying & Filling up your Oil
Tools Required: Funnel, Ratchet Set, Oil catcher/collection pan, Towel, Gloves, Jack stand (or
ramps), new oil bolt gasket
Emptying & Filling up your Oil:
1.
You will need to find out what type of oil you require and
the viscosity for your car. You can find what type of oil
you need in your instruction manual and how much you
need. For Example: Synthetic Oil, 5W-30 and 5 liters
2. Once you have found the kind of oil you need, buy the
amount you need according to your manual. Whatever oil
you don’t use, you can use it later.
3. To lift up your car, first place your car in park with the
handbrake, or if you drive a manual, place it in first gear.
Place the jack stands underneath the correct location on
your car, you can find this in the instruction manual,
normally, there will be two indents on the bottom of your
car to show where the indents go. Or you can use ramps.
4. Go under the car, and locate the oil drain pan, it is usually
black and has a bolt coming right out.
5. Once you have found it, place your oil catcher
underneath the drain pan.
6. Loosen up the bolt using your ratchet set, you may need
to use something long at the end to the ratchet for more
leverage. Once it is loosened, loosen the rest of the way
using your hand letting all the oil drip out
7. Once all the oil has been drained, you can replace the
gasket on the bolt. These are normally single use, but
you can run them 2 times, just don't use them over 2
times.
8. Screw back on the bolt nice and snug. Not too tight so
that you don’t damage the drain pan. Wipe the
surrounding area.
9. To fill up your oil, find your oil cap. If your oil cap is dirty
clean everything around it so that nothing falls into the
drain pan. Once it is clean, open up your cap and place in
your funnel. If you don’t have a funnel, have a towel ready
for when you pour. Start pouring in your oil, with your
cloth on stand-by making sure you only fill the correct
amount. The side of your oil bottle should have a scale to
show how much you have used.
10. Take your car off the ramp or jack, checking for any
engine oil lights on the meter cluster while the car is on.
Once you are on the ground let the car idle, checking for
any leaks under the car.
11. Check your oil level by repeating the steps on page 5
12. You can store your used oil in a milk bottle or etc and give
it to your local parts store.
6
WARNING! Be careful when handling oil,
as some contaminants can be harmful.
Dispose oil correctly by giving it to a local
water disposer facility
Checking Your Brake Fluid & Filling your washer fluid
Brake fluid is a very important fluid to our vehicles. It is the fluid that applies pressure to the brake
pad to cause friction onto the brake disc. This is what slows/stops our cars. Without the brake
fluid our cars would not be able stop.
Tools Required: Torch possibly
Brake Logo
Max Indicator
Checking your Brake Fluid:
1. Locate the brake fluid reservoir. This is normally located towards the top of the engine bay.
The cap should have a logo similar to the yellow logo above.
2. Look at the level of the fluid in the reservoir, you may need to use a torch
3. Using the MAX and MIN lines on the reservoir, figure out how much fluid you have. If you have
too much, you may need to consider asking your local workshop. If it is below the MIN you
can fill up the brake fluid by finding out what kind you need and opening the cap.
WARNING!
Brake fluid can harm your eyes and damage painted surfaces. Be carful when handling Brake
fluid. If spilt, immediately clean with water.
Filling your washer fluid:
Tools Required: Water, Funnel
1. Locate the washer fluid reservoir, normally
shaped like show in the image
2. If the level of the fluid is not very high or not
visible you can fill up using washer liquid or
water, be careful not to get any particles into
the reservoir or your sprayers will stop
working. You can fill the reservoir to the top
but do not spill any, avoid this by using a
funnel.
3. Using washer fluid means there will be a
cleaning additive making the wipers more
effective. Normal water will work but will not
have any additives. Some washer fluids may have dilution instructions.
WARNING!
Washer Fluid contains Alcohol and other additive which is highly flammable. Let the engine cool
down before topping up to prevent flame.
7
Checklist
Battery Voltage
Battery Voltage
Battery Liquid level
Battery Liquid level
Coolant level &
Condition
Coolant level &
Condition
Checking your oil
Checking your oil
Brake fluid
Brake fluid
Wiper fluid
Wiper fluid
Tyre Pressure
Tyre Pressure
Tyre Tread
Tyre Tread
Headlights
Headlights
Rear lights
Rear lights
Turn Signals/
Indicators
Turn Signals/
Indicators
8
Checklist
Battery Voltage
Battery Voltage
Battery Liquid level
Battery Liquid level
Coolant level &
Condition
Coolant level &
Condition
Checking your oil
Checking your oil
Brake fluid
Brake fluid
Wiper fluid
Wiper fluid
Tyre Pressure
Tyre Pressure
Tyre Tread
Tyre Tread
Headlights
Headlights
Rear lights
Rear lights
Turn Signals/
Indicators
Turn Signals/
Indicators
9
Notes
Notes
Notes
Download How to check your car
How to check your car.pdf (PDF, 7.74 MB)
Download PDF
Share this file on social networks
Link to this page
Permanent link
Use the permanent link to the download page to share your document on Facebook, Twitter, LinkedIn, or directly with a contact by e-Mail, Messenger, Whatsapp, Line..
Short link
Use the short link to share your document on Twitter or by text message (SMS)
HTML Code
Copy the following HTML code to share your document on a Website or Blog
QR Code to this page

This file has been shared publicly by a user of PDF Archive.
Document ID: 0001933303.