Warrior Scaeva Patch 6.0 (PDF)
File information
This PDF 1.4 document has been generated by TextMaker, and has been sent on pdf-archive.com on 26/11/2019 at 11:15, from IP address 79.248.x.x.
The current document download page has been viewed 632 times.
File size: 430.27 KB (6 pages).
Privacy: public file

File preview
Scaeva, Warrior Rotations, Patch 6.0.a
Warrior Rotations - Introduction
Most of the newly introduced tactical items do not change the timing or
cooldowns of attacks. In this case the old rotations, that were used before
patch 6.0, are still valid.
A few items require completely new rotations.
This document deals with Rage, Fury and Vengeance, I may add some more in the
future.
1. Rotation for the Rage Juggernaut and the Fury Marauder
Tactical items: all except Syn’s Second Amulet, Force Barter and Enrage Crush.
Both classes share the same game mechanics, the timings of attacks and most
procs are identical. The energy management differs slightly.
It is possible to build ONE rotation for Rage and Fury, only smaller adaptations
are necessary: The Marauder uses Berserk, Battering Assault and the Vicious
Slash. The Juggernaut gets Enrage, Sundering Assault and Retaliation. All the
other core attacks end up in the same positions.
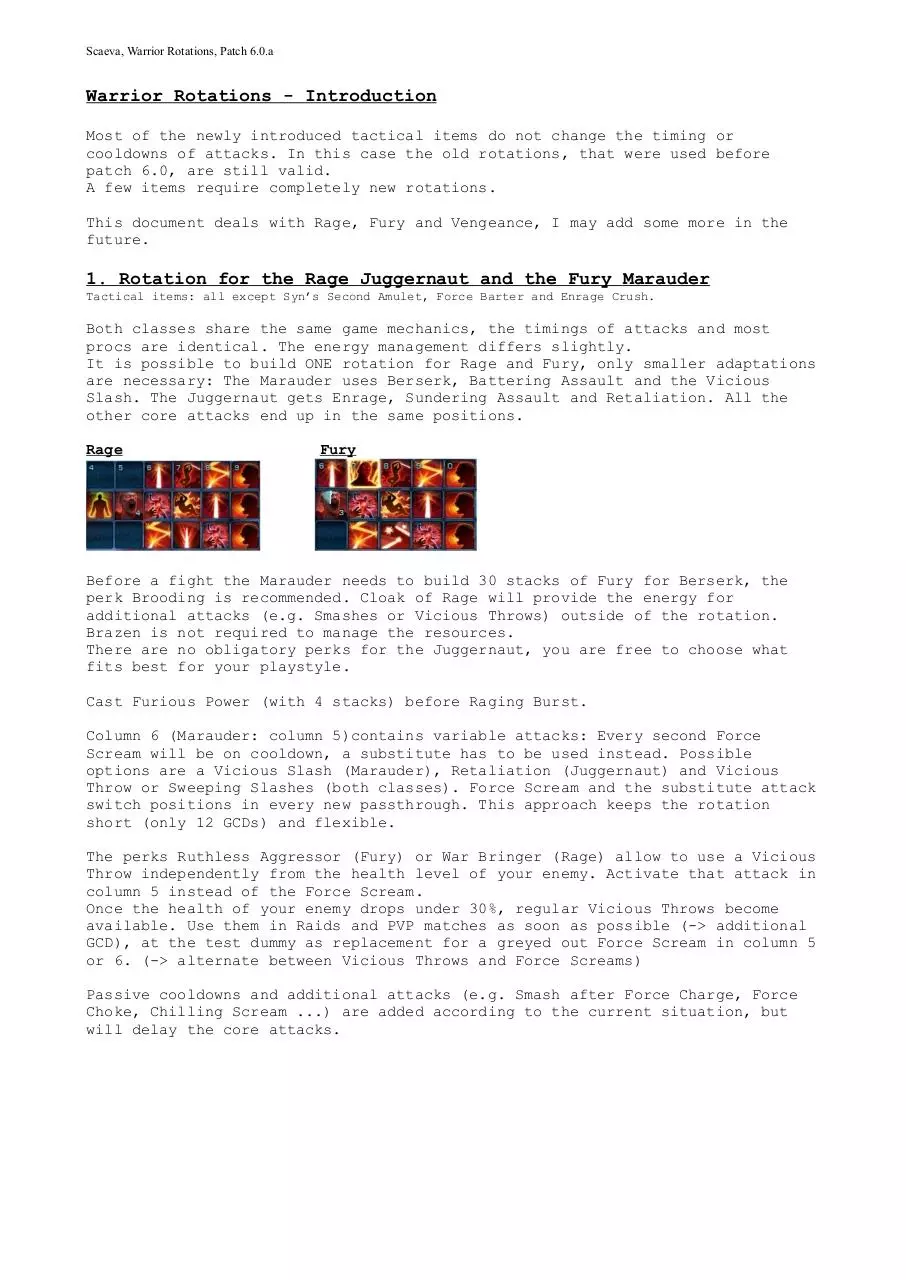
Rage
Fury
Before a fight the Marauder needs to build 30 stacks of Fury for Berserk, the
perk Brooding is recommended. Cloak of Rage will provide the energy for
additional attacks (e.g. Smashes or Vicious Throws) outside of the rotation.
Brazen is not required to manage the resources.
There are no obligatory perks for the Juggernaut, you are free to choose what
fits best for your playstyle.
Cast Furious Power (with 4 stacks) before Raging Burst.
Column 6 (Marauder: column 5)contains variable attacks: Every second Force
Scream will be on cooldown, a substitute has to be used instead. Possible
options are a Vicious Slash (Marauder), Retaliation (Juggernaut) and Vicious
Throw or Sweeping Slashes (both classes). Force Scream and the substitute attack
switch positions in every new passthrough. This approach keeps the rotation
short (only 12 GCDs) and flexible.
The perks Ruthless Aggressor (Fury) or War Bringer (Rage) allow to use a Vicious
Throw independently from the health level of your enemy. Activate that attack in
column 5 instead of the Force Scream.
Once the health of your enemy drops under 30%, regular Vicious Throws become
available. Use them in Raids and PVP matches as soon as possible (-> additional
GCD), at the test dummy as replacement for a greyed out Force Scream in column 5
or 6. (-> alternate between Vicious Throws and Force Screams)
Passive cooldowns and additional attacks (e.g. Smash after Force Charge, Force
Choke, Chilling Scream ...) are added according to the current situation, but
will delay the core attacks.
Scaeva, Warrior Rotations, Patch 6.0.a
Marauder only:
Add a Battering Assault after a Force Charge, then enter the rotation at
position #1.
If Bloodthirst and Frenzy are both available, you need to insert those two buffs
directly after Berserk. Using those just somewhere will mess up the energy
management and the procs triggered by Berserk.
Juggernaut only:
There are 2 different entry points (also for Syn’s Second Amulet): If you start
the rotation from quickbar #2 you will get a 10% damage reduction.
For a 5% damage buff cast Enrage (or Sundering Assault) after Force Charge and
begin the rotation in quickbar #1. Afterwards keep Enrage in quickbar #2, there
it will not collide with the Cascading Force. Endless Rage generates the needed
additional Rage.
1.1 Juggernaut - Syn’s Second Amulet
There are no variable attacks, the rotation also works at the test dummy.
(That rotation cannot be used with the „Flawless Riposte“ armorset, it removes
the cooldown of Riposte. It seems it is possible just to alternate between
Riposte and Furious Strike. Incredibly overpowered, perhaps it is a bug.)
1.2 Marauder - Enrage Crush
This is a variation of the marauder rotation above, it adds great AOE damage. In
column #5 you need to replace a greyed out Force Scream with a Vicious Slash, a
Vicious Throw or a Sweeping Slash.
Frenzy - Force Charge - Battering Assault is used as opening sequence.
The energy generation is not as good as of the other Fury rotation. In real
fights you need to build additional Rage, this can be done by picking either the
perk Cloak of Rage or Inexorable (-> PVP). Force Choke and Force Charge also
build resources.
If you replace the Dual Saber Throw with an Assault the function of the rotation
can be checked at the test dummy.
Scaeva, Warrior Rotations, Patch 6.0.a
2. Vengeance Juggernaut Rotations
Overview
Players usually want to use the core attacks (Shatter, [Sundering Assault],
Impale, Force Scream and Vengeful Slam) of this class on cooldown without
skipping Ravage and Destroyer procs. In addition ALL the game mechanics of the
Vengeance Juggernaut should be applied. There are conflicts between those 2
goals, you cannot have both at the same time.
Rotations with a duration of 24 GCDs do not delay attacks, but they don't build
3 bleeding stacks at positions where they can be spread or refreshed. As
consequence the perk Bloodmaster will never provide a 15% damage bonus. In real
fights this is a huge disadvantage.
However, it is possible to build a rotation of 25 GCDs that gets all the procs
right. There are 2 variants of my rotation, the first one works well in raids
and PVP against single and multiple enemies.
The second one is a 24-GCD rotation that should only be used at the test dummy
(or against a single enemy).
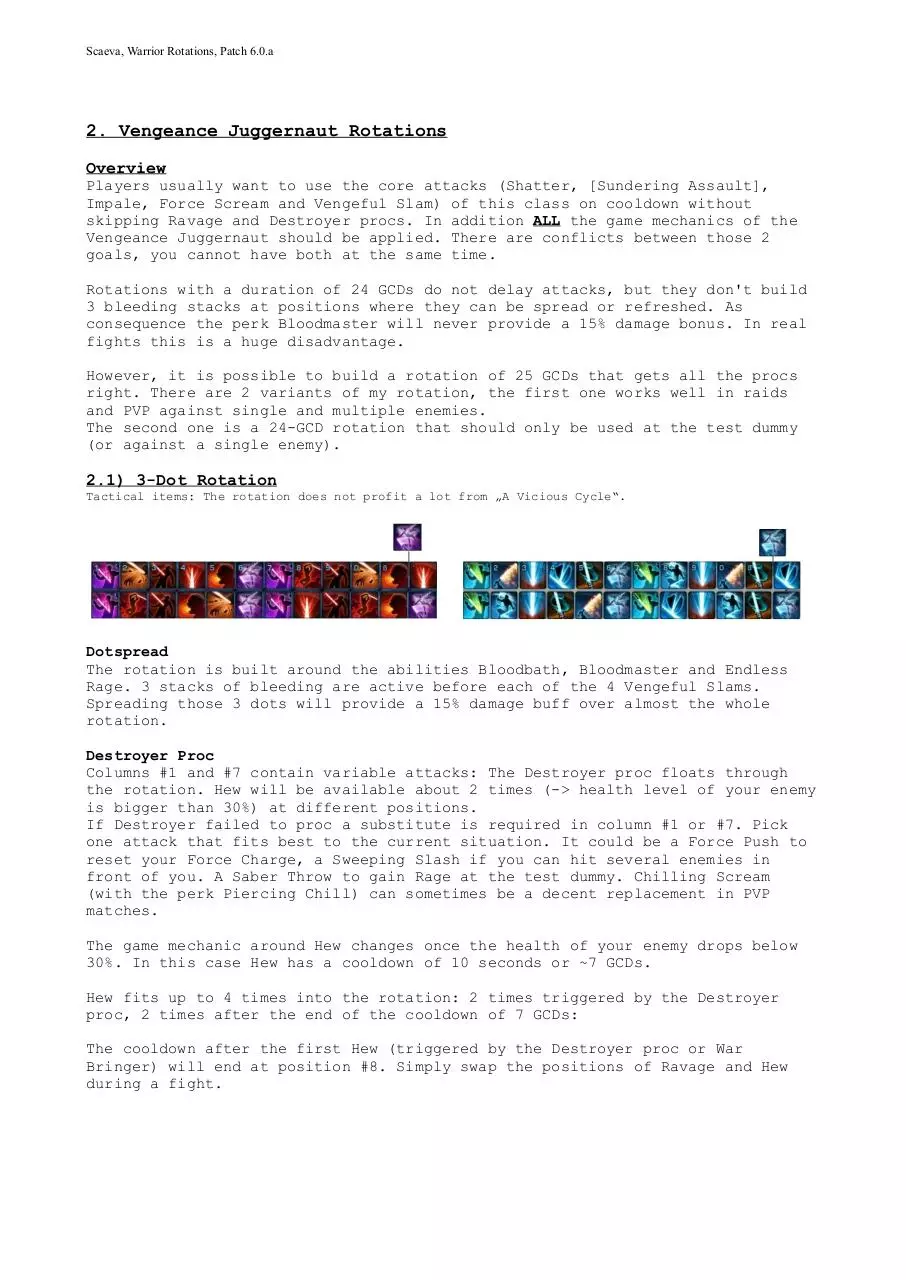
2.1) 3-Dot Rotation
Tactical items: The rotation does not profit a lot from „A Vicious Cycle“.
Dotspread
The rotation is built around the abilities Bloodbath, Bloodmaster and Endless
Rage. 3 stacks of bleeding are active before each of the 4 Vengeful Slams.
Spreading those 3 dots will provide a 15% damage buff over almost the whole
rotation.
Destroyer Proc
Columns #1 and #7 contain variable attacks: The Destroyer proc floats through
the rotation. Hew will be available about 2 times (-> health level of your enemy
is bigger than 30%) at different positions.
If Destroyer failed to proc a substitute is required in column #1 or #7. Pick
one attack that fits best to the current situation. It could be a Force Push to
reset your Force Charge, a Sweeping Slash if you can hit several enemies in
front of you. A Saber Throw to gain Rage at the test dummy. Chilling Scream
(with the perk Piercing Chill) can sometimes be a decent replacement in PVP
matches.
The game mechanic around Hew changes once the health of your enemy drops below
30%. In this case Hew has a cooldown of 10 seconds or ~7 GCDs.
Hew fits up to 4 times into the rotation: 2 times triggered by the Destroyer
proc, 2 times after the end of the cooldown of 7 GCDs:
The cooldown after the first Hew (triggered by the Destroyer proc or War
Bringer) will end at position #8. Simply swap the positions of Ravage and Hew
during a fight.
Scaeva, Warrior Rotations, Patch 6.0.a
After Hew was triggered at quickbar #2, position #1 replace the next Sundering
Assault (quickbar #2, position #8) with Hew. A Saber Throw in column 7 or
activating Enrage will generate the required energy. (-> Before patch 6.0 the
set bonus of the Vengeance Juggernaut provided a damage buff. That set bonus is
gone now, replacing SA does not reduce the damage output anymore.) The
substitution does not work at the test dummy.
Swap the positions of Shatter and Hew (in quickbar #1, positions #1&2) if the
Destroyer proc was used in qickbar #2, column #7.
Energy Management
The passive ability Endless Rage generates Rage when Juggernauts suffer damage.
The energy costs for that 25th attack are easily covered. In raids or PVP
matches Rage is not an issue.
Perks
The rotation is based on cooldowns of attacks and the abilities of the Vengeance
Juggernaut, it does not require any specific perks to function. Choose anything
you like.
Starting Options
Depending on the enemy you may use a Saber Throw before you activate Force
Charge or at the position where Destroyer fails to proc the first time (test
dummy: quickbar #2, column #1).
There are 3 different starting positions: Force Charge in combination with
Warbringer will trigger the first Hew.
If you prefer a different perk start the rotation from position #2 (Shatter) or
#9 (Impale).
Some weaker enemies get killed before you can apply the 3 dots. Begin the
rotation (after a Force Charge and Enrage) at Shatter in quickbar 2, so the
strongest dot will be spread.
Permutation
The positions of the 4 Force Screams and Impale can be swapped. The result is a
permutated rotation that looks different, but does exactly the same.
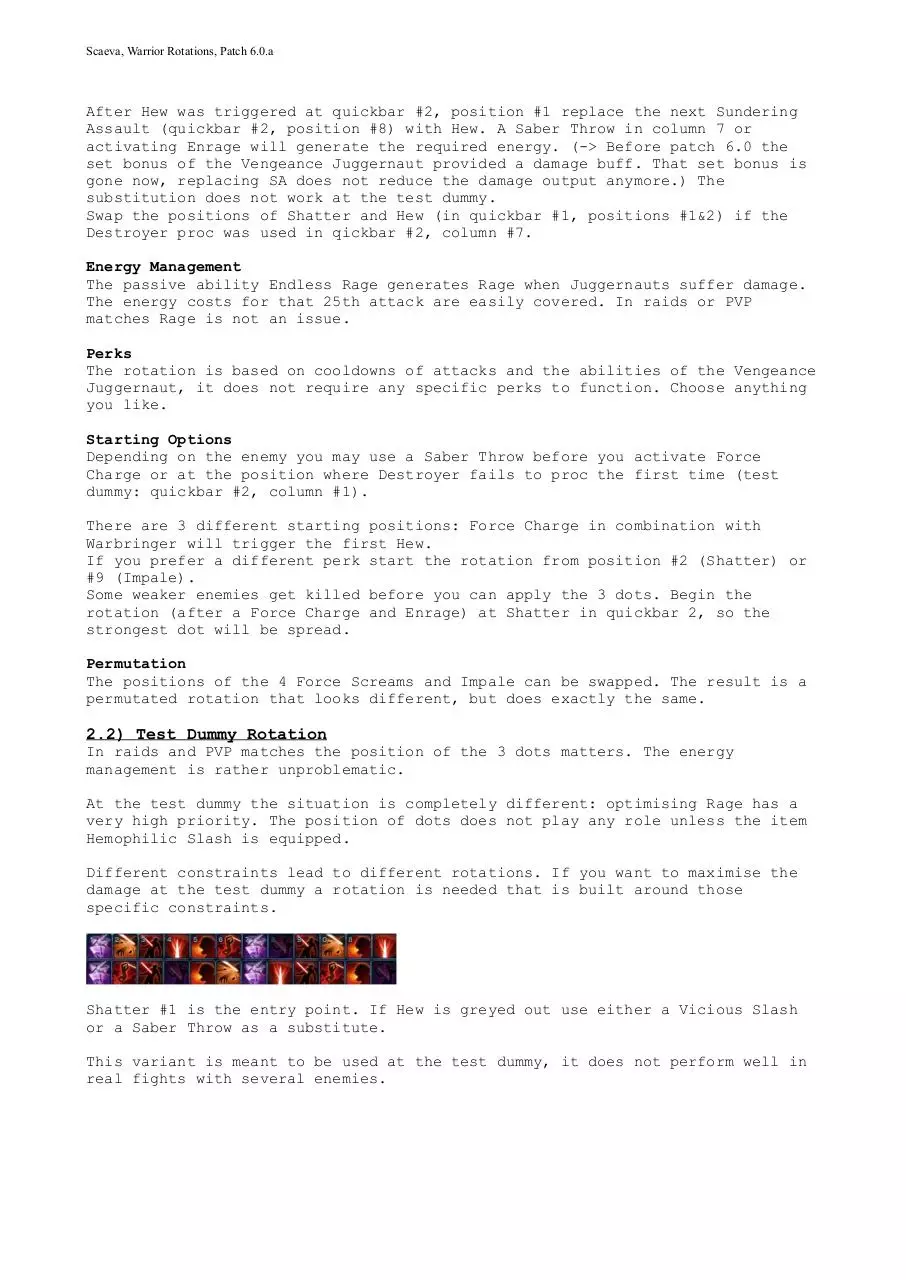
2.2) Test Dummy Rotation
In raids and PVP matches the position of the 3 dots matters. The energy
management is rather unproblematic.
At the test dummy the situation is completely different: optimising Rage has a
very high priority. The position of dots does not play any role unless the item
Hemophilic Slash is equipped.
Different constraints lead to different rotations. If you want to maximise the
damage at the test dummy a rotation is needed that is built around those
specific constraints.
Shatter #1 is the entry point. If Hew is greyed out use either a Vicious Slash
or a Saber Throw as a substitute.
This variant is meant to be used at the test dummy, it does not perform well in
real fights with several enemies.
Scaeva, Warrior Rotations, Patch 6.0.a
2.3) Hemophilic Slash
Two different situations have to be distinguished:
1. Fights against groups of enemies
The tactical item Hemophilic Slash keeps the dots active for a longer period of
time. This directly increases the damage and the damage bonus of dots.
There is a higher chance that 3 dots are active before a Slam, even if you were
interrupted or there were other delays (e.g. server lags). The Vengeance
Juggernaut clearly profits from this item.
Bloodbath usually deals more damage than a Hemophilic Slash as more than one
enemy can be affected by the 3 dots. It makes sense to adopt a playstyle that
optimises AOE damage.
2. Fights against a single enemy
A Vengeful Slam spreads the dots at the end of its GCD, Ravage refreshes them at
the beginning. Using a Ravage at one of the 4 points, where 3 dots are active,
does not work. At a first glance it seems that a completely different rotation
is required to handle the changed game mechanics of Ravage.
Surprisingly, there is a quick and dirty solution to solve the problem:
The 3-dot rotation is simply reversed.
After a Force Charge pick Sundering Assault in quickbar #2 as entry point. Now
run through the rotation from right to left.
This results in the sequence [Sundering Assault - Hew (triggered by Warbringer)
V. Slam - Shatter - Force Scream - Impale - Ravage - Hew (Destroyer proc) Sundering Assault (quickbar #1, position #12) - Slam (the 25th attack cannot be
skipped)- Force Scream - .....]
After reaching position #1 quickbar #1 jump back to the last attack in quickbar
#2.
Reversing the rotation improves the relative position of Ravage towards the 3
dots. The first Ravage (column #2) refreshes 3 dots, so does Ravage in column
#8. Ravage in column #10 affects only 2 dots. In total 8 out of 9 dots are
refreshed.
I don’t think that this number can be reached with a rotation of 24 GCDs.
It is an elegant solution, the „normal“ order (from left to right) of the
rotation optimises the dotspread with Vengeful Slams, reversing it (running from
right to left) improves the refresh of dots with Ravage.
Scaeva, Warrior Rotations, Patch 6.0.a
2.4) Cut to Pieces
The 25-GCD rotation works best against a small number of enemies.
With the tactical item „Cut to Pieces“ larger groups can be killed efficiently
(e.g. bugs on Ossus or tougher adds in the new opeation on Dxun).
Start my AOE-Rotation (after Enrage and Force Charge) at the second Impale
(quickbar #1, position #9). The next Slam will spread the 3 dots to up to 8
enemies in range. Critical bleeding effects will reduce the cooldown of your
next Slam. Continue with the rotation, but add a Slam whenever it is available.
This will push back the other attacks, but hitting several enemies deals far
more damage.
Once the dots are applied Ravage and Hew may be skipped or replaced by a Slam, a
Sweeping Slash or a Chilling Scream (with the perk Piercing Chill).
After killing the last add simply continue with the rotation, the cooldown of
the core attacks will have ended. So the tactical item Cut to Pieces can be
integrated seamlessly into the existing rotation.
Dipl.-Ing. Scaeva
Download Warrior Scaeva Patch 6.0
Warrior_Scaeva_Patch_6.0.pdf (PDF, 430.27 KB)
Download PDF
Share this file on social networks
Link to this page
Permanent link
Use the permanent link to the download page to share your document on Facebook, Twitter, LinkedIn, or directly with a contact by e-Mail, Messenger, Whatsapp, Line..
Short link
Use the short link to share your document on Twitter or by text message (SMS)
HTML Code
Copy the following HTML code to share your document on a Website or Blog
QR Code to this page

This file has been shared publicly by a user of PDF Archive.
Document ID: 0001935024.