Suzuki GS1000G Secondary drive bearing replacement (PDF)
File information
This PDF 1.4 document has been generated by Writer / LibreOffice 5.1, and has been sent on pdf-archive.com on 30/03/2016 at 18:27, from IP address 184.6.x.x.
The current document download page has been viewed 855 times.
File size: 4.51 MB (21 pages).
Privacy: public file


File preview
Suzuki GS1000G Secondary Drive Bearing Replacement
By GS1000G Shopper, October 2015
On occasion usually due to a lack of maintenance the bearings in your secondary drive unit can fail.
When this happened to my bike, I found there was no definitive how-to on the subject, so I decided to
write one. This document uses numerous page breaks to make it easier to read and print the relevant
material. If there is a substantial gap at the bottom of a page, it will be marked as continued on the
following page.
First, some terms so we're on the same page:
The GS “G” models are shaft driven.
This involves a primary drive from the crankshaft at the clutch.
The primary drive connects to a secondary drive system is located on the left rear of the engine and
connects the engine to the rear wheel drive shaft.
The drive shaft connects to a final drive located next to the rear wheel and allows shaft rotation to turn
the wheel.
If parts of my bike look different from yours, it is probably because this one has had a fuel injection
system installed in place of the carbs. The fuel filter and feed hose for the fuel rail are visible in some
pictures. There is an extensive write-up on this project on the GS Resources.
This repair paper will focus on replacing the secondary drive bearings. When these fail, the results can
be catastrophic in that the rear wheel will be unable to turn freely. God blessed me by allowing this to
happen at a low speed- I had just been riding at over 60 MPH and had stopped due to the fuel cutting
off.
The secondary drive consists of two shafts at a 90 degree angle. One is parallel to the crankshaft and I'll
call this the drive gear. The other is parallel to the drive shaft and I'll call it the driven gear. An easy
way to remember this is the crankshaft drives the drive gear, when then results in the gear that connects
to the shaft to the final drive so the shaft can be driven.
Repair overview:
The engine does not need to be removed on the 1981 GS1000G. The drive gear can be removed in
about 15-20 minutes from the left side. The driven gear takes longer since the swing arm needs to be
removed for access.
Service manual:
I downloaded the factory GS1000 service manual from BikeCliff's excellent website. It's free, so there's
no excuse to not have one. This how-to is based in part on tech info from that manual, as well as
firsthand experience. No special tools are required, but you need the know-how to do things such as
pressing bearings on and off and removing and installing bearing races. The manual is not optional.
Page 1 of 21
Suzuki GS1000G Secondary Drive Bearing Replacement
By GS1000G Shopper, October 2015
Parts required (with frugal commentary/sources):
Each of these two shafts has a pair of bearings, and the assembly uses one oil seal and two large orings. There is also a round cover on the side of the engine. As of 2015, most parts are all still available
from Suzuki.
Here's a list of part numbers for the 1981 GS1000G. While other models are similar, always look up
your application and/or compare your old parts to ensure you buy the correct parts.
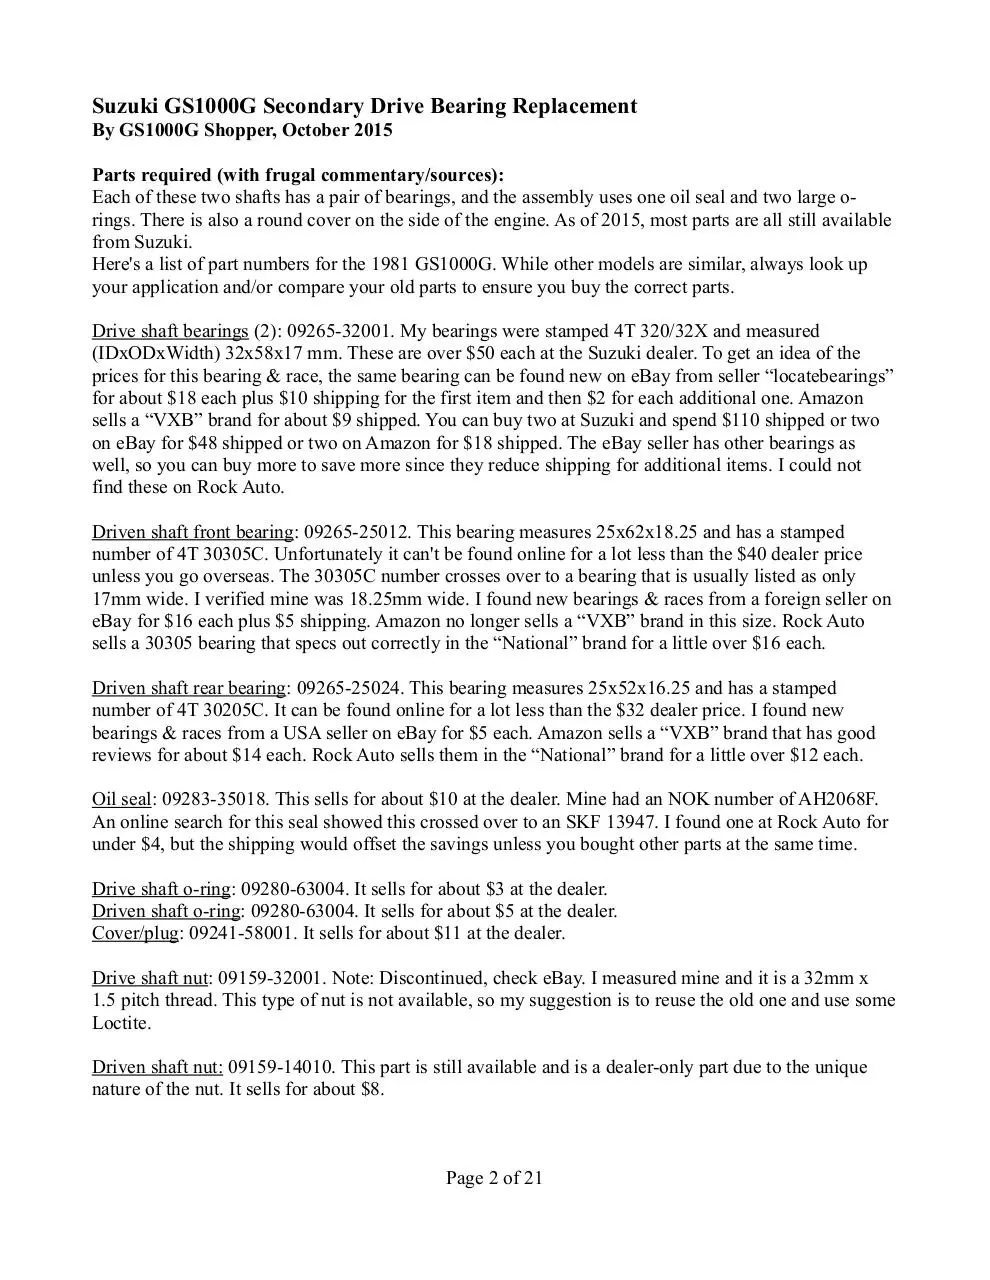
Drive shaft bearings (2): 09265-32001. My bearings were stamped 4T 320/32X and measured
(IDxODxWidth) 32x58x17 mm. These are over $50 each at the Suzuki dealer. To get an idea of the
prices for this bearing & race, the same bearing can be found new on eBay from seller “locatebearings”
for about $18 each plus $10 shipping for the first item and then $2 for each additional one. Amazon
sells a “VXB” brand for about $9 shipped. You can buy two at Suzuki and spend $110 shipped or two
on eBay for $48 shipped or two on Amazon for $18 shipped. The eBay seller has other bearings as
well, so you can buy more to save more since they reduce shipping for additional items. I could not
find these on Rock Auto.
Driven shaft front bearing: 09265-25012. This bearing measures 25x62x18.25 and has a stamped
number of 4T 30305C. Unfortunately it can't be found online for a lot less than the $40 dealer price
unless you go overseas. The 30305C number crosses over to a bearing that is usually listed as only
17mm wide. I verified mine was 18.25mm wide. I found new bearings & races from a foreign seller on
eBay for $16 each plus $5 shipping. Amazon no longer sells a “VXB” brand in this size. Rock Auto
sells a 30305 bearing that specs out correctly in the “National” brand for a little over $16 each.
Driven shaft rear bearing: 09265-25024. This bearing measures 25x52x16.25 and has a stamped
number of 4T 30205C. It can be found online for a lot less than the $32 dealer price. I found new
bearings & races from a USA seller on eBay for $5 each. Amazon sells a “VXB” brand that has good
reviews for about $14 each. Rock Auto sells them in the “National” brand for a little over $12 each.
Oil seal: 09283-35018. This sells for about $10 at the dealer. Mine had an NOK number of AH2068F.
An online search for this seal showed this crossed over to an SKF 13947. I found one at Rock Auto for
under $4, but the shipping would offset the savings unless you bought other parts at the same time.
Drive shaft o-ring: 09280-63004. It sells for about $3 at the dealer.
Driven shaft o-ring: 09280-63004. It sells for about $5 at the dealer.
Cover/plug: 09241-58001. It sells for about $11 at the dealer.
Drive shaft nut: 09159-32001. Note: Discontinued, check eBay. I measured mine and it is a 32mm x
1.5 pitch thread. This type of nut is not available, so my suggestion is to reuse the old one and use some
Loctite.
Driven shaft nut: 09159-14010. This part is still available and is a dealer-only part due to the unique
nature of the nut. It sells for about $8.
Page 2 of 21
Suzuki GS1000G Secondary Drive Bearing Replacement
By GS1000G Shopper, October 2015
If you buy all this from a dealer, these will usually add up to around $210 plus shipping as of 2015.
Substituting Amazon's drive shaft bearings along with Rock Auto's driven shaft bearings and oil seal
and the remainder from a dealer will total about $77 plus shipping. It pays to shop.
Since you'll be pulling the swing arm, it would pay to replace the bearings there as well. The OEM
bearings are part #09265-17012 and measure 17x40x13.25 mm. These sell for around $35, but since
they are just regular bearings, quality replacements can be had for far less. Amazon sells a 17x40x13.25
bearing for $6.60 with free shipping. Both have the same 30203 number stamped on them.
If required, 4 x 6mm socket head bolts for the side cover.
Tools/materials required (nearly all of these can be found at Harbor Freight):
● Set of combination wrenches to include 10-17mm.
● Set of sockets to include 19mm impact socket, 21mm socket (swing arm nut), and 41mm socket
(drive shaft nut). I would suggest a Harbor Freight 3/4” drive metric socket set as the sockets
can also be used to drive bearings and races.
● 1&1/8” deep socket to install driven shaft bearing.
● 1/2” drive breaker bar
● 1/2” drive 6” extension
● Set of metric hex socket (side cover & swing arm bolts)
● Impact wrench to use with 19mm socket & 41mm socket if needed
● Punch, drift, or chisel
● Claw hammer
● Bench vise
● Hydraulic press or a buddy that has one
● Bearing separator for 1.2”/32mm shaft
● Phillips head driver or socket driver
● Pair of large flat blade screwdrivers
● Digital metric caliper to measure shims
(Tools/materials continued on next page)
Page 3 of 21
Suzuki GS1000G Secondary Drive Bearing Replacement
By GS1000G Shopper, October 2015
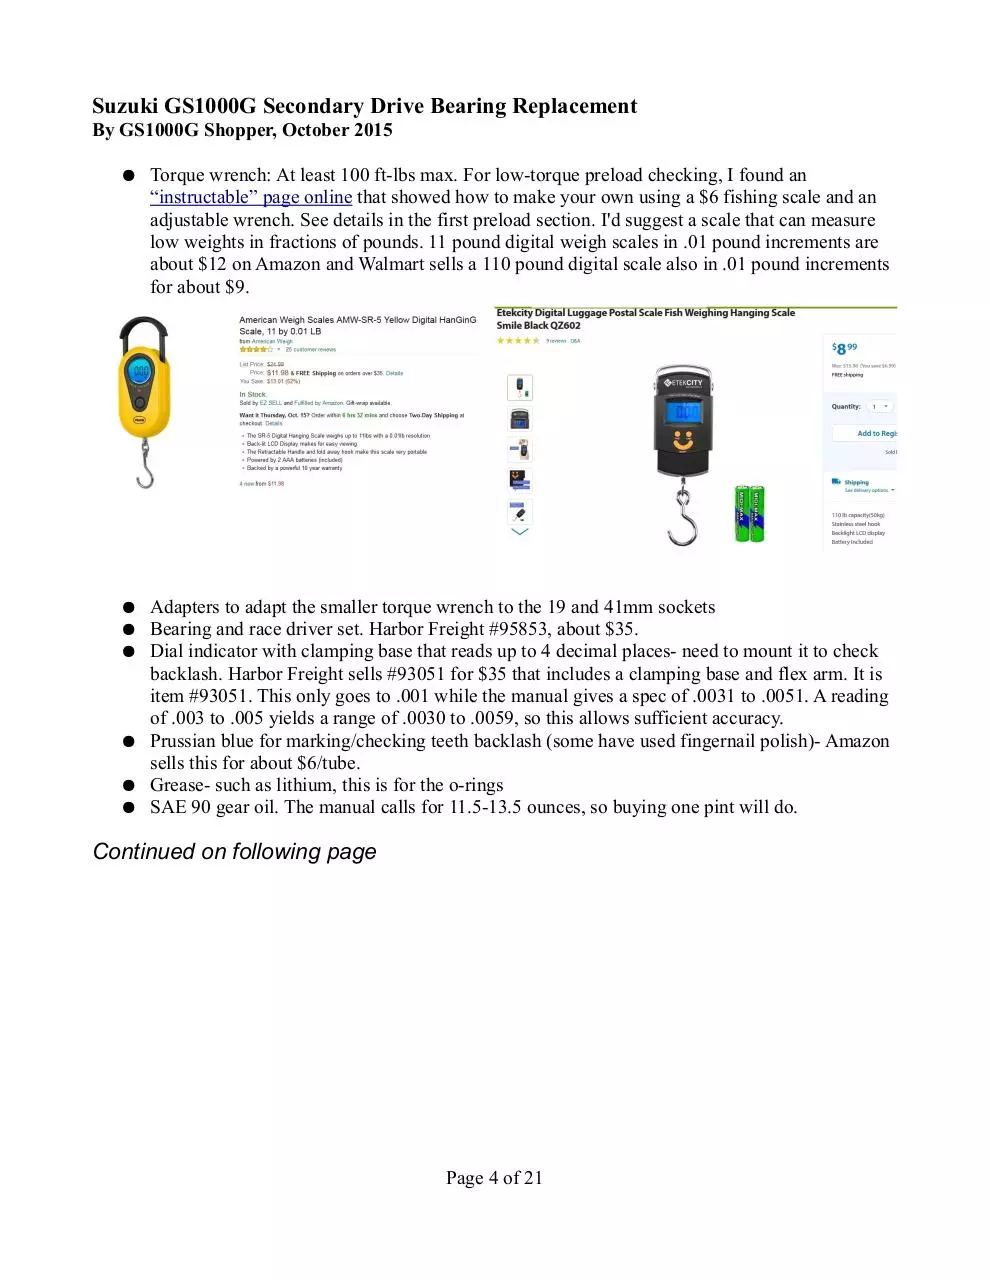
● Torque wrench: At least 100 ft-lbs max. For low-torque preload checking, I found an
“instructable” page online that showed how to make your own using a $6 fishing scale and an
adjustable wrench. See details in the first preload section. I'd suggest a scale that can measure
low weights in fractions of pounds. 11 pound digital weigh scales in .01 pound increments are
about $12 on Amazon and Walmart sells a 110 pound digital scale also in .01 pound increments
for about $9.
● Adapters to adapt the smaller torque wrench to the 19 and 41mm sockets
● Bearing and race driver set. Harbor Freight #95853, about $35.
● Dial indicator with clamping base that reads up to 4 decimal places- need to mount it to check
backlash. Harbor Freight sells #93051 for $35 that includes a clamping base and flex arm. It is
item #93051. This only goes to .001 while the manual gives a spec of .0031 to .0051. A reading
of .003 to .005 yields a range of .0030 to .0059, so this allows sufficient accuracy.
● Prussian blue for marking/checking teeth backlash (some have used fingernail polish)- Amazon
sells this for about $6/tube.
● Grease- such as lithium, this is for the o-rings
● SAE 90 gear oil. The manual calls for 11.5-13.5 ounces, so buying one pint will do.
Continued on following page
Page 4 of 21
Suzuki GS1000G Secondary Drive Bearing Replacement
By GS1000G Shopper, October 2015
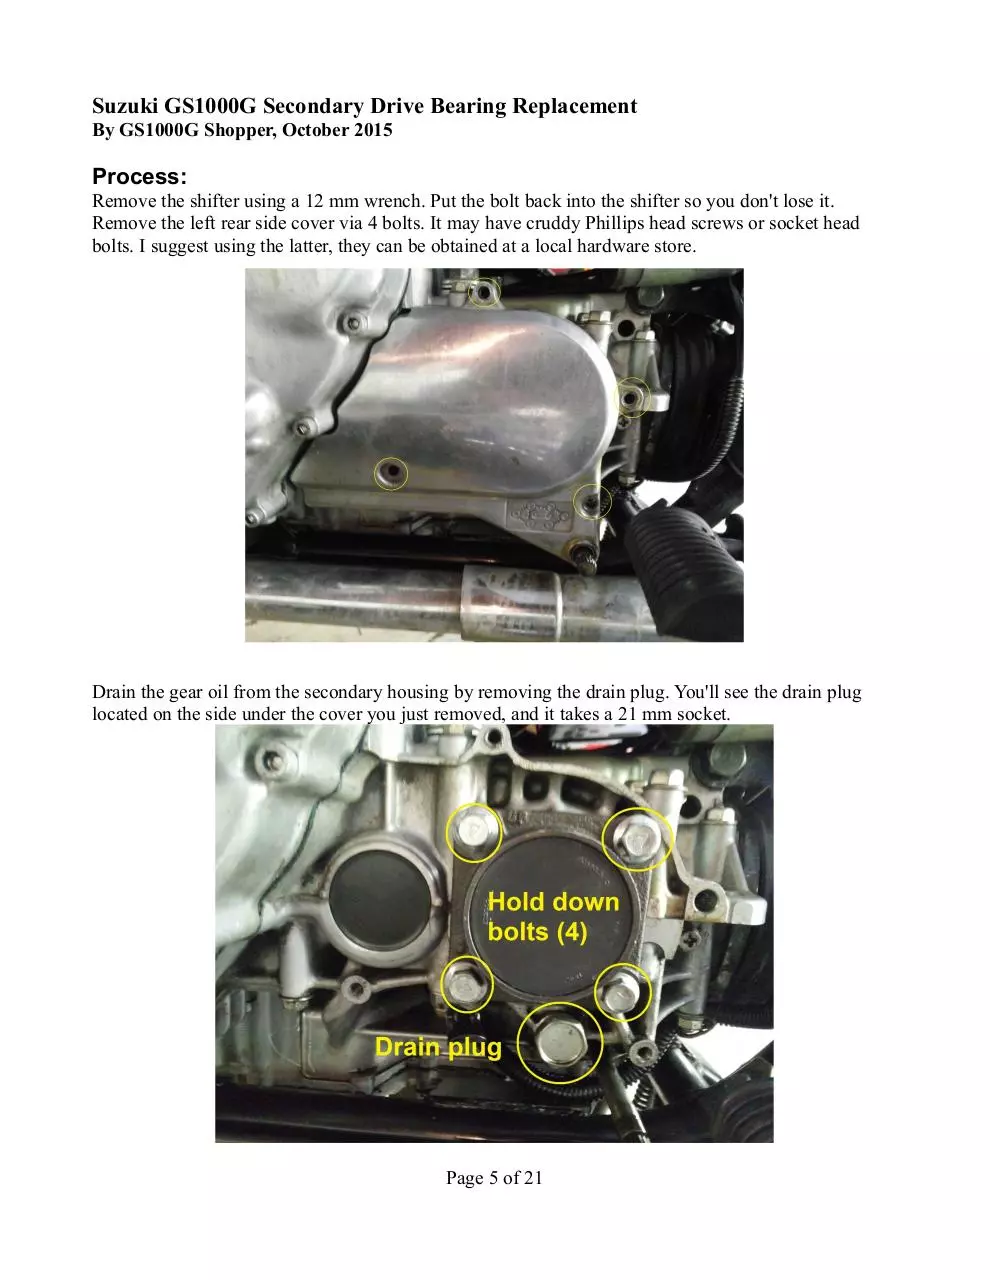
Process:
Remove the shifter using a 12 mm wrench. Put the bolt back into the shifter so you don't lose it.
Remove the left rear side cover via 4 bolts. It may have cruddy Phillips head screws or socket head
bolts. I suggest using the latter, they can be obtained at a local hardware store.
Drain the gear oil from the secondary housing by removing the drain plug. You'll see the drain plug
located on the side under the cover you just removed, and it takes a 21 mm socket.
Page 5 of 21
Suzuki GS1000G Secondary Drive Bearing Replacement
By GS1000G Shopper, October 2015
Removal of drive gear assembly:
Refer to the prior photo. There are 4 x 12mm head bolts holding the drive gear to the engine. There are
a number of shims under the square flange. First, a trick to save buying a $55 special tool. There is a
41mm nut under the circular cover. The cover can be removed by using a drift/punch/screwdriver on
the outside edge until it can be pulled or popped off. I ended up punching a hole through mine and used
the screwdriver to lever it off. All the $55 special tool does is hold the shaft from turning so you can
loosen the nut. I used the engine to do so, as the nut was not on overly tight. Be sure to loosen both
this 41mm nut and the 19mm driven shaft nut while the assembly is in place (see next section)!
First, use a punch to raise the flattened part of the nut.
Then put the 41mm socket on it and give it a swift pull. My broke loose right away. My 3/4” drive
ratchet is about 18” long, so that helped for leverage. Be sure to loosen both this 41mm nut and the
19mm driven shaft nut while the assembly is in place (see next section)!
Remove the 4 bolts, and then loosen the case bolts that are adjacent to the gear, likely 2 x 12m head and
2 x 10mm head. It helps to remove the fill cap (17mm wrench) to access the inner 10mm head bolt..
This helps to lessen the tension on the gear assembly.
Page 6 of 21
Suzuki GS1000G Secondary Drive Bearing Replacement
By GS1000G Shopper, October 2015
You then can work on pulling the gear out. I found that using the screwdrivers one on each side helps.
It must come out straight, if it is crooked it will not come out. Once it is out far enough, you can
remove it by hand.
Here is the assembly once it has been removed:
Page 7 of 21
Suzuki GS1000G Secondary Drive Bearing Replacement
By GS1000G Shopper, October 2015
Next we want to disassemble the assembly. Once the 41mm nut is off, you can place the assembly in a
hydraulic press using the flange to support it and press out the shaft. You'll be left with the shaft and
one bearing plus the spacer and shims. Do not lose the shims, they are discontinued. Be sure there are
three shims! One of mine stuck to the bearing and I almost lost it. Use the bearing separator and
press off the remaining bearing. This was the tightest fit of all the press work on my assembly. Finally,
use a punch to remove the bearing races from inside the housing. I did not take any pictures of this part
of the job, but here is what you have left once you're done:
Page 8 of 21
Suzuki GS1000G Secondary Drive Bearing Replacement
By GS1000G Shopper, October 2015
Now we are ready to reassemble the drive assembly. Make sure everything is clean. Assembly is
basically the reverse process:
1) Install the new bearing races in the housing
2) Press on the new inner bearing
3) Install the spacer and shims
4) Press the shaft onto the new outer bearing
5) Lube the bearings with gear oil
6) Thread the nut onto the shaft
7) Note: Do not install the square shims or new o-ring until the preload has been checked
8) Install the assembly until the engine shaft engages the gear.
9) Once it is in place, torque the nut to 87-108 foot-pounds.
10) Remove the assembly for preload testing.
Note: To hit 100 foot pounds of torque, I installed the driven assembly and with the bike in 1st gear held
the 19mmm driven nut with a 6” extension and breaker bar while I torqued the drive nut.
Now we can check the preload:
1) Turn the shaft several times in both directions to seat the bearings.
2) Using the 41mm socket, the turning force (preload) should be 2.6 to 4.3 inch-pounds. You'll
need to adapt the socket to the proper scale torque wrench.
A note about low-scale inch-pounds: In the “tools” section, I mentioned making your own measuring
tool using an adjustable wrench and a $6 fishing scale. Here's some more detail:
This can be reduced to a mathematical formula. We need to know the length of the wrench and the
amount of pounds of force used to turn the wrench. Let's say we have a 10” adjustable wrench and it is
9 inches from the center of the bolt to the center of the hole where we attach the scale. If your wrench
is longer/shorter, you just use the inches. If it takes ½ pound of force to move the 9 inch wrench, you
have 4.5 inch pounds. Note that you must keep the scale at 90 degrees from the wrench. You can be
clever and drill holes in the handle at shorter distances to measure lower amounts. A ½ pound pull on a
3 inch wrench is 1.5 inch-pounds. For this preload, I'd suggest using a 6” wrench and looking for
between 7.0 to 11.5 ounces of force for 2.6 to 4.3 inch-pounds. Take several measurements and average
them.
For the drive preload, I ended up with between 8 and 11 ounces on a 6 inch wrench, or an average of
9.5 ounces, which translates to 3.56 inch-pounds.
Don't be afraid to get this right. The assemblies go in and out a lot easier once you have removed and
cleaned them, and it's easy to remove the shafts and replace preload shims.
Page 9 of 21
Download Suzuki GS1000G Secondary drive bearing replacement
Suzuki_GS1000G_Secondary_drive_bearing_replacement.pdf (PDF, 4.51 MB)
Download PDF
Share this file on social networks
Link to this page
Permanent link
Use the permanent link to the download page to share your document on Facebook, Twitter, LinkedIn, or directly with a contact by e-Mail, Messenger, Whatsapp, Line..
Short link
Use the short link to share your document on Twitter or by text message (SMS)
HTML Code
Copy the following HTML code to share your document on a Website or Blog
QR Code to this page

This file has been shared publicly by a user of PDF Archive.
Document ID: 0000355005.