MeshAndTextureReplacementGuide (PDF)
File information
This PDF 1.4 document has been generated by Writer / LibreOffice 5.2, and has been sent on pdf-archive.com on 31/12/2016 at 14:22, from IP address 87.14.x.x.
The current document download page has been viewed 481 times.
File size: 2.53 MB (7 pages).
Privacy: public file


File preview
Mesh and Texture Replacement
Guide by TheLacus (contact)
Starting from build #52, Daggerfall Unity is capable of runtime injection of new
textures into the game, allowing higher resolution textures and improvements
to Daggerfall’s UI. Additionally, it is possible to include custom meshes and
materials during compile, opening the way for a models overhaul.
It is possible to enable/disable this functionality in the main menu or manually
in settings.ini (MeshAndTextureReplacement).
Index
•
Textures
Make and install texture packs.
•
Meshes
Import custom models in Dagerfall Unity.
•
Flats
Replace sprites with 3D models.
Textures
Textures can be easily imported at runtime, like in recent TES games.
Texture files (in .png format) need to be placed inside
Application.persistentDataPath/Textures, which is a location varying according to the
OS.
For example on windows is:
\AppData\LocalLow\Daggerfall Workshop\Daggerfall Unity\textures
The name of the texture sould be archive_record-frame.png, for example 9_1-0.png.
If you aren’t familiar with daggerfall naming, the first number is the name of
the package where textures are stored (ARCHIVE.XXX, ARCHIVE.009 in our
example), the second number indicates this is the n texture of the archive (1
means is the second one), and the third number is the frame, used only for
animated billboards. Textures for static models always have frame -0.
You can also release optional bump maps (archive_record-frame_Normal.png, for
example 9_1-0_Normal.png), and if you release textures with illuminated surfaces
(like a wall with a window) you need to create emission maps (archive_recordframe_Emission.png). This is not necessary if the emission surface is the whole
texture (lamps, etc.).
UI and inventory images are handled in a more specific way:
•
.IMGs
filename.png (ex: MAP100I0.IMG.png) in Daggerfall Unity\textures\img
•
.CIFs and .RCIs
filename_record-frame.png (ex: INVE16I0.CIF_3-0.png) in Daggerfall Unity\textures\cif
Note that is currently not possible to replace billboards (sprites) textures, only
textures used on static 3d models.
Meshes
This guide has the purpose of explaining how to setup a build of Daggerfall
Unity capable of replacing vanilla Daggerfall models with new imported
meshes.
A preprequisite of this guide is a working installation on the Unity editor and a
clone of DU source code. Here you can found a tutorial on how to do that.
Part 1: exporting the mesh
When exporting your model from a modelling software you need to take a few
things in consideration:
•
•
•
Models exported from Daggerfall Modelling are forty times bigger than
they need to be in order to be used in Unity, so you need to scale them
down by 0.025.
Unity engine reads models as Y-up not Z-up. You can use this plugin for
blender to address this. Of course, remember to check also the origin of
models.
This script allows a 1:1 replacement of a mesh only. Your model can’t be
made by more than one part, nor you can use unity prefabs, it needs to
be a single mesh with less than 65,534 vertices. Unity supports different
formats, but exporting to .fbx is suggested.
Part 2: importing your model
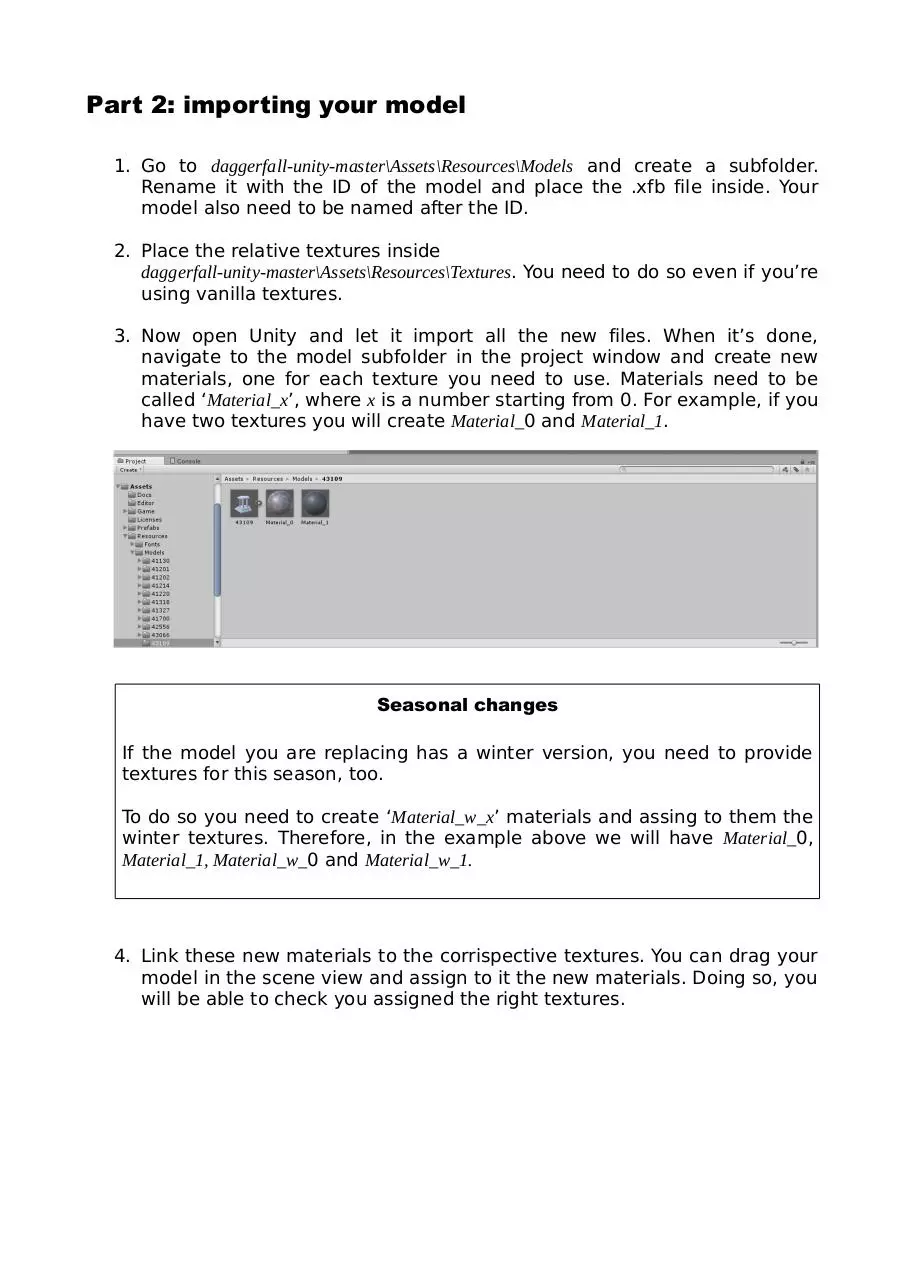
1. Go to daggerfall-unity-master\Assets\Resources\Models and create a subfolder.
Rename it with the ID of the model and place the .xfb file inside. Your
model also need to be named after the ID.
2. Place the relative textures inside
daggerfall-unity-master\Assets\Resources\Textures. You need to do so even if you’re
using vanilla textures.
3. Now open Unity and let it import all the new files. When it’s done,
navigate to the model subfolder in the project window and create new
materials, one for each texture you need to use. Materials need to be
called ‘Material_x’, where x is a number starting from 0. For example, if you
have two textures you will create Material_0 and Material_1.
Seasonal changes
If the model you are replacing has a winter version, you need to provide
textures for this season, too.
To do so you need to create ‘Material_w_x’ materials and assing to them the
winter textures. Therefore, in the example above we will have Material_0,
Material_1, Material_w_0 and Material_w_1.
4. Link these new materials to the corrispective textures. You can drag your
model in the scene view and assign to it the new materials. Doing so, you
will be able to check you assigned the right textures.
5. When you’re done, you can compile the project and look for your model
in-game.
F.A.Q.
Why the difference in scale?
Quoting MeshReader.cs:
// Using 1/40 scale (or * 0.025).
// True world scale is 1/39.37007874015748 (or * 0.0254). Basically conversion is inches (Daggerfall) to metres (Unity).
// 1/40 scale has been carefully chosen as it is close to true scale but requires less floating-point precision
// for tiling assets. It also produces numbers easier to remember for editor layouts and is easier to
// calculate manually (i.e. just divide by 40 to convert native units to Unity units).
// For example, an RMB block dimension is 4096 native units.
// 4096 / 40 = 102.4 (easy to remember for manual editor layouts, less precision required).
// 4096 * 0.0254 = 104.0384 (harder to remember for manual editor layouts, more precision required).
// This means world is slightly smaller over large distances (13107.2m error across entire map width).
I can see only terrain without any building in-game.
Please check your model has less than 65,534 vertices and it’s made of only
one part. Also be sure you aren’t missing any texture.
How can i change the filter type of imported textures?
There is a .ini setting (MainFilterMode, under [Video]) which change it for both
vanilla and custom textures.
Flats
Flats are handled in a different way: instead of importing mesh and materials,
we will provide to the game a prefab. This give us more freedom as prefabs
allow combining more than one mesh, using particles and scripts.
1. Go to daggerfall-unity-master\Assets\Resources\Flats and create a subfolder,
named after the sprite texture we are replacing. For example 205_0 for the
texture 0-0 in archive 205.
2. Place your model inside this folder (maybe in a subfolder called Mesh, for
exmple), the texture you need to use in the usual Resources/Textures folder
and create materials.
3. Create the prefab, name it with the same ID as above and place it in the
main subfolder.
In our case we will have /Flats/205_0/205_0.
Notes
•
Custom prefabs are placed in game assuming the origin of the model is
at the base, where they touch the ground or the surface they are
positioned on, so place it in this position.
•
If the model is supposed to collide with the player, check Generate
colliders in the mesh inspector inside the Unity editor.
Download MeshAndTextureReplacementGuide
MeshAndTextureReplacementGuide.pdf (PDF, 2.53 MB)
Download PDF
Share this file on social networks
Link to this page
Permanent link
Use the permanent link to the download page to share your document on Facebook, Twitter, LinkedIn, or directly with a contact by e-Mail, Messenger, Whatsapp, Line..
Short link
Use the short link to share your document on Twitter or by text message (SMS)
HTML Code
Copy the following HTML code to share your document on a Website or Blog
QR Code to this page

This file has been shared publicly by a user of PDF Archive.
Document ID: 0000530241.