zūmo 300 Series
®
Owner’s Manual
Models: zumo 340, 350
March 2012
190-01457-00
Printed in Taiwan
�
All rights reserved. Under the copyright laws, this manual may not be copied, in whole or in part, without the written consent of Garmin. Garmin reserves the
right to change or improve its products and to make changes in the content of this manual without obligation to notify any person or organization of such
changes or improvements. Go to www.garmin.com for current updates and supplemental information concerning the use of this product.
TracBack®, Garmin®, the Garmin logo, and zūmo® are trademarks of Garmin Ltd. or its subsidiaries, registered in the USA and other countries. BaseCamp™,
HomePort™, myGarmin™, myTrends™, nüMaps Guarantee™, nüMaps Lifetime™, and trafficTrends™ are trademarks of Garmin Ltd. or its subsidiaries. These
trademarks may not be used without the express permission of Garmin.
The Bluetooth® word mark and logos are owned by the Bluetooth SIG, Inc., and any use of such name by Garmin is under license. microSD™ is a trademark
of SD-3C. Windows® and Windows NT® are registered trademarks of Microsoft Corporation in the United States and/or other countries. Mac® is a trademark
of Apple Computer, Inc.
HD Radio Technology manufactured under license from iBiquity Digital Corporation. U.S. and Foreign Patents. HD Radio® and the HD logo are proprietary
trademarks of iBiquity Digital Corporation.
�
Table of Contents
Getting Started............................................................... 1
Mounting Your Device in a Motorcycle ...................................... 1
About the Powered Mount Cables ........................................ 1
Installing the Handlebar Base ............................................... 1
Attaching the Power Cables to the Motorcycle Mount .......... 1
Attaching the Base Plate to the Motorcycle Mount ............... 2
Attaching the Base Plate to the Handlebar Base .................. 2
Installing Your Device in the Motorcycle Mount .................... 2
Removing Your Device from the Motorcycle Mount ................... 2
Mounting Your Device in an Automobile .................................... 2
About myDashboard .................................................................. 3
Setting Up myDashboard ...................................................... 3
Registering the Device .......................................................... 3
Updating the Software ........................................................... 3
nüMaps Guarantee™ ............................................................ 3
Updating Maps ...................................................................... 3
Turning Off the Device ............................................................... 3
Resetting the Device ............................................................. 3
About Sleep Mode ..................................................................... 3
Entering Sleep Mode ............................................................. 3
Exiting Sleep Mode ............................................................... 3
Adjusting the Screen Brightness ................................................ 3
Adjusting the Volume ................................................................. 3
Status Bar Icons ......................................................................... 3
Acquiring GPS Signals .......................................................... 3
Transportation Modes ........................................................... 3
Battery Information ................................................................ 3
Setting the Time .................................................................... 4
Using the On-Screen Buttons .................................................... 4
Using the On-Screen Keyboard ................................................. 4
About Shortcuts ......................................................................... 4
Adding a Shortcut Icon .......................................................... 4
Removing a Shortcut ............................................................. 4
Finding Locations.......................................................... 4
About Locations ......................................................................... 4
Finding a Location by Category ............................................ 4
Finding a Location Using the Search Bar .............................. 4
Changing the Search Area .................................................... 4
Reporting a Closed or Missing Location ............................... 4
Rating a Point of Interest ....................................................... 5
About Search Tools ................................................................... 5
Finding an Address ............................................................... 5
Finding an Intersection .......................................................... 5
Finding a City ........................................................................ 5
Finding a Location Using Coordinates .................................. 5
Finding a Location by Browsing the Map .............................. 5
Saving a Home Location ............................................................ 5
Going Home .......................................................................... 5
Editing Your Home Location Information .............................. 5
Finding Recently Found Destinations ........................................ 5
Clearing the List of Recently Found Locations ...................... 5
Finding Parking .......................................................................... 5
Finding Your Last Parking Spot ............................................ 5
Setting a Simulated Location ..................................................... 5
Saving Locations ........................................................................ 6
Saving a Location .................................................................. 6
Saving Your Current Location ............................................... 6
Starting a Route to a Saved Location ................................... 6
Editing a Saved Location ...................................................... 6
Assigning Categories to a Saved Location ........................... 6
Sharing a Saved Location ..................................................... 6
Sending a Location to the Device ......................................... 6
Loading Photos for Navigation .............................................. 6
Table of Contents
Deleting a Saved Location .................................................... 6
Navigation.......................................................................6
Starting a Route ......................................................................... 6
Changing the Route Calculation Mode ................................. 6
Previewing Multiple Routes ................................................... 6
Starting a Route to a Saved Location ................................... 6
Your Route on the Map .............................................................. 7
Using the Navigation Map ..................................................... 7
Adding a Point to a Route ..................................................... 7
Taking a Detour ..................................................................... 7
Stopping the Route ............................................................... 7
Updating Speed Limits .......................................................... 7
Using Suggested Routes ...................................................... 7
About Exit Services .................................................................... 7
Finding Exit Services ............................................................. 7
Navigating to an Exit ............................................................. 7
Avoiding Road Features ............................................................ 7
About Custom Avoidances ......................................................... 7
Avoiding an Area ................................................................... 7
Avoiding a Road .................................................................... 7
Disabling a Custom Avoidance ............................................. 7
Deleting Custom Avoidances ................................................ 8
Enabling Advanced Detours ...................................................... 8
Taking a Detour Around Specified Areas .............................. 8
Navigating Off Road ................................................................... 8
Map Pages...................................................................... 8
Customizing the Map ................................................................. 8
Customizing the Map Layers ................................................. 8
Viewing the Trip Log ............................................................. 8
Changing the Map Data Field ............................................... 8
Customizing Map Buttons ..................................................... 8
Changing the Map Dashboard .............................................. 8
Changing the Map Perspective ............................................. 8
Viewing Turns ............................................................................ 8
Viewing a List of Turns .......................................................... 8
Viewing the Next Turn ........................................................... 8
Viewing Junctions ................................................................. 8
Viewing Traffic Alerts ............................................................ 8
Viewing Trip Information ....................................................... 9
Viewing Current Location Information ........................................ 9
Finding Nearby Services ....................................................... 9
Getting Directions to Your Current Location ......................... 9
Hands-Free Voice Prompts........................................... 9
About Wireless Headsets ........................................................... 9
Enabling Bluetooth Wireless Technology .............................. 9
Pairing a Wireless Headset ........................................................ 9
Deleting a Paired Headset .................................................... 9
Disconnecting Your Headset ................................................. 9
Tips After Pairing the Devices ............................................... 9
Using the Apps............................................................... 9
Using Help ................................................................................. 9
Searching Help Topics .......................................................... 9
Planning a Trip ........................................................................... 9
Scheduling a Trip .................................................................. 9
Changing Transportation Modes in a Trip ........................... 10
Navigating to a Saved Trip .................................................. 10
Editing a Saved Trip ............................................................ 10
TracBack® ............................................................................... 10
Following Your Recent Track .............................................. 10
Saving Your Recent Track as a Trip ................................... 10
Using the Compass .................................................................. 10
Viewing Previous Routes and Destinations ............................. 10
Logging Service History ........................................................... 10
Adding Service Categories .................................................. 10
Deleting Service Categories ................................................ 10
i
�
Deleting Service Records .................................................... 10
Editing a Service Record ..................................................... 10
Using the World Clock ............................................................. 10
Viewing the World Map ....................................................... 10
Setting an Alarm ...................................................................... 10
Using the Calculator ................................................................. 11
Converting Units ...................................................................... 11
Setting Currency Conversion Rates .................................... 11
About Offers ............................................................................. 11
Viewing Offers ..................................................................... 11
Viewing an Offer List ........................................................... 11
Disabling Traffic and Offers ................................................. 11
Using the Language Guide ...................................................... 11
Purchasing the Language Guide ......................................... 11
Selecting Languages in the Language Guide ..................... 11
Translating Words and Phrases .......................................... 11
Using a Bilingual Dictionary ................................................ 11
Traffic............................................................................ 11
Receiving Traffic Data .............................................................. 11
Traffic Receiver ........................................................................ 11
About the Traffic Icon .......................................................... 12
Traffic on Your Route ............................................................... 12
Viewing Traffic on Your Route ............................................ 12
Manually Avoiding Traffic on Your Route ............................ 12
Taking an Alternate Route .................................................. 12
Viewing Traffic on the Map .................................................. 12
Traffic in Your Area .................................................................. 12
Searching for Traffic Delays ................................................ 12
Viewing a Traffic Incident on the Map ................................. 12
Understanding Traffic Data ...................................................... 12
Traffic Subscriptions ................................................................ 12
Subscription Activation ........................................................ 12
Disabling Traffic ....................................................................... 12
Avoiding Theft ..................................................................... 15
Extending the Battery Life ................................................... 15
Changing the Fuse in the Vehicle Power Cable ...................... 15
Mounting on Your Dashboard .................................................. 15
Removing the Device, Cradle, and Mount ............................... 15
Removing the Device from the Cradle ................................ 15
Removing the Cradle from the Mount ................................. 15
Removing the Suction Cup Mount from the Windshield ...... 15
Updating Maps ......................................................................... 15
About nüMaps Lifetime ....................................................... 15
Purchasing Additional Maps .................................................... 15
Safety Cameras ....................................................................... 15
Custom Points of Interest ......................................................... 16
Installing POI Loader Software ........................................... 16
Using the POI Loader Help Files ......................................... 16
Finding Extras ..................................................................... 16
Purchasing Accessories ........................................................... 16
Troubleshooting ....................................................................... 16
Index..............................................................................17
Data Management ........................................................ 12
About Data Management ......................................................... 12
File Types ................................................................................ 12
About Memory Cards ............................................................... 12
Installing a Memory Card .................................................... 12
Connecting the Device to Your Computer ............................... 13
Transferring Data From Your Computer .................................. 13
Disconnecting the USB Cable ............................................. 13
Deleting Files ........................................................................... 13
Customizing the Device.............................................. 13
Map and Vehicle Settings ........................................................ 13
Enabling Maps .................................................................... 13
Navigation Settings .................................................................. 13
Route Preferences .............................................................. 13
Display Settings ....................................................................... 13
Bluetooth Settings .................................................................... 14
Managing the Bluetooth Device List .................................... 14
Disabling Bluetooth ............................................................. 14
Traffic Settings ......................................................................... 14
About Traffic Subscriptions ................................................. 14
trafficTrends ........................................................................ 14
Units and Time Settings ........................................................... 14
Language and Keyboard Settings ............................................ 14
Device and Privacy Settings .................................................... 14
Proximity Alerts Settings .......................................................... 14
Restoring Settings .................................................................... 14
Appendix.......................................................................14
Power Cables ........................................................................... 14
Charging the Device ............................................................ 14
About Device Care ................................................................... 14
Cleaning the Outer Casing .................................................. 15
Cleaning the Touchscreen .................................................. 15
ii
Table of Contents
�
Getting Started
WARNING
See the Important Safety and Product Information guide in the
product box for product warnings and other important
information.
1 Mount the device (page 1).
2 Register the device (page 3).
3 Check for updates:
• Software updates (page 3).
• Free map update (page 3).
Mounting Your Device in a Motorcycle
About the Powered Mount Cables
WARNING
Garmin strongly recommends having an experienced installer
with the proper knowledge of electrical systems install the
device. Incorrectly wiring the power cable can result in damage
to the vehicle or the battery and can cause bodily injury.
See the Important Safety and Product Information guide in the
product box for product warnings and other important
information.
NOTE: Both 1/4 in. standard and M6 bolts are included.
Match the size of the factory bolts on your clutch/brakeclamp bracket.
2 Thread the new bolts through the handlebar base, spacers
, and brake-clamp bracket.
3 Tighten the bolts to secure the base.
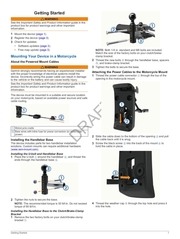
Attaching the Power Cables to the Motorcycle Mount
1 Thread the power cable connector through the top of the
opening in the motorcycle mount.
The device must be mounted in a suitable and secure location
on your motorcycle, based on available power sources and safe
cable routing.
Motorcycle cradle
Bare wires with inline fuse for power connection (to motorcycle
power)
Installing the Handlebar Base
The device includes parts for two handlebar installation
solutions. Custom mounts can require additional hardware
(www.ram-mount.com).
2 Slide the cable down to the bottom of the opening and pull
the cable back until it is snug.
3 Screw the black screw into the back of the mount to
hold the cable in place.
Installing the U-bolt and Handlebar Base
1 Place the U-bolt around the handlebar , and thread the
ends through the handlebar base .
2 Tighten the nuts to secure the base.
NOTE: The recommended torque is 50 lbf-in. Do not exceed
torque of 80 lbf-in.
4 Thread the weather cap through the top hole and press it
into the hole.
Installing the Handlebar Base to the Clutch/Brake-Clamp
Bracket
1 Remove the two factory bolts on your clutch/brake-clamp
bracket .
Getting Started
1
�
2 Tilt the device back until it snaps into place.
Removing Your Device from the Motorcycle
Mount
Attaching the Base Plate to the Motorcycle Mount
1 Thread the M4 x 40 mm panhead screws through the
washers , cradle , spacers , and base plate .
1 Press the button on the side of the mount.
2 Lift out the device.
3 On the motorcycle mount, place the weather cap on the
power connector in the center of the cable (page 1).
Mounting Your Device in an Automobile
NOTICE
Before mounting the device, check the local laws pertaining to
windshield mounting.
2 Tighten the nuts to secure the base plate.
Attaching the Base Plate to the Handlebar Base
1 Align the ball of the handlebar base and the ball of the
base plate with the double-socket arm .
2
3
4
5
6
Insert the ball into the double-socket arm.
Tighten the knob slightly.
Adjust for optimal viewing and operation.
Tighten the knob to secure the mount.
Align the ball of the base plate attached to the cradle with
the other end of the double-socket arm.
7 Repeat steps 2–4.
Installing Your Device in the Motorcycle Mount
1 Fit the bottom of your device into the cradle.
2
WARNING
This product contains a lithium-ion battery. To prevent the
possibility of personal injury or product damage caused by
battery exposure to extreme heat, store the device out of direct
sunlight.
Do not use the suction cup mount on a motorcycle.
1 Pull back the weather cap on the back of the cradle.
2 Plug the automotive power cable into the mini-USB
connector under the weather cap.
3 Remove the clear plastic from the suction cup.
4 Clean and dry your windshield and the suction cup with a
5
6
7
8
9
lint-free cloth.
Press the suction cup to the windshield, and flip the lever
back toward the windshield.
Snap the cradle onto the suction cup arm.
Fit the bottom of your device into the cradle.
Tilt the device back until it snaps into place.
Plug the other end of the automotive power cable into a
power outlet.
Getting Started
�
About myDashboard
Use myDashboard to register your device, check for software
and map updates, access product manuals and support, and
more.
Setting Up myDashboard
1 Connect the USB cable to the USB port on the back of the
device.
2 Connect the USB cable to the USB port on your computer.
3 Go to www.garmin.com/dashboard.
4 Follow the on-screen instructions.
Registering the Device
1 Open myDashboard (page 3).
2 Click Register Now.
3 Follow the on-screen instructions.
Updating the Software
1 Open myDashboard (page 3).
2 Under Software Updates, click Update Now.
3 Follow the on-screen instructions.
nüMaps Guarantee™
To receive one free map update (if available), register your
device at http://my.garmin.com within 90 days of acquiring
satellites while driving with your device. You are not eligible for
the free map update if you register by phone or wait longer than
90 days after the first time you acquire satellites while driving
with your device. For more information, go to www.garmin.com
/numaps.
Updating Maps
1 Open myDashboard (page 3).
2 Register the device (page 3
3 Select an option:
• Under Map Updates, click Update Now.
• If a free map update is no longer available, click Buy
Now.
4 Follow the on-screen instructions.
Lifetime Subscriptions
Some models include subscriptions to lifetime features.
LT: This model includes a lifetime traffic subscription and a
traffic receiver (automobile mode only).
LM: This model includes a nüMaps Lifetime™ subscription
(page 15).
LMT: This model includes a nüMaps Lifetime subscription,
lifetime traffic subscription, and a traffic receiver (automobile
mode only).
Turning Off the Device
1 Hold the Power key .
NOTE: If you hold the Power key for less than 5 seconds,
the device enters sleep mode (page 3).
2 Select Off.
Resetting the Device
You can reset your device if it stops functioning.
Hold the Power key for 10 seconds.
About Sleep Mode
Use sleep mode to conserve battery power when your device is
not in use. Sleep mode uses very little power, and a battery
charge lasts for weeks when your device is in sleep mode.
Entering Sleep Mode
Press the Power key.
Exiting Sleep Mode
While the device is in sleep mode, press the Power key.
Adjusting the Screen Brightness
1 Select Settings > Display > Brightness.
2 Use the slider bar to adjust the brightness.
Adjusting the Volume
1 Select Volume.
2 Select an option:
• Use the slider bar to adjust the volume.
• Select to mute the device.
Status Bar Icons
The status bar is located at the top of the main menu. The
status bar icons display information about features on the
device. You can select some icons to change settings or view
additional information.
: GPS signal status.
: Bluetooth® technology status (appears when Bluetooth is
enabled).
: Transportation mode indicator.
: Current time.
: Battery status.
Acquiring GPS Signals
To navigate with your device, you must acquire satellites.
in
the status bar indicates the satellite signal strength (see
page 3). Acquiring satellites can take several minutes.
1 Turn on the device.
2 If necessary, go outdoors to an open area, away from tall
buildings and trees.
to view detailed information about the
3 If necessary, hold
satellite signals.
Viewing GPS Signal Status
Hold
for three seconds.
Transportation Modes
Motorcycle mode
Automobile mode
Off-road mode (See page 8)
Routing and navigation are calculated differently based on your
transportation mode.
Choosing a Transportation Mode
Select
.
Battery Information
After the device is connected to power, it begins to charge.
Getting Started
3
�
in the status bar indicates the status of the internal battery.
To increase the accuracy of the battery gauge, you should fully
discharge the battery and then fully charge it. Do not unplug the
device until it is fully charged.
Setting the Time
NOTE: You can select Automatic to automatically set the time
each time the device is powered on.
.
1 Select
Scroll
the
numbers
to set the time.
2
Using the On-Screen Buttons
•
•
•
•
•
Select
to return to the previous menu screen.
Hold
to quickly return to the main menu.
Select or to see more choices.
Hold or to scroll faster.
Select
to see a menu of options for the current screen.
Using the On-Screen Keyboard
See Language and Keyboard settings to change the keyboard
layout (page 14).
• Select a character on the keyboard to enter a letter or
number.
• Select a series of letters, such as "A-I," to select a letter in
that series.
• Select
to add a space.
• Select to delete a search entry.
• Select
to delete a character.
• Select to change the keyboard language mode.
• Select
to enter special characters, such as punctuation
marks.
• Select to change character capitalization.
About Shortcuts
Adding a Shortcut Icon
You can add shortcuts to the Where To? menu. A shortcut can
point to a location, a category, or a search tool.
The Where To? menu can contain up to 36 shortcut icons.
1 Select Where To? > Add Shortcut.
2 Select an item.
Removing a Shortcut
> Remove Shortcut(s).
1 Select Where To? >
2 Select the shortcut to remove.
3 Select the shortcut again to confirm.
Finding Locations
The device offers many methods for finding locations.
• By category (page 4).
• Near another location (page 4).
• By spelling the name (page 4).
• By address (page 5).
• Using recently found locations (page 5).
• Using coordinates (page 5).
• Using the map (page 5).
• Using saved locations (page 6).
About Locations
The detailed maps loaded in your device contain locations, such
as restaurants, hotels, and auto services. You can use
categories to browse for nearby businesses and attractions.
Finding a Location by Category
1 Select Where To?.
2 Select a category, or select Categories.
3 If necessary, select a subcategory.
4 Select a location.
Searching Within a Category
After you have performed a search for a point of interest, certain
categories may display a Quick Search list that shows the last
three destinations you selected.
1 Select Where To?.
2 Select a category, or select Categories.
3 Select a category.
4 If applicable, select a destination from the Quick Search list.
5 If necessary, select the appropriate destination.
Finding a Location Using the Search Bar
You can use the search bar to search for locations by entering a
category, brand name, address, or city name.
1 Select Where To?.
2 Select Enter Search in the search bar.
3 Enter all or part of the search term.
Suggested search terms appear below the search bar.
4 Select an option:
• To search for a type of business, enter a category name
(for example, "movie theaters").
• To search for a business name, enter all or part of the
name.
• To search for an address near you, enter the street
number and street name.
• To search for an address in another city, enter the street
number, street name, city, and state.
• To search for a city, enter the city and state.
• To search for coordinates, enter latitude and longitude
coordinates.
Select
an option:
5
• To search using a suggested search term, select the
term.
• To search using the text you entered, select .
6 If necessary, select a location.
Changing the Search Area
1 From the main menu, select Where To?.
2 Select Searching Near.
3 Select an option.
Reporting a Closed or Missing Location
If your search results include an outdated or incorrect location,
you can report the error to Garmin® and remove the location
from future searches.
4
Finding Locations
�
1
2
3
4
5
Search for a location (page 4).
From the search results, select a location.
Select .
Select
> Edit.
Select Report as Closed or Report as Missing.
The information is sent to Garmin when you connect your
device to myDashboard using your computer (page 3).
Rating a Point of Interest
You can assign a star rating to a point of interest.
1 Search for a location (page 4).
2 From the search results, select a location.
3 Select .
4 Select the stars to rate the point of interest.
The star rating updates on your device.
About Search Tools
You can search for locations by using the on-screen keyboard
or by entering the location address or coordinates.
Finding an Address
NOTE: The order of the steps may change depending on the
map data loaded on your device.
1 Select Where To? > Address.
2 Enter the address number, and select Done.
3 Enter the street name, and select Next.
4 If necessary, select Searching Near to change the city,
state, or province.
5 If necessary, select the city, the state, or the province.
6 If necessary, select the address.
Finding an Intersection
1 Select Where To? > Categories > Intersections.
2 Select a state or province.
3
4
5
6
7
NOTE: If necessary, select State or Country to change the
country, state, or province.
Enter the first street name, and select Next.
If necessary, select the street.
Enter the second street name, and select Next.
If necessary, select the street.
If necessary, select the intersection.
Finding a City
1 Select Where To? > Categories > Cities.
2 Select Enter Search.
3 Enter a city name, and select .
4 Select a city.
Finding a Location Using Coordinates
Before you can find a location using coordinates, you must add
a shortcut to the coordinates search tool (page 4).
You can find a location using latitude and longitude coordinates.
This can be helpful when geocaching.
1 Select Where To? > Categories > Coordinates.
2 If necessary, select > Format, select the correct
coordinate format for the type of map you are using, and
select Save.
3 Select the latitude coordinate.
4 Enter the new coordinate, and select Done.
5 Select the longitude coordinate.
6 Enter the new coordinate, and select Done.
Finding Locations
7 Select View on Map.
Finding a Location by Browsing the Map
Before you can find places included in the map data, such as
restaurants, hospitals, and fuel stations, you must enable the
map layer for places along the road (page 8).
1 Select View Map.
2 Drag and zoom the map to display the area to search.
3 If necessary, select , and select a category icon to view
only a specific category of places.
Location markers ( or a blue dot) appear on the map.
4 Select an option:
• Select a location marker.
• Select a point, such as a street, intersection, or address
location.
5 If necessary, select the location description to view additional
information.
Saving a Home Location
You can set your home location for the location you return to
most often.
> Set Home Location.
1 Select Where To? >
2 Select Enter My Address, Use Current Location, or
Recently Found.
The location is saved as "Home" in the Saved menu
(page 6).
Going Home
Select Where To? > Go Home.
Editing Your Home Location Information
You can change the address or phone number for a location
that appears in the search results.
1 Select Where To? > Saved > Home.
> Edit.
2 Select >
3 Enter your changes.
4 Select Done.
Finding Recently Found Destinations
Your device stores the last 50 destinations you have found.
1 Select Where To? > Recent.
2 Select a location.
Clearing the List of Recently Found Locations
Select Where To? > Recent >
> Clear > Yes.
Finding Parking
1 Select Where To? > Categories > Parking.
2 Select a parking location.
Finding Your Last Parking Spot
When you remove your device from the vehicle mount while the
device is on, your current location is saved as a parking spot.
Select Apps > Last Spot.
Setting a Simulated Location
If you are indoors or not receiving satellite signals, you can use
the GPS to set a simulated location.
1 Select Settings > Navigation > GPS Simulator.
2 From the main menu, select View Map.
3 Tap the map twice to select an area.
The address of the location appears at the bottom of the
screen.
5
�
4 Select the location description.
5 Select Set Location.
Saving Locations
Saving a Location
1 Search for a location (page 4) .
2 From the search results, select a location.
3 Select .
> Save.
4 Select
5 If necessary, enter a name, and select Done.
Saving Your Current Location
1 From the map, select the vehicle icon.
2 Select Save.
3 Enter a name, and select Done.
4 Select OK.
Starting a Route to a Saved Location
1 Select Where To? > Saved.
2 If necessary, select a category, or select All Saved Places.
3 Select a location.
4 Select Go!.
Editing a Saved Location
1 Select Where To? > Saved.
2 If necessary, select a category.
3 Select a location.
4 Select .
> Edit.
5 Select
6 Select an option:
•
•
•
•
Select Name.
Select Phone Number.
To assign categories to the Favorite, select Categories.
To save a photo with the Favorite, select Assign Photo
(page 6).
• To change the symbol used to mark the Favorite on a
map, select Change Map Symbol.
7 Edit the information.
8 Select Done.
Assigning Categories to a Saved Location
You can add custom categories to organize your saved
locations.
NOTE: Categories appear in the saved locations menu after
you have saved more than 12 locations.
1 Select Where To? > Saved.
2 Select a location.
3 Select .
> Edit > Categories.
4 Select
5 Enter one or more category names, separate by commas.
6 If necessary, select a suggested category.
7 Select Done.
Sharing a Saved Location
If you save the location of a business that is not in the map
data, you can share the location with Garmin® so that it can be
added to future map updates and shared with the Garmin
community.
1 Select Where To? > Saved.
2 If necessary, select a category.
6
3 Select a location.
4 Select .
5 Select Share Place.
Sending a Location to the Device
You can send locations to your device from various online
sources, including http://connect.garmin.com.
1 Connect your device to your computer (page 3).
2 If necessary, install the Garmin Communicator Plugin. Go to
www.garmin.com/communicator for more information.
3 On your computer, find a location on a supported website.
4 From the website, select Send to GPS.
NOTE: Some websites may use a different button or link.
5 Follow the on-screen instructions.
Loading Photos for Navigation
You can load photo files that include location information onto
your device or memory card. Photos with location information
are assigned automatically to the "Photos" category (page 6).
• Transfer a photo file that includes location information from
your computer to your device (page 13).
• Go to http://connect.garmin.com/photos or another supported
website, and send a photo to your device that includes
location information (page 6).
Deleting a Saved Location
NOTE: Deleted locations cannot be recovered.
1 Select Where To? > Saved.
> Delete Saved Places.
2 Select
3 Select the box next to the saved locations to delete, and
select Delete.
Navigation
Starting a Route
1
2
3
4
Search for a location (page 4).
Select a location.
Select Go!.
If necessary, select a route.
Changing the Route Calculation Mode
The route calculation is based on road speeds and vehicle
acceleration data for a given route. The calculation mode affects
only automobile routes.
Select Settings > Navigation > Calculation Mode.
• Select Faster Time to calculate routes that are faster to
drive but can be longer in distance.
• Select Shorter Distance to calculate routes that are
shorter in distance but can take more time to drive.
• Select Less Fuel to calculate routes that could use less
fuel than other routes.
• Select Off Road to calculate point-to-point routes (without
roads).
Previewing Multiple Routes
1 Search for a location (page 4).
2 From the search results, select a location.
3 Select Routes.
4 Use the on-screen buttons to select a route.
5 Select Go!.
Starting a Route to a Saved Location
1 Select Where To? > Saved.
Navigation
�
2 If necessary, select a category, or select All Saved Places.
3 Select a location.
4 Select Go!.
Your Route on the Map
The route is marked with a magenta line. A checkered flag
marks your destination.
As you travel, the device guides you to the destination with
voice prompts, arrows on the map, and directions at the top of
the map. If you depart from the original route, the device
recalculates the route and provides new directions.
Using Suggested Routes
Before you can use this feature, you must save at least one
location and enable the travel history feature (page 14).
Using the myTrends™ feature, your device predicts your
destination based on your travel history, the day of the week,
and the time of day. After you have driven to a saved location
several times, the location may appear in the navigation bar on
the map, along with the estimated time of travel, and traffic
information.
Select the navigation bar to view a suggested route to the
location.
About Exit Services
While you navigate a route, you can find gas, food, lodging, and
restrooms near upcoming exits.
Services are listed under tabs by category.
Gas
Food
Using the Navigation Map
1 From the main menu, select View Map.
2 If the zoom controls are hidden, select the map to display the
zoom controls.
3 Select the map.
4 Select an option:
• To zoom in or out, select
or .
• To rotate the map view, select .
• To switch between North Up and 3-D views, select .
• To add or remove map layers, select
.
• To view specific categories, select .
• To center the map on your current location, select .
• To view shortcuts for map and navigation features, select
.
Adding a Point to a Route
Before you can add a stop, you must be navigating a route.
1 From the map, select > Where To?.
2 Search for the extra stop.
3 Select the stop from the search results.
4 Select Go!.
5 Select Add to Active Route.
Taking a Detour
While navigating a route, you can use detours to avoid
obstacles ahead of you, such as construction zones.
While navigating, select
> Detour.
Stopping the Route
From the map, select
.
Updating Speed Limits
NOTICE
The speed limit feature is for information only and does not
replace your responsibility to abide by all posted speed limit
signs and to use safe driving judgment at all times. Garmin will
not be responsible for any traffic fines or citations you receive
for failing to follow all applicable traffic laws and signs.
An icon displaying the current speed limit may appear as you
travel on major roadways.
1 From the map, select > Set Speed Limit.
and
to set the speed limit.
2 Select
Navigation
Lodging
Restrooms
Finding Exit Services
1 From the map, select > Exit Services.
2 Use the arrows to select an upcoming exit.
3 Select an exit service tab.
4 Select a point of interest.
Navigating to an Exit
1 From the map, select
2 Select Go!.
> Exit Services >
.
Avoiding Road Features
1 Select Settings > Navigation > Avoidances.
2 Select the road features to avoid on your routes, and select
Save.
About Custom Avoidances
Custom avoidances allow you to avoid specific areas and
sections of road. You can enable and disable custom
avoidances as needed.
Avoiding an Area
1 Select Settings > Navigation > Custom Avoidances.
2 If necessary, select Add Avoidances.
3 Select Add Avoid Area.
4 Select the upper-left corner of the area to avoid, and select
Next.
5 Select the lower-right corner of the area to avoid, and select
Next.
The selected area is shaded on the map.
6 Select Done.
Avoiding a Road
1 Select Settings > Navigation > Custom Avoidances.
2 Select Add Avoid Road.
3 Select the starting point of the section of road to avoid, and
select Next.
4 Select the ending point of the road section, and select Next.
5 Select Done.
Disabling a Custom Avoidance
You can disable a custom avoidance without deleting it.
7
�
1 Select Settings > Navigation > Custom Avoidances.
2 Select an avoidance.
> Disable.
3 Select
Deleting Custom Avoidances
1 Select Settings > Navigation > Custom Avoidances.
2 Select an option:
• To delete all custom avoidances, select .
• To delete one custom avoidance, select the avoidance,
and select
> Delete.
Enabling Advanced Detours
Select Settings > Navigation > Advanced Detours.
Taking a Detour Around Specified Areas
You can take a detour for a specified distance along your route
or detour around specific roads. This is useful if you encounter
construction zones, closed roads, or poor road conditions.
1 Select a destination, and select Go! (page 4).
2 From the map, select > Detour.
3 Select Next 0.5mi on Route, Next 2mi on Route, Next 5mi
on Route, or Detour by Road(s) on Route.
4 If necessary, select a road to detour around.
Navigating Off Road
If you are not following roadways as you navigate, you can use
Off Road mode.
1 Select Settings > Navigation.
2 Select Calculation Mode > Off Road > Save.
The next route will be calculated as a straight line to the
location.
Removing Buttons from the Map
You can remove all buttons from the right side of the map.
1 Select Settings > Map & Vehicle > Map Buttons.
2 Select an icon, and select OK.
3 Select Save.
Changing the Map Dashboard
The dashboard displays trip information at the bottom of the
map. You can select different dashboards to change the style
and the layout of the information.
1 Select Settings > Map & Vehicle > Dashboards.
2 Use the arrows to select a dashboard.
3 Select Save.
Changing the Map Perspective
1 Select Settings > Map & Vehicle > Driving Map View.
2 Select an option:
• Select Track Up to display the map in two dimensions (2D), with your direction of travel at the top.
• Select North Up to display the map in 2-D with North at
the top.
• Select 3-D to display the map in three dimensions.
Viewing Turns
Viewing a List of Turns
When you are navigating a route, you can view all of the turns
and maneuvers for your entire route and the distance between
turns.
1 While navigating a route, select the text bar on the top of the
map.
2 Select a turn.
Map Pages
Customizing the Map
Customizing the Map Layers
You can customize which data appear on the map, such as
icons for points of interest and road conditions.
1 From the map, select .
2 Select Map Layers.
3 Select which layers you want to include on the map, and
select Save.
Viewing the Trip Log
Your device keeps a trip log, which is a record of the path you
have traveled.
1 Select Settings > Map & Vehicle > Map Layers.
2 Select the Trip Log check box.
Changing the Map Data Field
1 From the map, select the data field in the lower left-hand
corner.
2 Select a type of data to display.
3 Select Save.
Customizing Map Buttons
You can include up to two icons on the right side of the main
map.
1 Select Settings > Map & Vehicle > Map Buttons.
2 Select an icon, and select OK.
3 Select .
4 Select a different icon.
8
The details for the turn appear. If available, an image of the
junction appears for junctions on major roadways.
Viewing the Entire Route on the Map
1 While navigating a route, select the navigation bar at the top
of the map.
2 Select > Map.
Viewing the Next Turn
While navigating an automobile route, a preview of the next
turn, lane change, or other maneuver appears in the upper-left
corner of the map.
The preview includes the distance to the turn or maneuver and
the lane in which you should be traveling, if available.
From the map, select
to view the next turn on the map.
Viewing Junctions
While navigating a route, you can view the junctions on major
roadways. When you approach a junction in a route, the image
of that junction appears briefly, if available.
From the map, select
to view the junction, if available.
Viewing Traffic Alerts
While you navigate an automobile route, a traffic alert may
appear in the navigation bar.
Select the alert to view more information.
Map Pages
�
Viewing Trip Information
The trip information page displays your present speed and
provides statistics about your trip.
NOTE: If you make frequent stops, leave the device turned on,
so it can accurately measure elapsed time during the trip.
From the map, select
> Trip Computer.
• Select Add Headset.
• If you have already paired a different headset, select
Settings > Bluetooth > Add Headset.
On
your headset, enable Bluetooth wireless technology.
4
5 On your device, select OK.
A list of nearby Bluetooth devices appears.
6 Select your headset from the list, and select OK.
7 If necessary, confirm that the device is allowed to connect.
8 If necessary, enter the device Bluetooth PIN (0000) into your
headset.
Your device will send navigation prompts to your headset while
you navigate a route.
Deleting a Paired Headset
Resetting Trip Information
1 From the map, select > Trip Computer.
2 Select > Reset Field(s).
3 Select an option:
• When not navigating a route, select Select All to reset
every data field except the speedometer, on the first
page.
• Select Reset Trip Data to reset the information on the trip
computer.
• Select Reset Max. Speed to reset the maximum speed.
• Select Reset Trip B to reset the odometer.
Viewing Current Location Information
You can use the Where Am I? page to view information about
your current location. This feature is helpful if you need to tell
emergency personnel your location.
From the map, select
> Where Am I?.
Finding Nearby Services
You can use the Where Am I? page to find nearby services,
such as hospitals or police stations.
> Where Am I?.
1 From the map, select
2 Select a category.
You can delete a paired headset to prevent it from automatically
connecting to your device in the future.
1 Select Settings > Bluetooth > Headset.
2 Select .
3 Select the headset, and select Delete.
Disconnecting Your Headset
1 Select Settings > Bluetooth.
2 Select Headset > None > Save.
3 Select Yes.
Your headset is disconnected from your device but remains
paired with your device.
Tips After Pairing the Devices
• After the initial pairing, the two devices can connect
automatically each time you turn them on.
• When your phone is connected to your device, you are ready
to make phone calls.
• When you turn on the device, it tries to connect to the last
phone to which it was connected.
• You might need to set your mobile phone to connect to the
device automatically when the device is turned on.
Using the Apps
Getting Directions to Your Current Location
If you need to tell another person how to get to your current
location, your device can give you a list of directions.
Select Apps > Where Am I? >
> Directions to Me.
Hands-Free Voice Prompts
Using Help
Select Apps > Help to view information about using the
device.
Searching Help Topics
Select Apps > Help >
.
About Wireless Headsets
Planning a Trip
Using wireless technology, your device can send audio
navigation prompts to a wireless headset. For more information,
go to www.garmin.com/bluetooth
You can use the trip planner to create and save a trip with
multiple destinations.
1 Select Apps > Trip Planner.
2 Select New Trip.
3 Select Select Start Location.
4 Search for a location (page 4).
5 Select Select.
6 To add additional locations, select .
7 Select Next.
8 Enter a name, and select Done.
Enabling Bluetooth Wireless Technology
1 Select Settings > Bluetooth.
2 Select Bluetooth.
Pairing a Wireless Headset
Before you can receive navigation prompts through your
headset, you must pair your device with a compatible mobile
headset.
1 Place your headset and your Bluetooth device within 33 ft.
(10 m) of each other.
2 On your device, enable wireless technology.
3 Select an option:
Hands-Free Voice Prompts
Scheduling a Trip
You can use the trip planner to create and save a trip with
multiple destinations.
1 Select Apps > Trip Planner.
9
�
2 Select a trip.
3 Select a location.
4 Select Departure Time (or Arrival Time if the location is not
the first stop in the trip).
5 Select a date and time, and select Save.
6 Select Duration.
7 Select the amount of time you will spend at the location, and
select Save.
8 If necessary, repeat steps 3–7 for each location.
Changing Transportation Modes in a Trip
You can change the transportation modes used to travel in a
saved trip.
1 Select Apps > Trip Planner.
2 Select a trip.
> Transportation Mode.
3 Select
4 Select a transportation mode.
5 Select Save.
Navigating to a Saved Trip
1 Select Apps > Trip Planner.
2 Select a saved trip.
3 Select Go!.
4 If prompted, select a route (page 7).
Editing a Saved Trip
1 Select Apps > Trip Planner.
2 Select a saved trip.
3 Select .
4 Select an option:
• Select Rename Trip.
• Select Edit Destinations to add and delete location, or to
change the order of locations.
• Select Delete Trip.
• Select Optimize Order to arrange the stops on your trip
in the most-efficient order.
TracBack®
Following Your Recent Track
The TracBack feature records a track of your recent movement.
You can retrace your recent track back to where you started.
1 Select Apps > TracBack.
Your recent track appears on the map.
2 Select Go!.
Saving Your Recent Track as a Trip
You can save your recent track as a trip, which you can
navigate later using the trip planner (page 10).
1 Select Apps > TracBack.
Your recent track appears on the map.
> Save as Trip.
2 Select
3 Enter a name, and select Done.
Using the Compass
You can navigate using a GPS compass.
Select Apps > Compass.
Viewing Previous Routes and Destinations
Before you can use this feature, you must enable the travel
history feature (page 14).
10
You can view your previous routes and places you have
stopped on the map.
Select Apps > Where I've Been.
Logging Service History
You can log the date and odometer reading when service or
maintenance is performed on your vehicle. The device provides
several service categories, and you can add custom categories
(page 10).
1 Select Apps > Service History.
2 Select a service category.
3 Select Add Record.
4 Enter the odometer reading, and select Next.
5 Enter a comment (optional).
6 Select Done.
Adding Service Categories
1 Select Apps > Service History.
> Add Category.
2 Select
3 Enter a category name, and select Done.
Deleting Service Categories
When you delete a service category, all service records in the
category are also deleted.
1 Select Apps > Service History.
> Delete Categories.
2 Select
3 Select the service categories to be deleted.
4 Select Delete.
Renaming Service Categories
Select Apps > Service History.
Select the category to be renamed.
Select Rename Category.
Enter a name, and select Done.
1
2
3
4
Deleting Service Records
1 Select Apps > Service History.
2 Select a service category.
3 Select > Delete Records.
4 Select the service records to be deleted.
5 Select Delete.
Editing a Service Record
You can edit the comment, odometer reading, and date of a
service record.
1 Select Apps > Service History.
2 Select a category.
3 Select a field.
4 Enter the new information, and select Done.
Using the World Clock
1 Select Apps > World Clock.
2 If necessary, select a city, enter a city name, and select
Done.
Viewing the World Map
Apps > World Clock > .
Nighttime hours appear in the shaded area of the map.
Setting an Alarm
1 Select Apps > Alarm Clock.
2 Set a time.
Using the Apps
�
3 Select the Alarm On check box.
Using the Language Guide
Using the Calculator
Use the Language Guide to look up and translate words or
phrases.
Select Apps > Language Guide.
Select Apps > Calculator.
Converting Units
1
2
3
4
5
Select Apps > Unit Converter.
If necessary, select the button next to Convert, select a
measurement category, and select Save.
If necessary, select a unit button, select a unit of
measurement, and select Save.
Select the field below the unit you want to convert.
Enter the number, and select Done.
Setting Currency Conversion Rates
This feature is not available in all areas.
You can update the currency conversion rates for the unit
converter.
1 Select Apps > Unit Converter.
2 Select the button next to Convert.
3 Select Currency, and select Save.
4 If necessary, select a currency button, select a different
currency, and select Save.
5 Select the button at the bottom of the screen that displays
the currency conversion rates.
6 Select the box next to a currency.
7 Enter a value, and select Done.
8 Select OK.
About Offers
If your device package includes a traffic receiver, you will
receive location-relevant offers and coupons. Ad-based traffic
information is available only in North America.
NOTE: The traffic receiver must be connected to external power
and you must be in a coverage area to receive ad-based traffic
information.
See our privacy statement at www.garmin.com/privacy.
Viewing Offers
CAUTION
Do not attempt to write down the coupon codes while driving.
This feature is available only if you are using an ad-supported
lifetime traffic receiver.
1 Select an offer that appears on the screen to search for the
nearest location related to that offer.
2 If available, select to view coupon information.
3 Write down this code and present it when you arrive at the
location.
Viewing an Offer List
This feature is available if you are using an ad-supported
lifetime traffic receiver.
Select Apps > Offers to view a list of the offers you have
received.
Purchasing the Language Guide
Your device comes with a limited demonstration version of the
language guide.
To purchase the full language guide, go to www.garmin.com
/languageguide.
Selecting Languages in the Language Guide
You can select the languages you want to translate when
translating words and phrases.
1 Select Apps > Language Guide.
2 Select > Language.
3 Select From, select the language to translate from, and
select Save.
4 Select To, select the language to translate to, and select
Save.
Translating Words and Phrases
1 Select Apps > Language Guide.
2 Select a category and subcategories.
3 If necessary, select , enter a keyword, and select Done.
4 Select a word or a phrase.
to listen to the translation.
5 Select
Using a Bilingual Dictionary
1 Select Apps > Language Guide > Bilingual Dictionaries.
2 Select a dictionary.
3 If necessary, select , enter a word, and select Done.
4 Select a word.
to listen to the translation.
5 Select
Traffic
Receiving Traffic Data
NOTICE
Heated (metallized) windshields could degrade the performance
of the traffic receiver.
Before you can receive traffic data, you must purchase a
compatible Garmin traffic receiver accessory. Go to
http://my.garmin.com for more information.
When the receiver is within a traffic coverage area, your device
will begin displaying traffic information.
The traffic receiver and the device may need to be in data range
of an FM station transmitting traffic information.
1 Connect the traffic receiver to an external power source.
2 Connect the traffic receiver to the device.
Traffic Receiver
Disabling Traffic and Offers
1 Select Traffic > Traffic.
2 Clear the Traffic check box.
The device no longer receives live traffic data, but
automobile routes still avoid potentially congested areas
using trafficTrends™, if enabled. See page 14.
Traffic
Mini-USB connector
External antenna connector
11
�
Internal antenna
Understanding Traffic Data
Power LED
The traffic legend explains the icons and colors used on the
traffic map.
1 From the map, select > Traffic.
2 Select Traffic Legend .
Vehicle power adapter
About the Traffic Icon
When you are receiving traffic information, a traffic icon appears
on the map. The traffic icon changes color to indicate the
severity of traffic conditions.
Green: Traffic is flowing freely.
Yellow: Traffic is moving, but there is a delay. There is
moderate traffic cong
...
 Historical archive . public document