rag rugging instructions:
Using a 19mm crochet hook with a square hook shape rather than the smoother looking ones.
Cut and rip strips of bedsheets into 8 cm width. Tie together and roll into jumbo balls for easy storage.
Tie together using a reef knot, or use the zig zag no tie option.
Tie together:
zig zag:
cut here >
< then cut here
reef knot:
daisy chain:
Use this method for the outer edge of the rug so you don’t see any of the loose ends and you get a nice trim.
Cut your strips and make a small insicion in either end. to join two strips together, push the end of the
strip labelled A through the slit of B. Then push A through the slit of the end of C and pull through till
you have joined them together. It is fussier but leaves a nice clean edge to your rug.
1.
2.
B
A
C
3.
You’re ready to start your rug
�
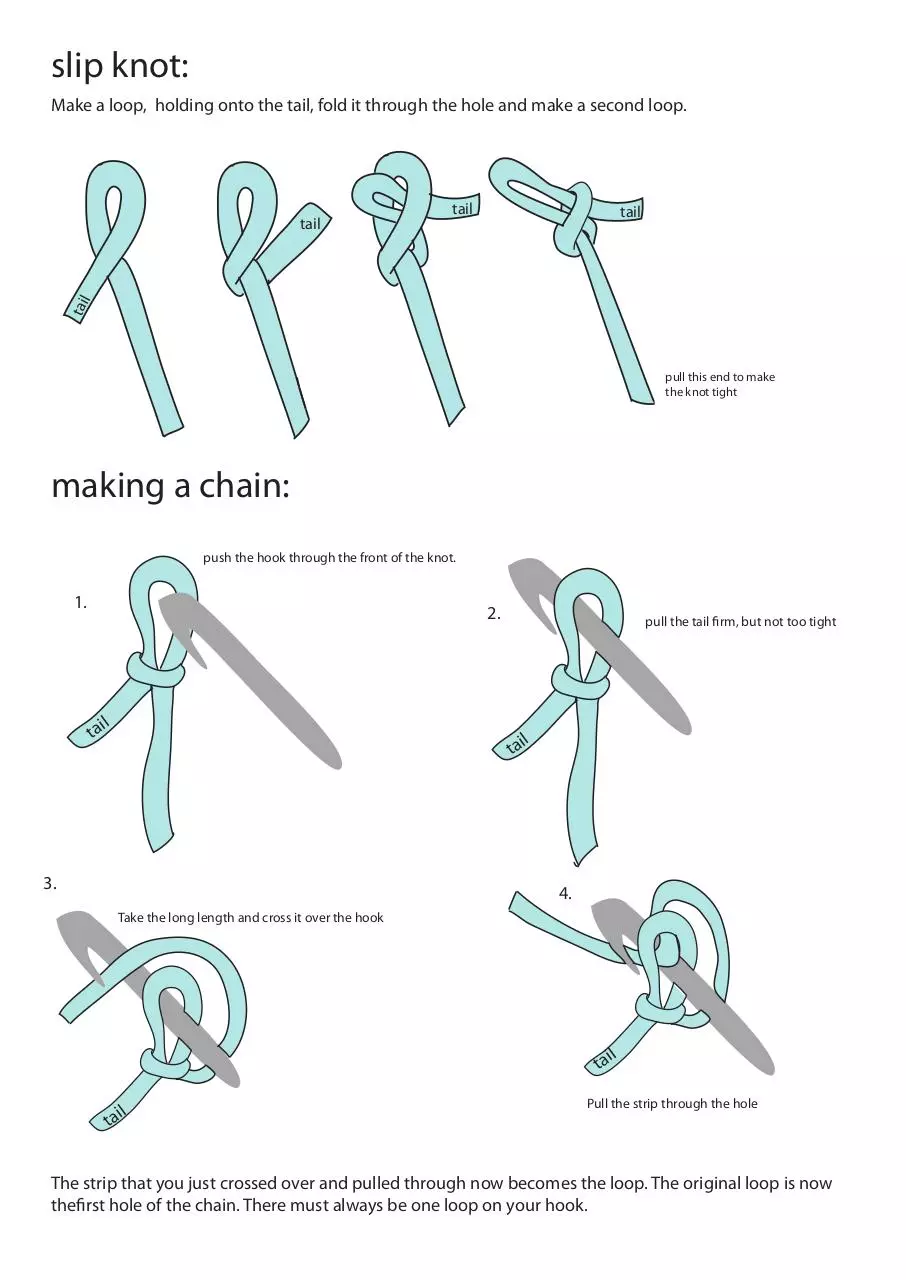
slip knot:
Make a loop, holding onto the tail, fold it through the hole and make a second loop.
tail
tail
tail
tail
pull this end to make
the knot tight
making a chain:
push the hook through the front of the knot.
1.
2.
l
tai
pull the tail firm, but not too tight
l
tai
3.
4.
Take the long length and cross it over the hook
l
tai
l
tai
Pull the strip through the hole
The strip that you just crossed over and pulled through now becomes the loop. The original loop is now
thefirst hole of the chain. There must always be one loop on your hook.
�
5.
t ai
l
t ai
l
6.
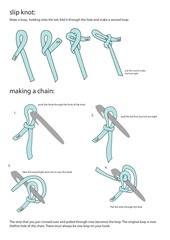
Your chain should look something like this.
Now repeat the process making 5 loops
in your chain.
7.
8.
il
tai
l
ta
It should look something like this.
8.
9.
th
g
len
Now that you have 5 loops,
turn the chain and push the hook through
the front of the first loop. Now you have
2 loops on your hook. This is the start of
your rug circle.
il
ta
pull length down through
loops
Push the two loops together on the hook
so they are touching, cross the length of fabric over the
hook again like you do in a chain and pull it through
both loops. You should now have one loop on your
hook again.
Now you should
have something
vaguely resembling
this.
�
10.
ole
4th h
11.
clockwise
with the tail
at the back
3rd
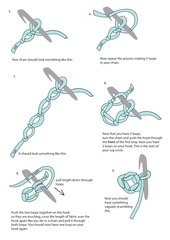
Push the
loops together so they
are alongside each other.
hole
le
ole
t
ng
2nd h
h
length
Push the two loops together on the
thickest part of the hook. Cross the length
over and pull it through both of the loops.
You now have one loop on your hook again.
repeat this process until you have gone
through the 5 holes and are back at the
start again.
Twist your hook and find the hole next
to the left of the loop you have on your hook.
The tail should be at the back now. Push your
hook through the front of the hole.
You now have two loops on your hook.
double stitch & adding a stitch:
The process for the first trip around has been using the ‘chain’ method also known as a ‘single stitch’.
Now that the basic circle has been created, we are going to start doing a double stitch. As well as this we
need to add a stitch. A good saying to remember to add stitches is : to run further around an oval you need
to take more steps. If you don’t add stitches, there is no way for the rug to grow. It will just turn into a cone.
4th hole
5th hole
13.
12.
3rd hole
This loop
stays on the hook
for the first pull
through.
First hole
2nd hole
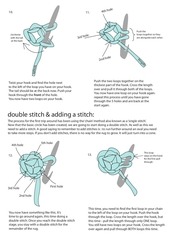
You now have something like this. It’s
time to go around again, this time doing a
double stitch. Once you reach the double stitch
stage, you stay with a double stitch for the
remainder of the rug.
This time, you need to find the first loop in your chain
to the left of the loop on your hook. Push the hook
through the loop. Cross the length over the hook, but
this time - pull the length through only ONE loop.
You still have two loops on your hook. Cross the length
over again and pull through BOTH loops this time.
�
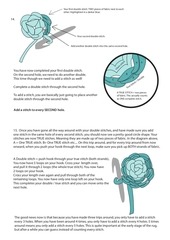
Your first double stitch. TWO pieces of fabric next to each
other. Highlighted in a darker blue.
14.
Your second double stitch.
Add another double stitch into this same second hole.
You have now completed your first double stitch.
On the second hole, we need to do another double.
This time though we need to add a stitch as well!
Complete a double stitch through the second hole.
To add a stitch, you are basically just going to place another
double stitch through the second hole.
ain
h
tc
A
sti
A
ch
B
B
C
C
e
Tru
D
h/
ble
ou
tc
Sti
A TRUE STITCH = two pieces
of fabric. This actually counts
as ONE complete stitch.
Add a stitch to every SECOND hole.
15. Once you have gone all the way around with your double stitches, and have made sure you add
one stitch in the same hole of every second stitch, you should now see a pretty good circle shape. Your
stitches are now TRUE stiches. Meaning they are made up of two pieces of fabric. In the diagram above,
A = One TRUE stitch. B= One TRUE stitch etc.... On this trip around, and for every trip around from now
onward, when you push your hook through the next loop, make sure you pick up BOTH strands of fabric.
A Double stitch = push hook through your true stitch (both strands),
You now have 3 loops on your hook. Cross your length over,
and pull it through 2 loops (the whole true stitch). You now have
2 loops on your hook.
Cross your length over again and pull through both of the
remaining loops. You now have only one loop left on your hook.
This completes your double / true stitch and you can move onto the
next hole.
The good news now is that because you have made three trips around, you only have to add a stitch
every 3 holes. When you have been around 4 times, you only have to add a stitch every 4 holes. 5 times
around means you only add a stitch every 5 holes. This is quite important at the early stage of the rug,
but after a while you can guess instead of counting every stitch.
�
trouble shooting & tips
16. Once you have gone around 30 times, you only need to add a stitch every 30 holes. If you notice the edge
of your rug is curling up, you may need to add a few more. Just use your instinct to where you want to add
more stiches. If you notice your rug is getting wavy, you may have added too many. Wait longer before adding
your next stitch.
Curled edge - not
enough stitches
Wavy edge too many stitches
17. Try to maintain an even tension. Too tight and you won’t be able to get your hook through the holes.
Too loose and you may notice your rug looks puffy instead of flat.
18. When you want to change colours of fabric, cut your length and tie it to the next colour using a reef
knot or a square knot. Keep your loose ends on the underside of the rug. It may be hard to pull the knots
through, but you just have to do your best.
19. Weave your last end of fabric into the underside of the rug and knot tight to make sure you can’t
unravel it accidentally.
20. Check out this video on youtube to watch a demonstration, however it is a little bit different to the
steps I’ve written.
http://www.youtube.com/watch?v=36CLp52rU8g&feature=fvsr
�
 Historical archive . public document