9H5QB ESSB Setup
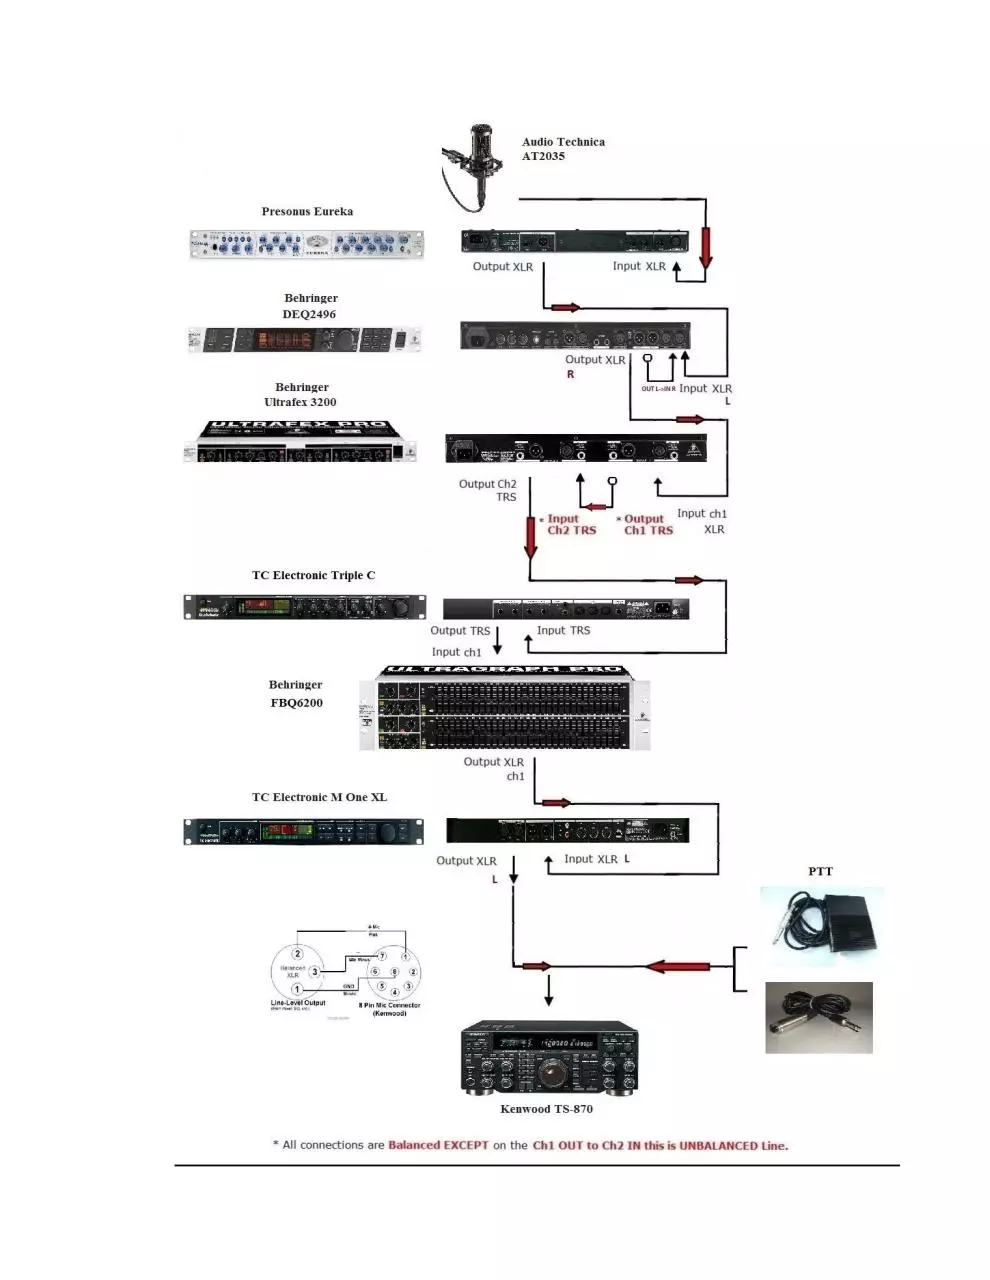
Audio Technica AT2035
The Audio-Technica AT2035 large-diaphragm condenser microphone gives you great performance at an amazingly
low price! The cardioid AT2035 features a switchable 80Hz high pass filter, a 10dB pad. This mic gives you
smooth, natural sound quality, and its ability to handle high sound pressure levels makes it useful on a range of
sound sources. No doubt about it - the AT2035 is a tremendous value!
MIC2200 - Preamp
The least expensive decent mic preamp of quality that you can buy in the market. The preamp has other added
features such as parametric EQ etc, but I purely use it for audio in and out. I use the left channel before plugging into
the DEQ2496.
DEQ2496
The DEQ2496 is an amazing EQ processor! I use only the Downward Expander LEFT (DYN) and Parametric
EQ RIGHT (PEQ). NO DEQ. GEQ is also utilized on LEFT channel only. I followed WZ5Q Voodoo Guru’s
expert advice for this, whilst my good friend Tony IK1JUO was instrumental in setting up this fine piece of gear.
EX3200
The EX3200 uses Dynamic Frequency Correction, Phase Shifting with respect to Delay Times, and Harmonization
to give the Audio a natural, lively brilliance in the Mids and Top End, and full, rich, deep Low End.
The TC Electronic Triple-C Multi-band Compressor & M One XL does a tremendous job in Dynamic Control and
bringing out the frequency separation through spectral balancing. The frequency separation is just truly unreal.
�
�
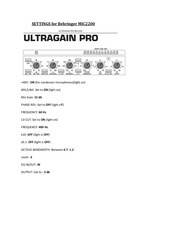
SETTINGS for Behringer MIC2200
+48V : ON (for condenser microphones)(light on)
MIC/LINE: Set to ON (light on)
Mic Gain: 15 db
PHASE REV.:Set to OFF (light off)
FREQUENCY: 60 Hz
LO CUT: Set to ON (light on)
FREQUENCY: 400 Hz
x10: OFF (light is OFF)
x0.1: OFF (light is OFF)
OCTAVE BANDWIDTH: Between 0.7- 1.2
Level: -2
EQ IN/OUT: IN
OUTPUT: Set to : 3 db
�
SETTINGS for Behringer DEQ2496
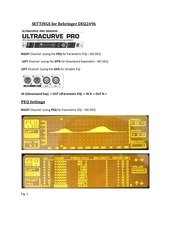
RIGHT Channel (using the PEQ for Parametric EQ) – NO DEQ
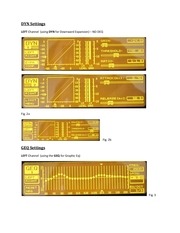
LEFT Channel (using the DYN for Downward Expander) – NO DEQ
LEFT Channel (using the GEQ for Graphic Eq)
IN L(Downward Exp) -> OUT L(Parametric EQ) -> IN R -> OUT R->
PEQ Settings
RIGHT Channel (using PEQ for Parametric EQ) – NO DEQ
Fig. 1
�
DYN Settings
LEFT Channel (using DYN for Downward Expansion) – NO DEQ
Fig. 2a
Fig. 2b
GEQ Settings
LEFT Channel (using the GEQ for Graphic Eq)
Fig. 3
�
PEQ – Basic Settings
As a starting point, be sure that none of the INPUT meter peaks are over -3db in INPUT gain, especially
into the DEQ2496. Set the EQ into PEQ (RIGHT Channel) mode (Fig. 1), these are settings for a basic
starting point, it will require tweaking for optimum sound. This is almost impossible to do without
actually monitoring it ‘on air’ and possibly using headphones.
Give these a try and see how it sounds. If you have a real bassy voice then you might have to reduce
Param 1(Fig.1) freq and perhaps reduce a bit of the gain.
If you have a lot of MIDS in your voice, then you might have to reduce Param 3 & 4(Fig. 1) filters.
The HIGHS will be the hardest to set. You want to push enough to get some brilliance and clarity, but
without having a Compressor, you won't be able to push a lot of them without causing ‘tearing’ and
‘sibilance’ in your signal. The secret here is to keep the bandwidth narrow, and just adjust the gains. The
frequencies listed in (Fig. 1) should be perfect on the Highs.
Param 7(Fig. 1) filter is for ‘brittleness’ reduction. It should be good if set as shown.
Param 2 filter is for boominess and boxiness. It should also be good as shown, however if your voice
fundamentals are from 100Hz to 200Hz, try reducing the gain another -5db to a total of -20db.
Lastly, keep an eye on Param 6 filter. If it sounds too ‘nasal’, then reduce this filter gain to 0 and see if it
goes away.....if it helps then reduce it further.
©
Adobe Audition CS6 Ver5.0
�
SETTINGS for Behringer EX3200
Channel 1:
SHIFT
LOW MIX
MODE
AUTO NR
SENSITIVITY
TUNE
PROCESS
HIGH MIX
SOLO
IN/OUT
SURROUND
SURROUND
= Set to Ultra Low
= Set to 1
= Set to SOFT
= Set to IN
= Set to 1 dBu
= Set to 3.3kHz
= Set to Exciter
= Set to 1
= Set to OFF
= Set to ON
= Set to IN
= Set to 3
Channel 2:
SHIFT
LOW MIX
MODE
AUTO NR
SENSITIVITY
TUNE
PROCESS
HIGH MIX
SOLO
IN/OUT
= Set to LOW
= Set to 3.5
= Set to SOFT
= Set to IN
= Set to 1 dBu
= Set to 4.5 kHz
= Set to Enhancer
= Set to 1
= Set to OFF
= Set to ON
Note: You might have to reduce the boost on the low end with the EQ and use the Bass Processor Controls on
the EX3200 to increase the Harmonic content of the Low End.
•
EXCITER — adds artificially generated overtones to the original signal, increasing presence and
perceived loudness without significant increase in signal level
•
ENHANCER — a dynamic equalizer which brings more clarity and a better stereo locating to your sound,
similar to the effect of an exciter
�
SETTINGS for TC Electronic Triple C
I/O Menu:
Press the “Menu” pushbutton – “Select” is displayed
Turn the “Value Set/Enter” knob to select the “I/O’ Menu” option
Push the “Value Set/Enter” knob to enter the Menu – You are in the I/O Menu
SET THESE PARAMETERS AS FOLLOWS
Turn the outer “Parameter” knob to change Parameters in menu
Turn the inner “Value Set/Enter” knob to change the settings of the parameters
Push the inner “Value Set/Enter” knob to select the changed setting
INPUT
-
ANALOG
CLOCK
-
48kHz
OUT RANGE
-
14dBU
OUT LEVEL
-
0db
DIG INGAIN
-
0db
DITHER
-
off
STATUSBITS
-
S/PDIF
MIDI CHAN
-
1
MIDI CC
-
On
PRG BANK
-
Factory
BULK DUMP
-
<ENTER>
SYSEX ID
-
0
LINK
-
off
EXPANDER
-
On
VIEW ANGLE -
32
�
A few words about the Front Panel Controls for the Multi-Band Compressor.
The Threshold, Ratio, Attack, and Release Controls on the front of the unit only control
the MID Band values. The Triple-C slaves the LO and HI Bands to the MID Band front controls.
This is the reason a lot of people don’t like this unit. What they failed to realize was that there
are more settings in the “Edit Menu” to individually control the Threshold values of the LO,
MID, and HI Band Compressors. This in conjunction with the Front Panel Controls (especially
the LO-BAND and HI-BAND RELEASE Controls) gives enough of a combination to make
unbelievable results. It just takes a lot of “Tweakin”…Ha Ha!
PROGRAM SETUP:
Press the “Menu” pushbutton – “Select” is displayed
Turn the inner “Value Set/Enter” knob to select the “Recall” option
Push the inner “Value Set/Enter” knob to enter the Menu – You are in the Preset Menu
Turn the inner “Value Set/Enter” knob to select “F1 Triple-C Comp” option
Push the inner “Value Set/Enter” knob to select this option
You are now in the Triple-C Comp Program.
We will change the Parameters and save this as your own program in the User Presets Memory.
Change the Parameters as follows:
FRONT PANEL CONTROLS:
From the left of the unit to the right. These will of course be adjusted later for correct
levels.
KNOBS:
(Upon adjusting the knobs, there is an “OVERIDE” indicator on the display that will
blink. You must move the control and wait for the blinking to stop before it will allow you to
change the parameter.)
INPUT LEVEL -
-3 db
THRESHOLD
-
-20 db
RATIO
-
1.12:1 rate
ATTACK
-
10.0 ms
RELEASE
-
20ms
�
LO-BAND OUTPUT -
14db
HI-BAND OUTPUT -
6 db
MAKEUP LEVEL
-
-6 db
PUSHBUTTONS:
MULTIBAND OFF -
Disengaged, Light is not lit
PEAK SENSITIVE
-
Disengaged, Light is not lit
SOFTLIM
-
Engaged, Light is lit
LOOK AHEAD
-
Engaged, Light is lit
ENVELOPE MODE -
Disengaged, Light is not lit
BYPASS
-
Disengaged, Light is not lit
MENU
-
Disengaged, Light is not lit
Now we will save this Program to the User Preset Memory.
Press the “Menu” pushbutton – “Select” is displayed
Turn the inner “Value Set/Enter” knob to select the “Store” option
Push the inner “Value Set/Enter” knob to enter the Menu – You are in the STORE Menu
The Next Empty User Preset will be displayed and Flash on and off
Turn the inner “Value Set/Enter” knob to select which User Memory you would like to
Store
Push the inner “Value Set/Enter” knob to select this location
The “U#” will now Flash and the caption “Triple-C Comp” will be displayed with a
flashing underscore underneath the “T” of “Triple-C”
Turn the inner “Value Set/Enter” knob to change the letter over the flashing underscore.
Turn the outer “Parameter” knob to change which letter the flashing underscore is under
Continue to change the caption to your liking.
Push the inner “Value Set/Enter” knob TWICE to save the program
�
Now we will change the parameters in the “Edit Menu”.
Press the “Menu” pushbutton – “Select” is displayed
Turn the inner “Value Set/Enter” knob to select the “EDIT MENU” option
Push the inner “Value Set/Enter” knob to enter the Menu – You are in the EDIT Menu
“COMP STYLE” will be displayed.
Turn the inner “Value Set/Enter” knob to select the “FLAT” option
Turn the outer “Parameter” knob to change to the next menu Caption
“LO-THR” will be displayed
Turn the inner “Value Set/Enter” knob to select “–3db”
Turn the outer “Parameter” knob to change to the next menu Caption
“MID-THR” will be displayed
Turn the inner “Value Set/Enter” knob to select “–3db”
Turn the outer “Parameter” knob to change to the next menu Caption
“HI-THR” will be displayed
Turn the inner “Value Set/Enter” knob to select “–12db”
Turn the outer “Parameter” knob to change to the next menu Caption
“DRG” will be displayed
Turn the inner “Value Set/Enter” knob to select “0”
Turn the outer “Parameter” knob to change to the next menu Caption
“HI X-OVER” will be displayed
Turn the inner “Value Set/Enter” knob to select “2.00 kHz”
Turn the outer “Parameter” knob to change to the next menu Caption
“LO X-OVER” will be displayed
Turn the inner “Value Set/Enter” knob to select “125 Hz”
Turn the outer “Parameter” knob to change to the next menu Caption
“EXT SIDE” will be displayed
Turn the inner “Value Set/Enter” knob to select “off”
NOW DON’T TOUCH ANYTHING!
�
Now we will save these changes to the User Preset Memory. It must be performed in this order
or you will loose the Edit Menu Setting changes.
Press the “Menu” pushbutton – your Preset name is shown on the display
Press the “Menu” pushbutton again – “Select” is displayed
Turn the inner “Value Set/Enter” knob to select the “Store” option
Push the inner “Value Set/Enter” knob to enter the Menu – You are in the STORE Menu
Your User Preset Name and Number will be displayed and Flash on and off
Push the inner “Value Set/Enter” knob TWICE to save the program
The display will indicate “Preset Stored”
Go back into the “EDIT MENU” to verify that your changes were saved.
Exit by pressing the “Menu” pushbutton.
Hint! If you ever change ANY settings on the Triple-C, you will have to save/store them in the
memory to make them permanent. I have readjusted the front controls several times and forgot to
store them. The next time I went to the User Preset and Reloaded it, of course all my new
settings were gone because of my failure to Save/Store them.
FINAL ADJUSTMENTS:
Well, you are all set to do the final adjustments now.
With all the other units in the rack set up the way you prefer, including all the Gain
Levels, The first thing to set is the “Input Level”. Set this control for an indication of –3 to –6db
with occasional peaks of 0db.
Depending on your voice characteristics, how many harmonics you are introducing into
the mix, and other rack equipment settings will determine how you set the THRESHOLD, LOBAND, and HI-BAND controls. Also the LO, MID, and HI THRESHOLD settings in the “EDIT
MENU”.
You will have to use yours ears, but you should notice a remarkable improvement immediately.
The last thing to set is the “Makeup Output Level”. Set this control for an indication of
–3 to –6db with occasional peaks of 0db.
Don’t forget to Save/Store the changes in the Memory. I usually make another User
Preset to store my in process changes and leave the first one as a baseline.
�
SETTINGS for TC Electronic M One XL
We will change the Parameters of Preset 75 Vocal Dynamic and save this as your own program
in the User Presets Memory.
Change the Parameters as follows:
FRONT PANEL CONTROLS:
From the left of the unit to the right. These will of course be adjusted later for correct levels.
KNOBS:
IN LEVEL – 10 o’clock
MIX % - Noon
EFFECT BAL – 2 o’clock
ROUTING key : Serial
I/O SETUP
•
•
•
•
•
•
Input source: - Analog
Clock: - 44.1kHz
Out Range : - 20dbu
Out level: - 0dB
Dig inGain: - 0dB
Dither: - OFF
�
UTILITY
•
•
•
•
•
•
Midi Channel: - 2
MIDI CC:- ON
Sys-Ex ID :- 0
Bypass :- 0% MIX
Pedal function :- TAP
Display View angle :- 32
ALGO/EDIT 1 – DYNAMICS
FX 1: DE-ESSER
Threshold: -16dB
Ratio: 4.0:1
Frequency: 5.16kHz
Attack: 1.4ms
Release: 140ms
FX Level: 100%
ALGO/EDIT 2
FX 2: PARAMETRIC EQUALIZER
Low Shelving Band:
Low Freq: 81.75Hz
Low Slope: 6dB/OCT
Low Gain: 4.0dB
Parametric Filters:
Freq 1 – 72.86Hz
BndWdth 1 – 0.16 OCT
Gain 1 – 2.0dB
�
Freq 2 – 81.75Hz
BndWdth 2 – 0.16 OCT
Gain 2 – 3.0dB
Freq 3 – 100Hz
BndWdth 3 – 0.16 OCT
Gain 3 – 2.0dB
High Shelving Band:
High Freq – 2.51KHz
High Slope – 12db/OCT
High Gain – 6.0dB
FX Level – 60%
© 9H5QB - 2013
�
msciclun@maltanet.net
�
 Historical archive . public document