Nellie 1.4
Welcome to the Documentation of Nellie 1.4. This Doc will help you set up Nellie in the best
and easiest way
Requirements
Self-Hosted WordPress installation
Divi Parent theme (latest version)
Nellie 1.4 Theme
Permalinks Structure Set (Pretty Links)
JS enabled on client browsers
PHP 5.5 above on your server
Being online (needed to import demo –for localhosts installations)
IMPORTANT NOTE: When Nellie is activated on your site or if it’s already been activated and
you’re using Pretty Links in the permalink structure, you MUST save the permalinks once
again
Basic Setup | Menu Settings | Nellie Mega Menu | Woo Sidebar | Product
Category Image | Author Bio | Nellie Options | Notes
�
Basic Setup
1. Download Nellie Theme from any of the authorized repositories and install this as a
child theme. Make sure Divi Latest Version is already installed in the site.
2. Nellie requires the WooCommerce Plugin. You cannot run the theme without this
Plugin. If Nellie does not find WooCommerce installed, it will automatically force you to
install this. Please go through the instructions on the screen to install that Plugin.
3. Once all is set, you will be redirected to the Nellie Theme Options Page. From there,
visit the first settings tab Demo Import.
4. Please go through the notes present in that screen. Click Import Button once and wait
for a while before the demo data is fetched from our server. It may take 50s to 5m
depending on your internet speed, server configuration and out server uptime. Once
the import is done, you will be notified about this on the screen.
5. The next step is to select your homepage and the Nellie suggested navigation menus.
Visit the next settings tab Homepage & Menu and assign the homepage and assign
the menus.
6. Go to WooCommerce settings tab and assign the mandatory WooCommerce pages
like Shop, My account, Cart, and Checkout. These pages are necessary for your store to
work.
7. Next move to Shop Sub-Tab under WooCommerce and add your Product Title, Shop
Page Description (optional) and a shop background image (better if you use an
image of 1920px X 700px).
8. The site is ready now and you can view the site.
�
Menu Settings
Nellie uses two menus (in version Nellie 1.4) Nellie 1.4 Menu and Mob Menu in two menu
locations. Both are necessary. You can, however, create your menus and assign them in the
suggested menu locations
Prerequisites:
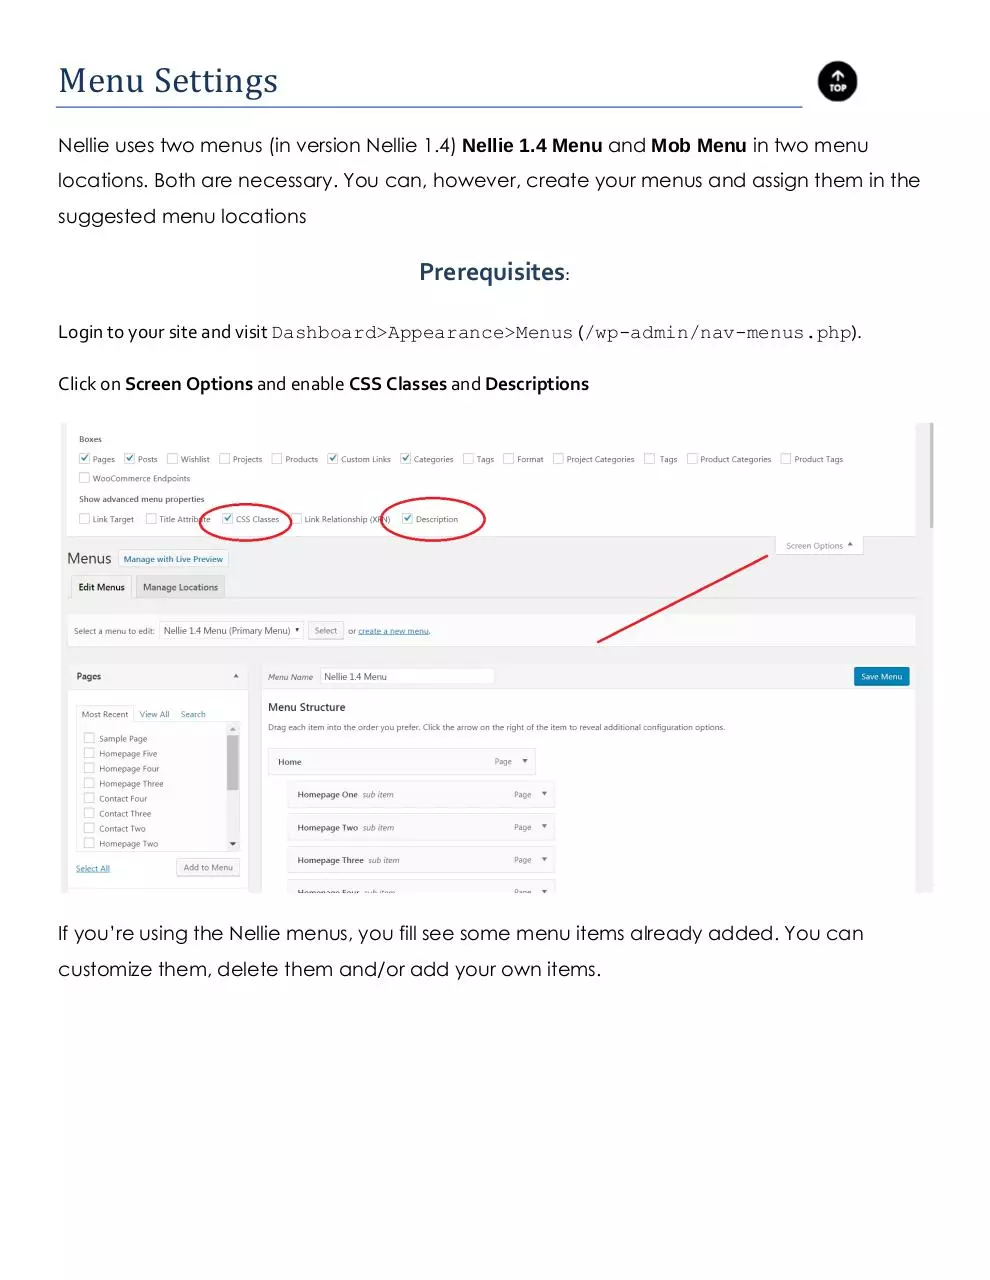
Login to your site and visit Dashboard>Appearance>Menus (/wp-admin/nav-menus.php).
Click on Screen Options and enable CSS Classes and Descriptions
If you’re using the Nellie menus, you fill see some menu items already added. You can
customize them, delete them and/or add your own items.
�
Nellie Mega Menu
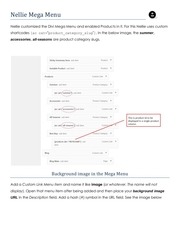
Nellie customized the Divi Mega Menu and enabled Products in it. For this Nellie uses custom
shortcodes [ac cat=”product_category_slug”]. In the below image, the summer,
accessories, all-seasons are product category slugs.
Background image in the Mega Menu
Add a Custom Link Menu item and name it like image (or whatever. The name will not
display). Open that menu item after being added and then place your background image
URL in the Description field. Add a hash (#) symbol in the URL field. See the image below
�
Mobile Menu (For slide out mobile menu)
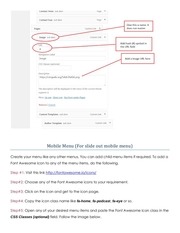
Create your menu like any other menus. You can add child menu items if required. To add a
Font Awesome Icon to any of the menu items, do the following.
Step #1: Visit this link http://fontawesome.io/icons/
Step#2: Choose any of the Font Awesome icons to your requirement.
Step#3: Click on the icon and get to the icon page.
Step#4: Copy the icon class name like fa-home, fa-podcast, fa-eye or so.
Step#5: Open any of your desired menu items and paste the Font Awesome Icon class in the
CSS Classes (optional) field. Follow the image below.
�
Woo Sidebar
Nellie uses a custom sidebar Woo Sidebar for WooCommerce pages like shop, category and
so. You will see a new Widget Area Woo Sidebar when Nellie has been activated on your
site. Add your WooCommerce specific widgets to this widget area and those will be
displayed in WC pages.
�
Product Category Image
Nellie allows you to add a background image on the Product Category page. Refer to our
demo site for this. You can upload an image on the Product category page along with the
category name and description. Follow the steps.
Step#1: Login to your site and visit Dashboard>Products>Categories> {Select your
category}.
Step#2: Click on your desired product category and land on this screen Edit Product
Category .
Step#3: Add a description for this product category (optional) and look at the bottom of this
screen and find Thumbnail option.
Step#4: Click the Upload/Add Image button and upload an image from your computer or
media library. Please try to choose a flat image (preferably of the 1920px width). Hit Update
button afterwards. Your image will be shown along with your category name and
description on that category page.
�
Author Bio
Nellie shows an author box in the single blog post page below the content. The author
box will show your profile image, your author bio and your social links (if added). Have a look
at the image below.
�
Follow the steps below as how you can get this author bio box.
Step#1: Login to your site and click on the Howdy,{yourname} box in the top right corner of
the admin toolbar (profile.php) or dashboard>users>your profile.
Step#2: Scroll down the page and locate Contact Info section.
Step#3: Fill in the fields with relevant links like your website, twitter, facebook and so. If added
only those social links will show. Else nothing will show up.
Step#4: Add an author bio in the Biographical Info text area (this will be the author bio
content).
Step#5: Click on the Update Profile button to update your profile info.
Note: Nellie uses your Gravatar image in the author bio box. Make sure your email address is
associated with your Gravatar Image.
�
 Historical archive . public document