�
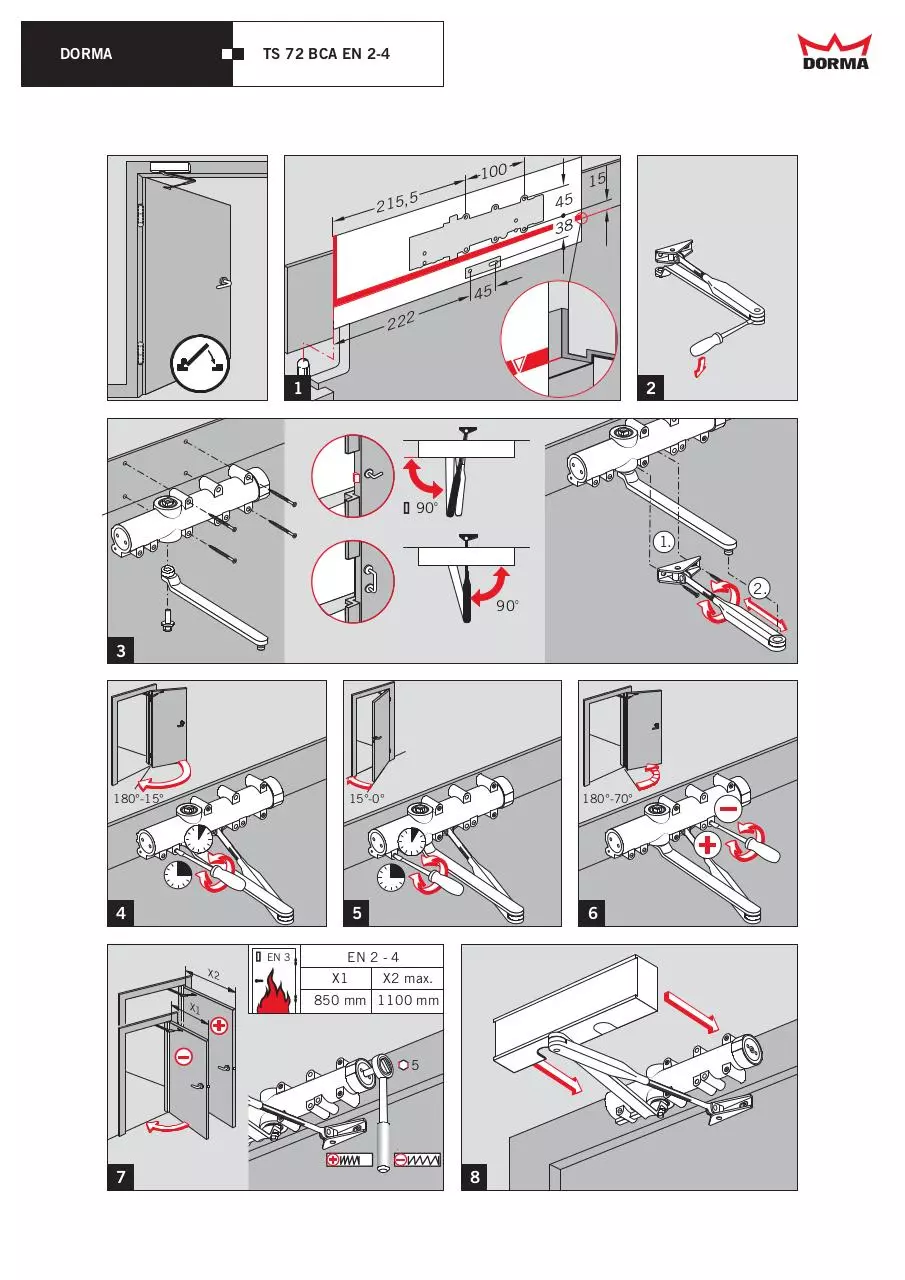
TS 72 BCA EN 2-4
WN 055815
01/02
DORMA
15
45
38
222
45
100
,5
215
1
2
³ 90o
1.
2.
90 o
3
180°-15°
180°-70°
15°-0°
5
4
³
X2
EN 3
EN 2 - 4
X1
X1
6
X2 max.
850 mm 1100 mm
5
7
8
�
DORMA
TS 72 BCA EN 2-4
15
45
38
222
45
100
215
,5
1
2
³ 90o
90 o
1.
2.
3
180°-15°
180°-70°
15°-0°
4
5
³
EN 3
X2
6
EN 2 - 4
X1
X2 max.
850 mm 1100 mm
X1
5
7
8
�
DORMA
TS 72 BCA EN 2-4
100
15
5
215,
45
38
45
222
1
2
³ 90o
1.
2.
90
o
3
180°-15°
15°-0°
4
5
³
X2
X1
EN 3
180°-70°
6
EN 2 - 4
X1
X2 max.
850 mm 1100 mm
5
7
8
�
DORMA
TS 72 BCA EN 2-4
100
15
215
45
,5
38
45
222
1
2
³ 90o
1.
2.
90
o
3
180°-15°
15°-0°
4
5
³
X2
6
EN 2 - 4
X1
X2 max.
850 mm 1100 mm
X1
Änderungen vorbehalten
EN 3
180°-70°
5
7
DORMA GmbH + Co.KG
8
Postfach 40 09 D-58247 Ennepetal • Breckerfelder Straße 42-48 D-58256 Ennepetal
Tel. +49 (0) 23 33 / 793-0
•
Fax +49 (0) 23 33 / 79 34 95
•
www.dorma.de
�
GEZE TS4000 / S
Overhead Door Closer
Installation Instructions
WARNING: DOOR CLOSERS WITH A POWER
RATING LOWER THAN 3 OR WITH MECHANICAL
HOLD OPEN DEVICES ARE NOT SUITABLE FOR
USE WITH FIRE DOORS.
Tools Required For Installation:
10mm Spanner
5mm Allen key (supplied)
M5 Tap and Tap wrench
(steel door mounting)
TS4000 BODY
Power adjustment
287
Incorrect use may cause injury
¾Obstruction of closing process (e.g. dragging
doors, sticking weather strips/sealing rubbers, roughrunning locks)
¾Incorrect installation and adjustment (e.g.
slamming doors)
¾Danger of finger trap between frame and door leaf.
¾Wrong size door closer.
¾Closer used for other purpose than to close side
hung doors.
Maintenance:
NOTE:
¾Maintenance to be carried out by a specialist only.
¾Check assembly for tolerance and undue wear.
¾Tighten any screws that may have become loose.
2
1
48
6
60
User Information for Door Closers
This information must be observed. Non compliance
will absolve the manufacture from any liability. The
door closer must only be used in accordance with its
intended use; i.e. closing of side hung doors
following manual opening.
Flat head screwdriver
Posidrive screwdriver
Power drill
4.2mm drill bit
Template (supplied)
Pencil
3
2x M6 Allen Bolts
2x Plastic end caps
1x Plastic spindle cover
4x 5x55mm Self-tapping countersunk screws
2x M5x40mm Countersunk screws
4x M5x55mm Countersunk screws
2x 5x50 Self-tapping countersunk screws
5
1x Closer body & cover
1x Guide Rail Assembly
4
Components Checklist:
Size indicator
Latch action adjuster
( TS4000 S only )
Back check adjustment (Not DA)
Delayed action adjuster
( TS4000 S only )
Closing speed adjuster
Spindle
285
PRIMARY ARM
app
rox.
300
At least once a year:
¾Grease moveable parts.
¾Check operation of doors and adjust if necessary.
¾For door closers subject to release by Electro
Mechanical and Electro Hydraulic means ensure that
local regulation are adhered to.
SECONDARY ARM
16
58
20
28
TS4000 PARALLEL ARM BRACKET
4
95
Installation and adjustment by specialist only
Where necessary, an additional doorstop or buffer
must be fitted to limit the maximum opening of the
door. This is of particular relevance for slide rail
closers where the opening angle may be limited by
frame. For further explanations see catalogue
preface and product information.
Door handing - DIN left / right
Stand facing the door on the hinge side / pull side. If the hinge or
pivot is to your right hand side the door is considered to be DIN
right. If the hinge or pivot is to your left hand side the door is
considered to be DIN left.
IMPORTANT WARNING:
HIGH INTERNAL PRESSURES, UNDER NO CIRCUMSTANCES
ATTEMPT TO DISMANTLE THE CLOSER.
1
�
44
60
38
Fixing in figure 1
47
44
45
135
135
160
160
130
130
¾With the aid of the template mark out the fixing positions. Align the hinge point of the
template with the centre line of the hinge on the door. (This applies to both left and right-hand
doors.) There are two holes to be drilled/tapped on the transom for the arm shoe and four
holes to be drilled/tapped on the door leaf for the closer body. If the template is not used refer
to fixing dimensions (see figure 1 and 2 above.)
Fig4
90
°
¾TS4000 and TS4000S If latch action is required (to overcome a latch or seals.) Separate the
primary and secondary arms. This can be done using a screwdriver as a lever between the
knuckle. The arm sections will snap together and apart. Secure the primary arm to the spindle
using M6 allen bolt supplied. Ensure splines are interlocked. Locate arm at approx. 80° with
respect to the door leaf, towards the hinge point. (See figure 3.) Fix the secondary arm to the
transom using the screws provided and loosen 10mm locking bolt on arm. Secure primary and
secondary arms together (simply click in place.) Prime the closer slightly by rotating the
primary arm to approx. 90° with respect to the door leaf and tighten the locking bolt. (See
figure 4.)
Fig3
°
80
¾Secure closer body with screws provided, making sure that the spindle is positioned towards
the hinge side. (See figure 1 and 2 above.) The power size (closing force) of the TS4000 is
adjusted by turning the Allen key screw situated above and to the right of the clear glass
indicator tube containing a small ball bearing. As the screw is turned the ball bearing will
gradually move to show its power size. If it doesn’t appear to be moving give the indicator a
gentle tap with your finger which will release it. (Please be aware that the power sizes indicated
on the closer are EN ratings 1 – 6.)
222
44
45
222
¾The latch action of the TS4000S can now be adjusted using the adjustment valve located on
the front in the centre of the body. Clockwise will decrease the latch action and anticlockwise
will increase the latch action. Do not overtighten.
¾TS4000 and TS4000S. If no latch action is required. As above however when priming the
closer rotate the secondary arm to approx. 90° with respect to the door leaf and tighten the
locking bolt. (See figure 5.)
¾TS4000 and TS4000S. The back check is a segment of the closers opening cycle with
increased resistance. It is factory set to come in when the door is at approx. 80°. To bring the
back check in later turn the valve anticlockwise.
¾The closing speed can now be adjusted using the adjustment valve located on the front of
the body of the closer. Clockwise will decrease the closing speed and anticlockwise will
increase the closing speed. Do not overtighten.
Fig5
°
90
¾Test installation by simulating persons using the entrance. The door should close smoothly
without slamming and present no potential hazard to traffic.
2
�
Fixing in figure 61
38
60
44
47
160
135
222
130
44
160
135
44
130
45
¾With the aid of the template mark out the fixing positions. Align the hinge point of the
template with the centre line of the hinge on the door. (This applies to both left and
right-hand doors.) There are two holes to be drilled/tapped on the door leaf for the arm
shoe and three holes to be drilled/tapped on the transom for the closer body. If the
template is not used refer to fixing dimensions (see figure 1 and 2 above.)
¾TS4000 for TS4000S see below. If latch action is required (to overcome a latch or
seals.) Separate the primary and secondary arms. This can be done using a
screwdriver as a lever between the knuckle. The arm sections will snap together and
apart. Secure the primary arm to the spindle using M6 Allen bolt supplied. Ensure
splines are interlocked. Locate arm at approx. 80° with respect to the transom, towards
the hinge point. (See figure 3.) Fix the secondary arm to the door leaf using the screws
provided and loosen 10mm locking bolt on arm. Secure primary and secondary arms
together (simply click in place.) Prime the closer slightly by rotating the primary arm to
approx. 90° with respect to the door leaf and tighten the locking bolt. (See figure 4.)
222
Fig3
°
80
¾Secure closer body with screws provided, making sure that the spindle is positioned
towards the hinge side. (See figure 1 and 2 above.) The power size (closing force) of
the TS4000 is adjusted by turning the Allen key screw situated above and to the right of
the clear glass indicator tube containing a small ball bearing. As the screw is turned the
ball bearing will gradually move to show the power size. If it doesn’t appear to be
moving give the indicator tube a gentle tap with your finger which will then release it.
(Please be aware that the power sizes indicated on the closer are EN ratings 1 – 6.)
45
Fig4
90
°
¾TS4000 for TS4000S see below. If no latch action is required. As above however
when priming the closer rotate the secondary arm to approx. 90° with respect to the
door leaf and tighten the locking bolt. (See figure 5.)
¾The latch action of the TS4000S can now be adjusted using the adjustment valve
located on the front in the centre of the body. Clockwise will decrease the latch action
and anticlockwise will increase the latch action. Do not overtighten.
¾TS4000 - The back check is a segment of the closes opening cycle with increased
resistance. It is factory set to come in when the door is approx.80°. To bring the back
check in later turn the valve anticlockwise.
¾TS4000S. A valve on the front of the closer varies delayed action. It can delay the
closing of the door from 0 – 30 seconds. Clockwise gives a shorter delayed action,
anticlockwise gives a longer delayed action. Do not overtighten.
Fig5
90
°
¾The closing speed can now be adjusted using the adjustment valve located on the
front of the body of the closer. Clockwise will decrease the closing speed and
anticlockwise will increase the closing speed. Do not overtighten.
¾Test installation by simulating persons using the entrance. The door should close
smoothly without slamming and present no potential hazard to traffic.
3
�
38
Fixing in figure 66
44
60
47
44
44
44
44
135
25
135
25
310
310
30
30
178
12
44
27
44
27
12
178
¾Mark the fixing positions in accordance with fixing dimensions (see figure 1 and 2
above.) There are three holes to be drilled/tapped on the door leaf for the closer body
and four holes to be drilled/tapped on the underside of the transom for the parallel arm
bracket.
¾Separate the primary and secondary arms. This can be done using a screwdriver as a
lever. The arm sections will snap together and apart. Secure the primary arm to the
spindle using M6 allen bolt supplied. Ensure splines are interlocked. Locate arm at
approx. 10° towards the rear of the closer. (See figure 3 and 4.) Turn closing speed
valve, located on the front of the body of the closer fully clockwise. This will decrease the
closing speed to almost zero. Do not overtighten. Rotate primary arm to approximately
90°. (See figure 5 and 6.) Secure closer body to door leaf with fixings provided, making
sure that the spindle is positioned away from the hinge side. (See figure 1 and 2 above.)
The power size (closing force) of the TS2000 is not adjustable in this configuration and
the unit must be mounted using the centre fixing holes. Secure primary and secondary
arms together (simply click in place.)
¾Rotate primary arm in direction of travel (away from door leaf) until an angle of approx.
2° is reached in relation to the door leaf. (See figure 7 and 8.) Tighten 10mm locking bolt.
¾TS4000 only. If no latch action is required. Fit closer as described above. Separate the
primary and secondary arms. Turn closing speed valve, located on the front of the body
of the closer fully clockwise. This will decrease the closing speed to almost zero. Do not
overtighten. Rotate the primary arm approx. 90° in the direction of travel (roughly
perpendicular to the door leaf.) Loosen the M6 allen bolt securing the primary arm to the
closer body enough to enable adjustment. Rotate the primary arm 1 notch of the splined
spindle in the opposite direction of travel. Re-tighten M6 allen bolt securing the primary
arm to the closer body. Loosen 10mm locking bolt on secondary arm and re-connect
primary and secondary arms. Re-adjust the closing speed. Rotate primary arm in
direction of travel (away from door leaf) until an angle of approx. 2° is reached in relation
to the door leaf. (See figure 7 and 8.) Tighten the 10mm locking bolt. If on testing the
latch action has not been removed repeat above until adjusted satisfactorily.
¾The latch action of the TS4000S can now be adjusted using the adjustment valve
located on the front in the centre of the body. Clockwise will decrease the latch action
and anticlockwise will increase the latch action. Do not overtighten.
¾TS4000S. A valve on the front of the closer varies delayed action. It can delay the
closing of the door from 0 – 30 seconds. Clockwise gives a shorter delayed action,
anticlockwise gives a longer delayed action. Do not overtighten.
¾The closing speed can now be adjusted using the adjustment valve located on the front
of the body of the closer. Clockwise will decrease the closing speed and anticlockwise
will increase the closing speed. Do not overtighten.
¾Test installation by simulating persons using the entrance. The door should close
smoothly without slamming and present no potential hazard to traffic.
4
�
 Historical archive . public document